Wondering how to install User Registration and set up the plugin on your WordPress website? If yes, this article is just the thing for you.
Below, we’ll talk about the installation and setup process for the User Registration plugin, both the free and premium versions. You can start using this powerful plugin to instantly create custom registration and login forms for your site.
So, let’s explore how to install and set up the User Registration plugin in detail.
Table of Contents
How to Install and Activate the User Registration Plugin?
First and foremost, you must install and activate the User Registration plugin on your WordPress website. This popular registration form plugin for WordPress comes with a simple drag-and-drop builder. You can add as many custom fields you need to the form and customize each field.
Below, we’ll show you the step-by-step process of installing both the free and pro versions of this plugin. This should help you start using the plugin to create custom user registration forms in no time!
A. Installing the Free User Registration Plugin
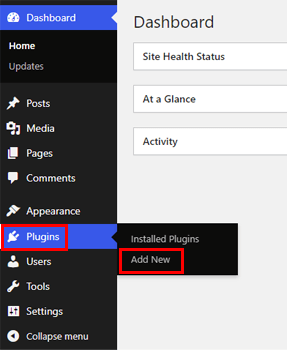
To install the free User Registration plugin, log into your WordPress site’s dashboard. Here, navigate to Plugins >> Add New.
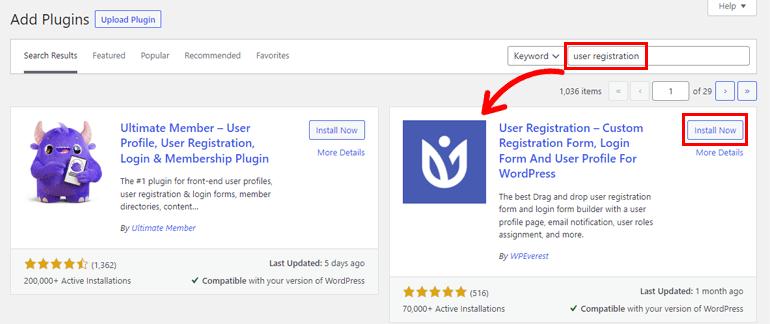
In the search bar, type in the plugin’s name. User Registration will then appear in the search results. All you have to do is click the Install Now button, and the plugin will start installing on your site.
Complete the installation by clicking on the Activate button, and you’re done.
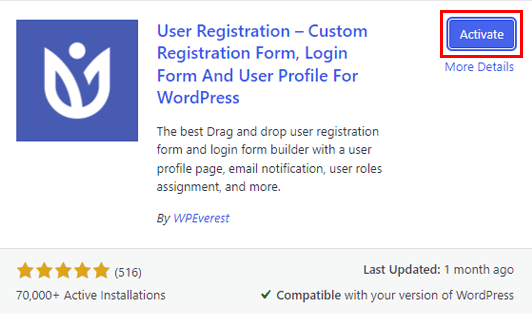
Now, you have the free version of the User Registration plugin on your site, ready for use!
B. Installing the User Registration Pro Plugin
User Registration Pro has 3 pricing plans, each offering varying access levels and features. You can visit the official pricing page for details and choose one suitable for your requirements or budget.
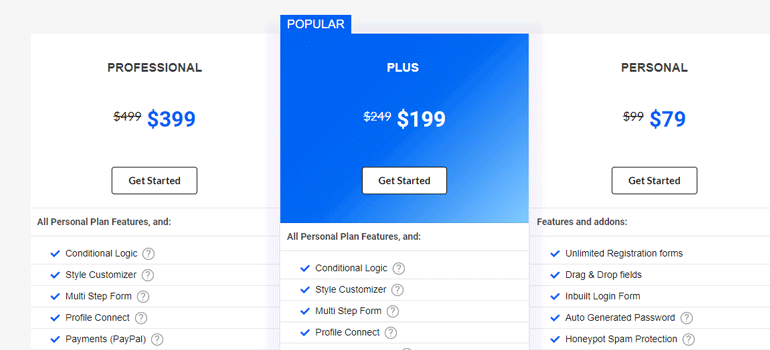
Then, press the Get Started button, and proceed with the registration and purchase.
When the purchase is made, you’ll receive login details for your WPEverest account in the email address you provided during registration.
So, log into your account. Then, from your dashboard, open the Downloads tab and click on the Download button for the User Registration Pro file.
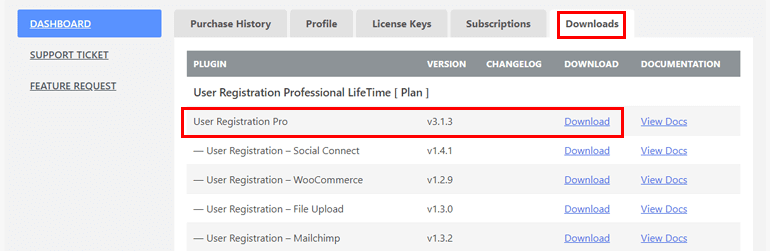
The Pro file will be saved on your device as a ZIP file.
Go back to your website dashboard and open Plugins >> Add New >> Upload Plugin. Choose the file you just downloaded and click Install Now.
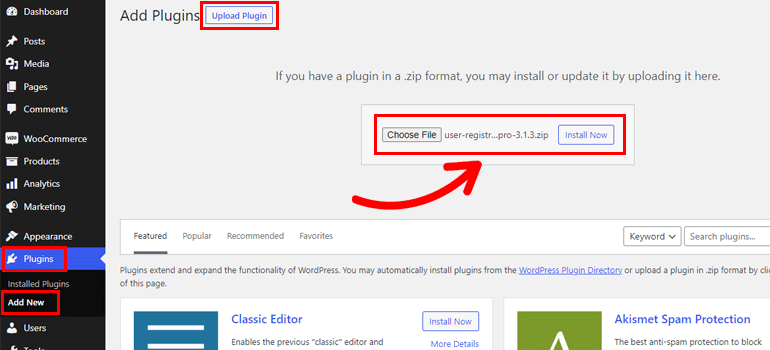
Finally, complete the installation by pressing the Activate Plugin button.

With that, you’ve successfully installed and activated User Registration Pro on your website.
How to Set Up the User Registration Plugin? (Free and Pro)
After the installation process is complete, a setup wizard will appear on your screen. You’ll get the setup wizard regardless of whether you’ve installed the free or the premium plugin.

Sure, you can skip this setup process entirely. You can either go back to the dashboard or start the form building instantly.
However, we recommend you complete the setup process if you’re a new user. For that, click Get Started.
There are a total of 6 steps you must complete. So, let’s look at each of them one by one.
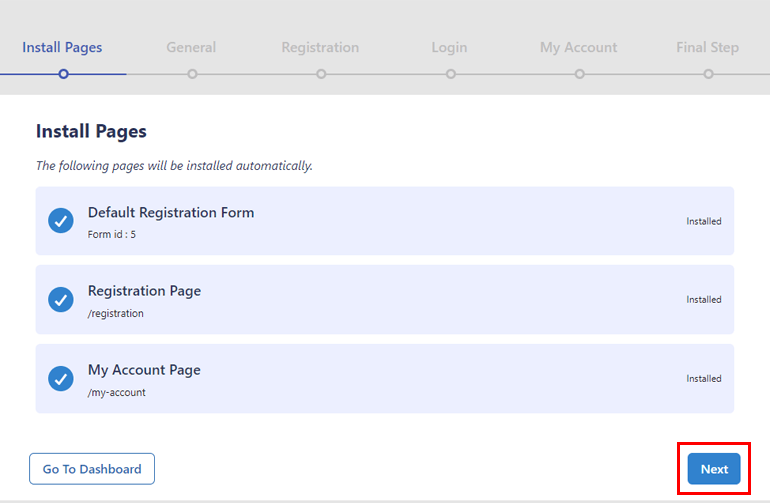
Step 1: Install Pages
The first step asks you to install the pre-built Default Registration Form, Registration Page, and My Account Page so that you don’t have to create them from scratch later.
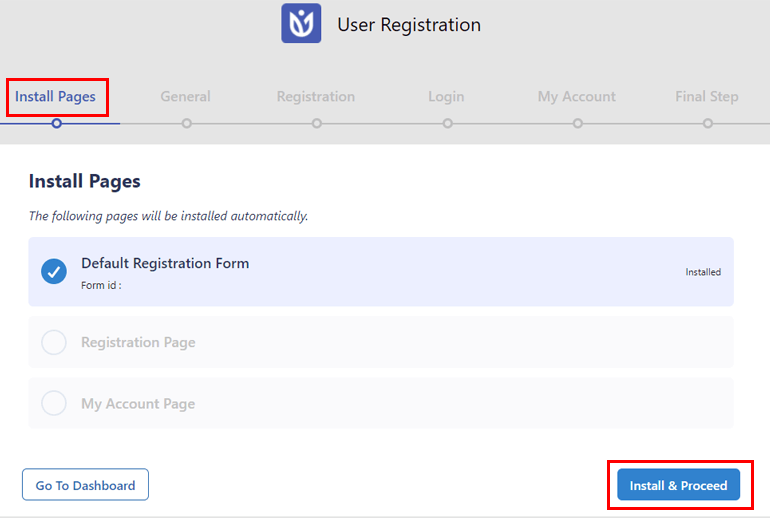
So, click Install & Proceed, and press Next when the installation is complete. This automatically adds the default form and sample pages to your website.
Step 2: General
In the General step, you can disable or enable the front-end registration on your site with the Anyone can register option. It’s turned on by default. We suggest you keep it enabled to let your users fill and submit the front-end registration forms you create with User Registration.
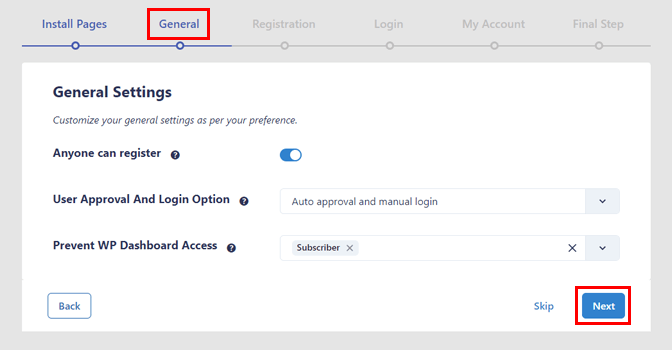
Besides that, you can choose a User Approval and Login Option from the dropdown. It can be:
- Auto approval and manual login
- Auto approval and auto login
- Admin approval
- Auto approval after email confirmation
Moreover, User Registration lets you Prevent WP Dashboard Access to specific user roles.
Once you’ve configured the general settings, click on Next to proceed ahead.
Step 3: Registration
This step lets you select a form template for your WordPress user registration form from 5 different layouts.
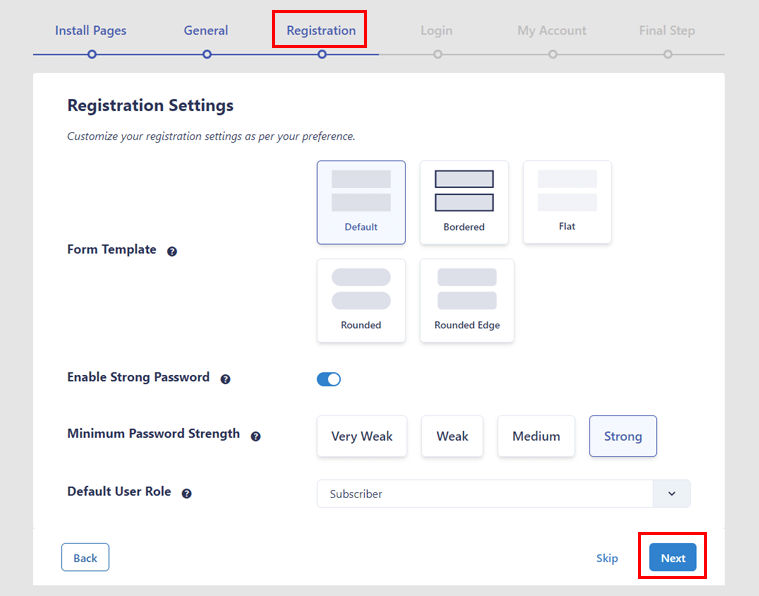
You may enable the strong password option if you want users to register with a secure password. If you enable this option, you’ll be able to set the Minimum Password Strength as well.
You can also choose the default user role you want to assign to the newly registered users. Then, hit Next to go to the following step.
Step 4: Login
The Login settings allow you to select a form template for the in-built login form. The plugin offers 5 beautiful layouts for you to choose from.
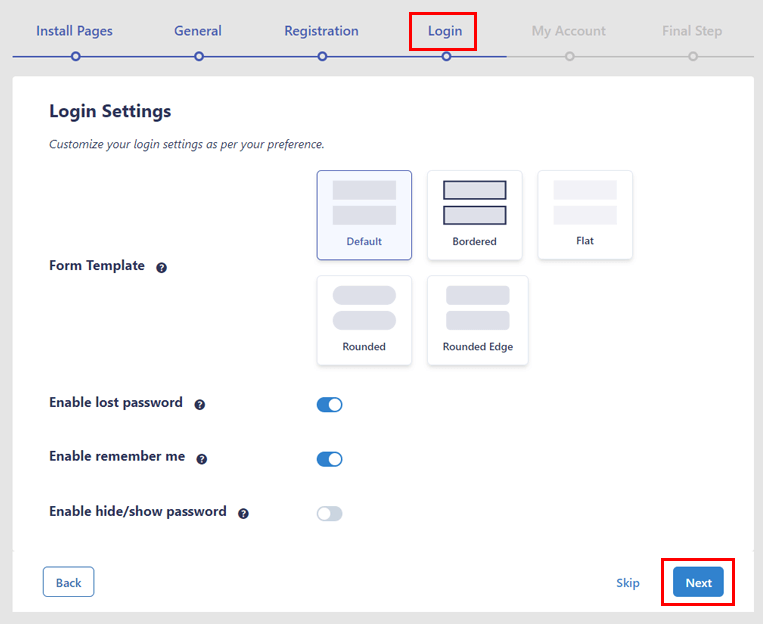
After that, you have the Enable lost password and Enable remember me options. You can toggle them on to add the “Lost password?” link and the “Remember me” checkbox to the login form.
Likewise, you can enable the hide/show password feature so that users can view the password they’ve entered into the field.
Step 5: My Account
This step helps you customize the settings for your My Account page. Therefore, you get to select either the Horizontal or Vertical layout for the page.
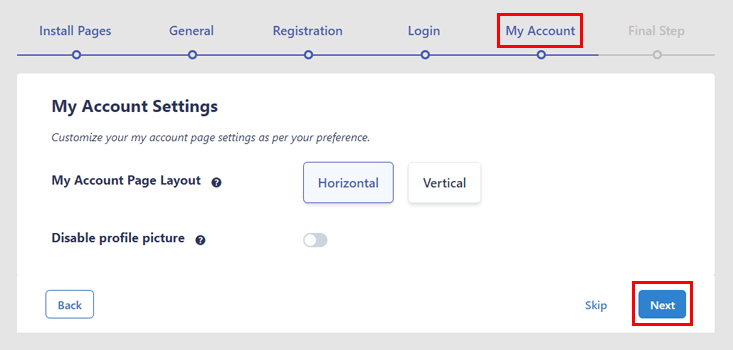
Plus, you can disable the profile picture feature to prevent users from editing their profile picture.
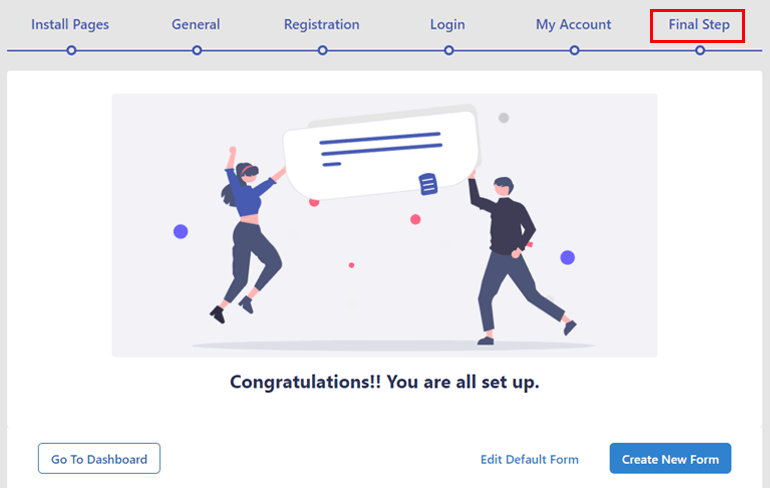
Step 6: Final Step
Congratulations, you’ve arrived at the Final Step! So, complete the setup process by clicking Next. With that, you’ve set up the User Registration plugin successfully.
Don’t worry; you can change the settings if necessary from the plugin’s Settings page in the future.
Now, click the Go To Dashboard button to return to the site’s dashboard. If you want to start building forms immediately, press Create New Form. This takes you to the intuitive drag-and-drop form builder, where you can quickly build custom registration forms.
Or, you can click the Edit Default Form button to customize the existing form instead of creating one from scratch.
How to Activate the License for User Registration Pro?
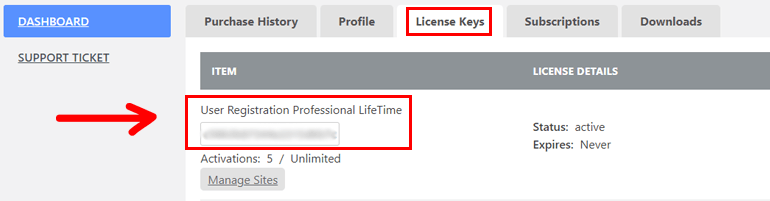
If you’re using the premium version of User Registration, you must activate its license. You’ll find the license key in your WPEverest account dashboard under the License Keys tab.
Copy the key and go to Plugins >> Installed Plugins in your website’s dashboard. Then, paste the key in the field under User Registration Pro and hit enter.
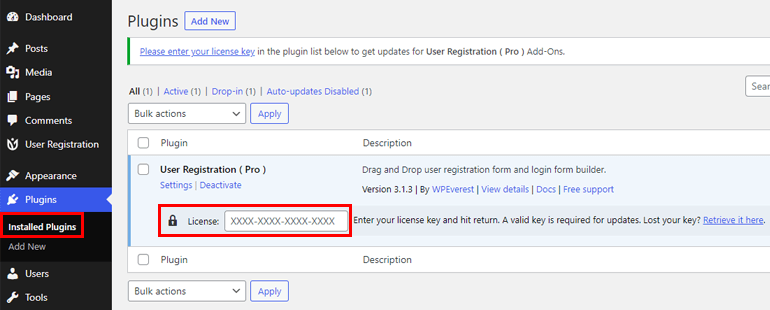
This activates the premium license for the plan you’ve purchased. Thus, you can receive automatic updates on User Registration and all its installed add-ons.
Wrapping Up
Even as a beginner, installing and activating the free or pro User Registration plugin is super simple. And given the plugin’s user-friendly design, you can set it up in just a few steps. Follow the tutorial above, and you should be good to go in no time.
With User Registration, you can easily build different registration forms for any website. For example, you can create WooCommerce registration forms, event registration forms, course registration forms, and so on.
Besides that, you can enable spam protection for the registration form, restrict content to users, and more.
Learn more about User Registration through our blog. Also, you can follow us on Twitter and Facebook to get updates on new posts.


![Zakra 3.0 | Zakra Pro 2.0 Release [Major Updates!]](https://i.ytimg.com/vi/g3rifl7kWvg/maxresdefault.jpg)