Want to learn how to enable the entry preview option for users in WordPress multi-part forms? Let us help you with an easy step-by-step guide that’ll assist you in making one for your WordPress website.
The preview option lets users view the data they’ve entered to fill into the previous parts of a multi-part form. This way, the users can go back and change the information they’ve provided if need be.
So, this article will give you a detailed guide on how you can enable the entry preview for users in WordPress multi-part forms.
Table of Contents
Best Way to Enable Entry Preview in WordPress Multi-Part Forms
Let’s be honest, nobody likes to fill out long forms. But here’s a little trick on how you can get your users to actually complete and submit your form.
You can create a multi-part form that divides the long form into multiple steps. So, the form fields are more organized and easier for users to fill.
On top of that, you can provide a preview of all the data the users filled in the fields before they submit the form. This prevents any incorrect data being entered into the system. The users can simply go to the previous part and edit the incorrect data.
Therefore, all you need is the best form builder plugin, Everest Forms. It’s a feature-rich drag and drop form builder which is suitable for making any kind of online form.

Most importantly, it provides you with the Multi Part Forms add-on. This add-on not only helps you create beautiful multi-part forms, but also enables entry preview for them.
With the entry preview feature, you can:
- Gather correct information from users
- Let users quickly go back to the previous part to edit the entries
That’s why, we’ll be using Everest Forms to enable entry preview in WordPress multi-part forms in this tutorial.
How To Enable Entry Preview in WordPress Multi-Part Forms
Here’s a step-by-step process of enabling entry preview in WordPress multi-part forms.
Step1: Install and Activate Everest Forms and Everest Forms Pro
The first thing you need to do is set up Everest Forms and Everest Forms Pro on your WordPress dashboard.
You’ll need both the free version and pro version of the plugin. That’s because the Multi Part Forms add-on is only available in the premium version (Plus plan or above).
For a detailed tutorial, go through our article on how to install Everest Forms Pro. It’ll guide you on the process of installing the free and premium versions of Everest Forms.
Step2: Install and Activate Multi Part Forms Add-on
Since you’ve got the pro version, you can now easily install any of the Everest Forms add-ons.
For that, navigate to Everest Forms >> Add-ons. After that, search for Multi-Part Forms. Then simply, click on the Install Addon button and press Activate.
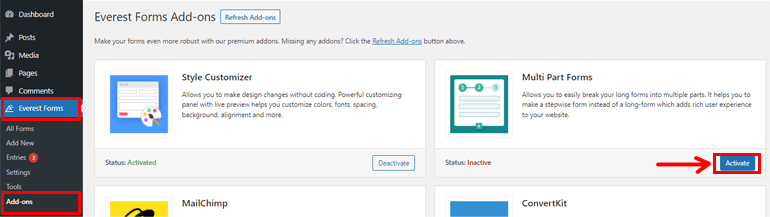
You’ll know the add-on is active when the status says Activated.
Step3: Create a New Multi-part Form
Once you’ve installed and activated the Multi Part Forms add-on, go to Everest Forms >> Add new. In the Add New Form page, you’ll find a collection of pre-built form templates. However, you can also start from scratch.
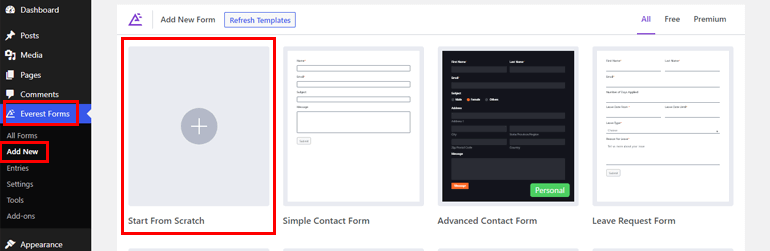
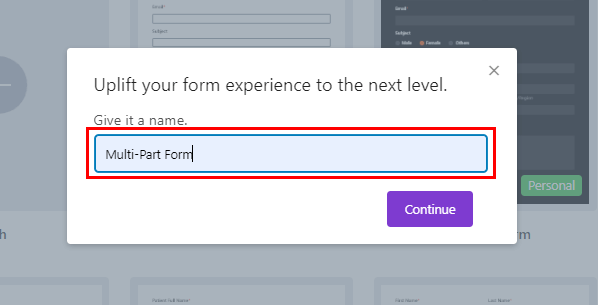
In this tutorial, we’ll show you how to create a multi-part form from scratch. So, click on Start From Scratch and name your form. Here, we’ll name it “Multi-Part Form” and press Continue.
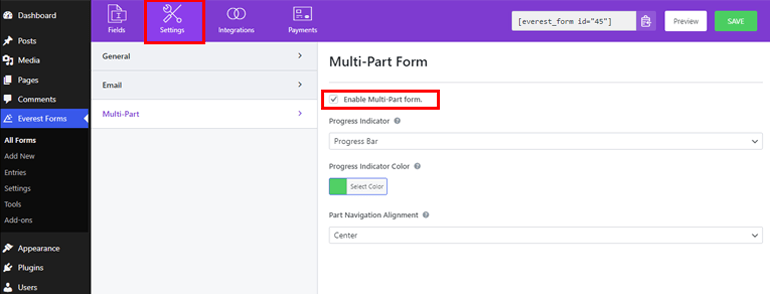
This takes you to the Everest Forms form builder. But before you start creating your form, you must enable the multi-part feature.
For that, navigate to Settings on the top and click on the Multi-Part tab. Here, you’ll need to enable the Multi-Part Form option, and you’re good to go.
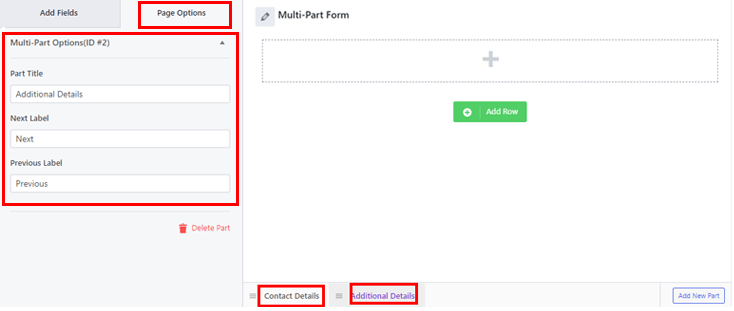
Right after you enable this option, the first part appears in the form builder. It’s titled Part Title, which you can later change from the Page Options.
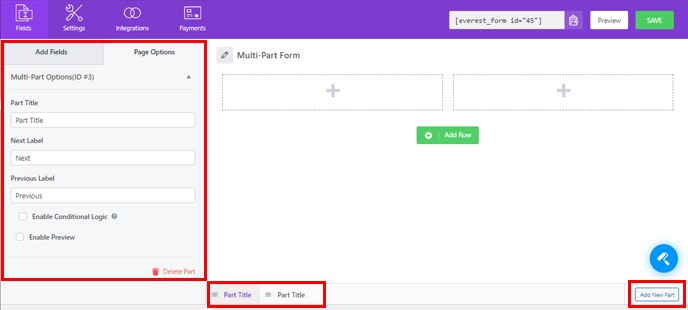
Now, all you need to do is drag your desired field and drop it into your form.

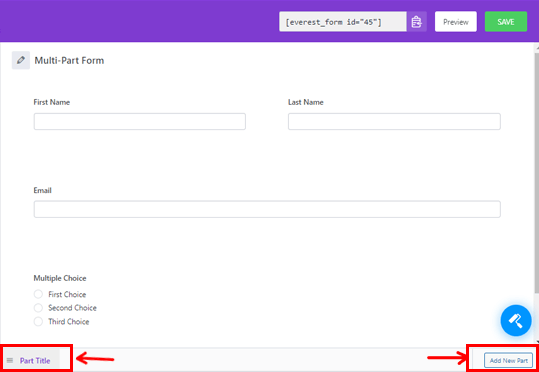
To add another part to your form, click on Add New Part, which you can find at the bottom of your form. This will open up the next blank page for you where you can keep adding desired fields like before.
You can also adjust the individual parts or move their position. Simply drag the part right or left for that.
Similarly, you can edit the Part Title and labels under the Page Options. Here we’ve named the parts “Contact Details” and “Additional Information”.
For a more detailed tutorial, check out this article on how to create a multi-step form using Everest Forms.
Finally, click on the Save button to save the changes you made to your form.
Step 4: Enable Entry Preview Option
Now, here’s the important part. The Multi Part Forms add-on also lets you enable entry preview in the form. This feature can be applied to all the parts except the first one since it doesn’t have any previous parts.
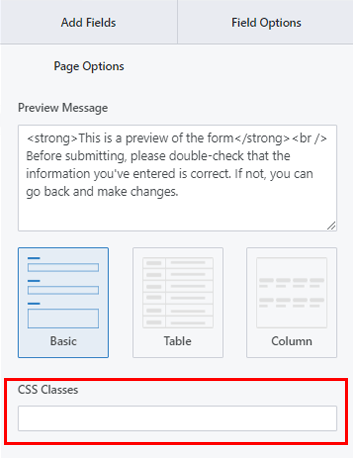
To enable the entry preview option, select the part for which you’d like to show a preview. After that, go to Page Options on the left, and scroll down to find Enable Preview. Then, enable this option by ticking the checkbox.
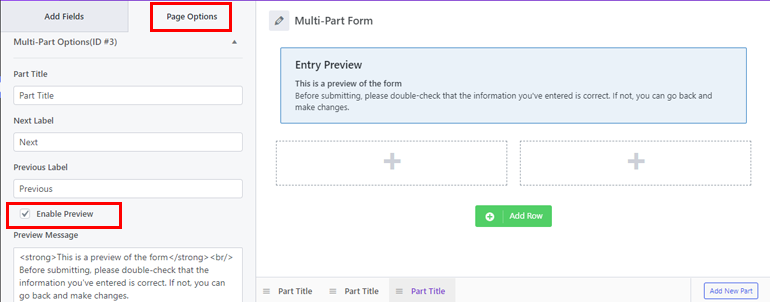
Here, you can also add a custom HTML message in the Preview Message box. This will be later displayed on the part where you’ve enabled the preview.
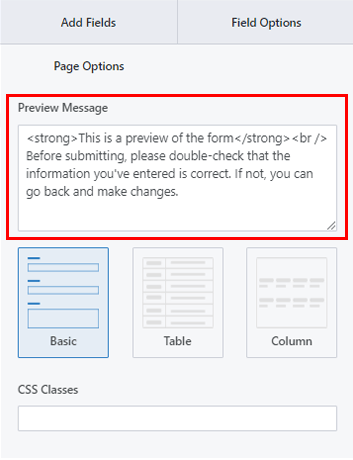
Once you’ve set the preview message, move further to select the layout from the given three layouts.
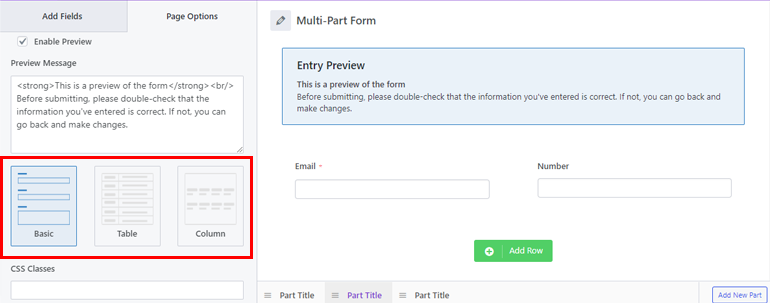
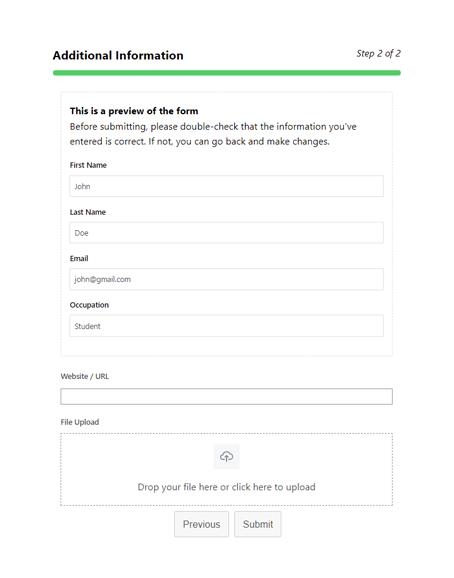
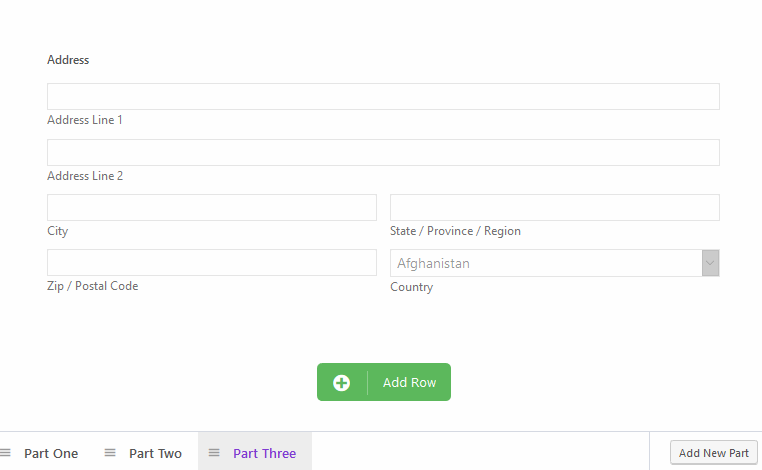
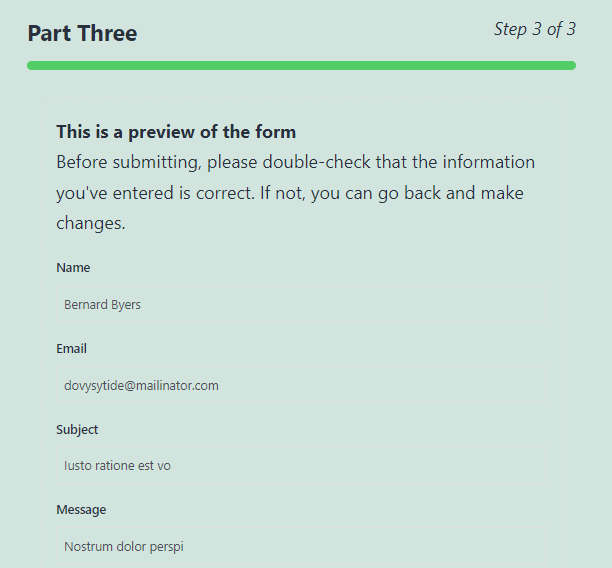
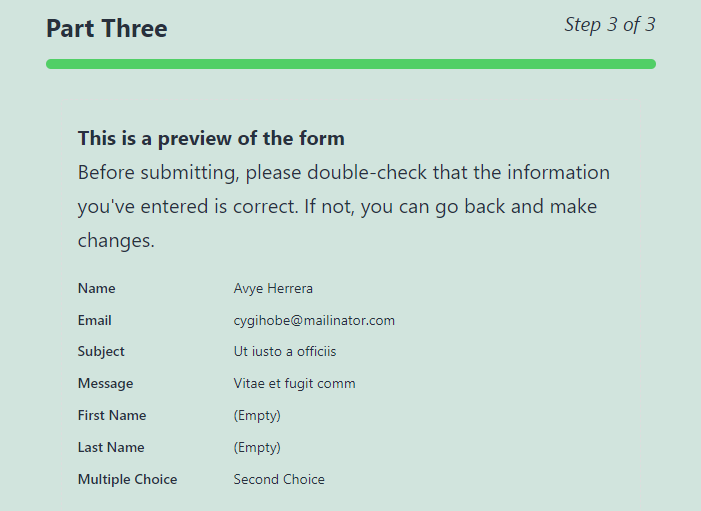
- Basic Layout: It has a simple interface followed by the user’s input or selection. Here’s an example of how this layout appears on the front end.
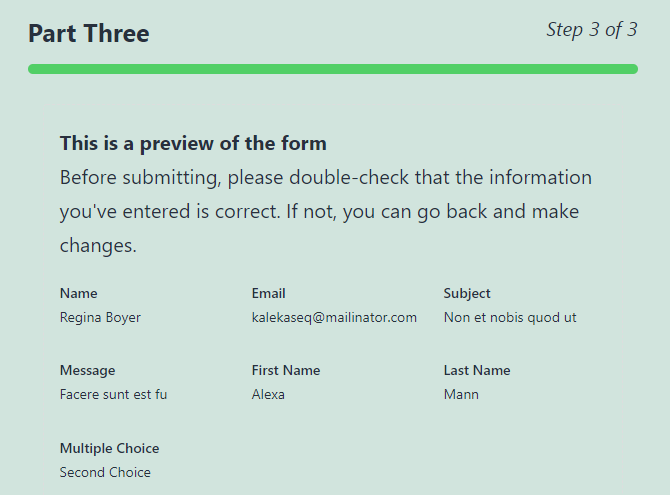
- Table Layout: It also uses a text layout but places the field labels and user’s input in two separate columns. Hence, this occupies less space on the form
- Column Layout: The entry data is displayed in 3 columns.
You can also add custom CSS classes for further customization.
Save the changes and you’ve successfully enabled entry preview for the form.
Step 5: Configure Multi-part Form Settings
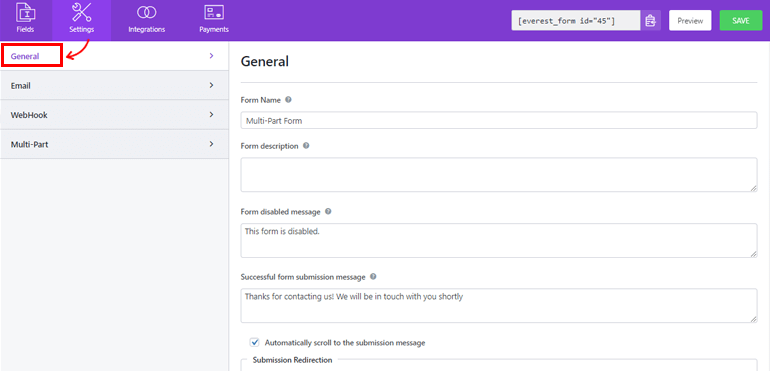
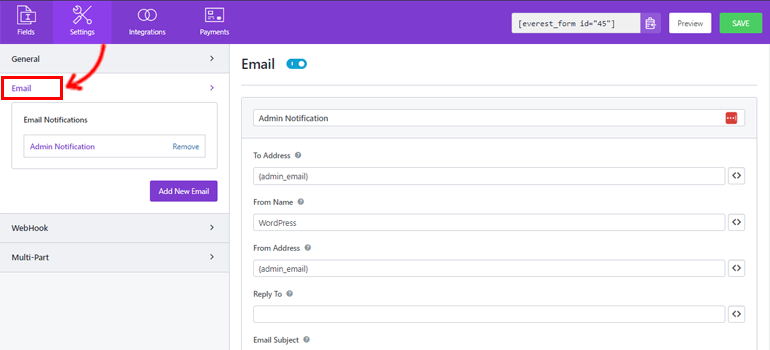
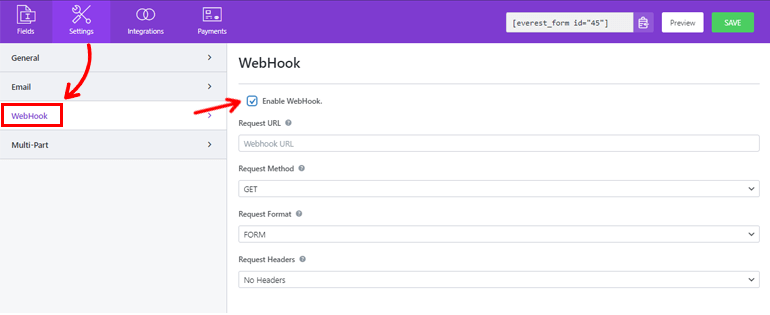
Next, you can open the Settings tab of the form to configure multi-part form settings. Here, you’ll find 4 sections with various customization options.
General: With the General settings, you can edit Form description, Form disabled message, form layout, etc.
Email: The Email settings allow you to create admin and user email notification templates.
WebHook: Using a WebHook, you can send the form data to any external URL. All you have to do is set the Request URL, Request Method, Request Format, and Request Header.
Multi-Part: This section enables you to customize the progress indicator, part alignment, and so on.
- Progress Indicator: It’s a progress bar by default. However, you can choose Circle Bar, Arrow Steps, or None from the drop-down.
- Progress Indicator Color: You can select the desired color for the progress indicator.
- Part Navigation Alignment: With this option, you can select a suitable alignment for the part buttons. You can set it on the right, left, center, or split.

You can now click on Save to save the changes you’ve made to the form.
Step 6: Add Your Form to the Website
You’ve successfully created a multi-part form using Everest Forms and enabled entry preview for it. But it won’t be visible to your users unless you display your form on the website.
Hence, to add the form to your site, you can use any of these two methods.
The first way is by using the form shortcode. You can simply copy the shortcode you see at the top of the form builder.
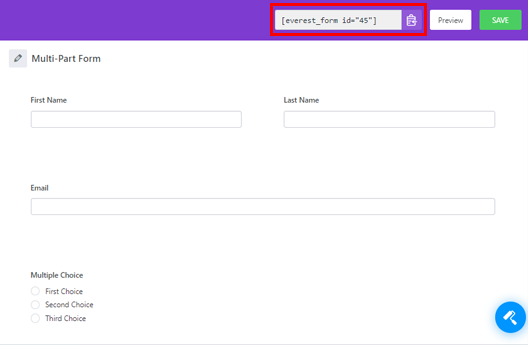
Then, create a new page or post, and you’ll get to the Gutenberg editor. Here, press on the Add Block (+) icon and search for the Shortcode block. Then, click on the block to add it to the page or post.

Next, paste the shortcode you previously copied into the block, and click on the Publish button.
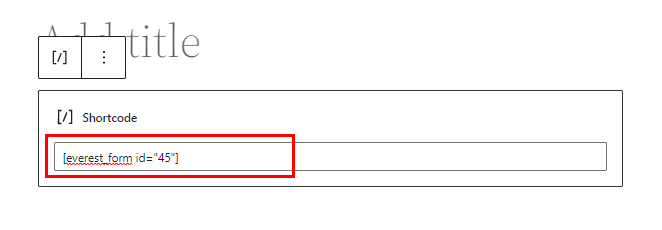
That’s it! Your form will be displayed on your site.
Alternatively, you can use the Everest Forms block to display your form. For that, click on the Add Block button and search for the Everest Forms block.
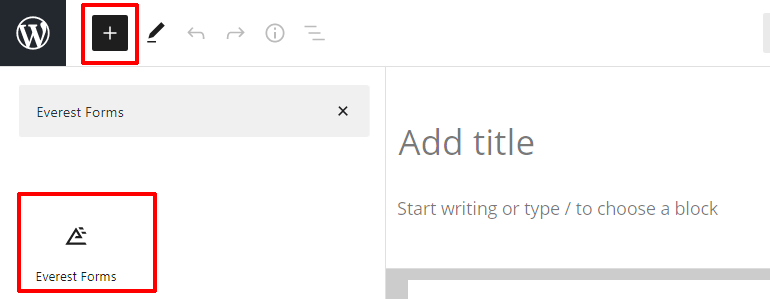
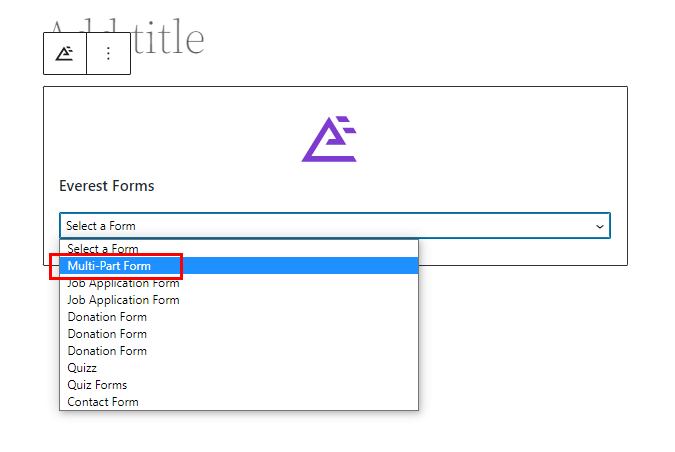
Add it to the page and select your WordPress multi-part form from the drop-down.
Finally, you can hit the Publish button at the top.
Wrapping it Up!
And that’s a wrap for our guide on how to enable the entry preview option for users in WordPress multi-part forms. With a feature-rich form builder plugin like Everest Forms, you can create a multi-step form and enable entry preview for it in no time!
Besides, the possibilities with Everest Forms are endless. You can use this powerful plugin to enable conditional redirection after form submission, customize the form style, and more.
Read more about Everest Forms on our blog if you’re interested. You can even check our YouTube channel for easy video tutorials.
Also, don’t forget to follow us on Facebook and Twitter for future updates.


![Zakra 3.0 | Zakra Pro 2.0 Release [Major Updates!]](https://i.ytimg.com/vi/g3rifl7kWvg/maxresdefault.jpg)