Want to know how to build a WordPress website? If yes, then this WordPress website tutorial is just for you.
Previously, creating a website used to be an uphill task requiring technical experts and a huge investment. But with WordPress, it isn’t the case anymore. The availability of superior platforms like WordPress has simplified the task of creating a website for all. Yes, even for the non-tech savvy and beginners like you.
Hence, this article aims to provide a step-by-step tutorial on how to build a website using WordPress. So, if you want to learn the easiest way to build a WordPress website, make sure you read this article till the end.
Table of Contents
A. Why is WordPress the Best Platform for Building a Website?

Out of the entire website builders out there, we’ve chosen WordPress to build a website. So, let’s unravel the reasons behind choosing WordPress to build a website.
- WordPress is the best Content Management System (CMS) that enables creating, modifying, and publishing your content online.
- You don’t need to have any coding skills to use this platform.
- It’s free and open-source meaning anyone can use and modify this software without any restrictions.
- It’s a flexible platform so it allows you to create any type of website imaginable.
- You get full authority over every aspect of your site such as content, design, features, and so on.
- It’s a popular platform comprising over 41% of all the websites.
Which Platform is the Best between WordPress.org and WordPress.com?
Not to be confused, there are two flavors of WordPress viz. WordPress.org and WordPress.com. Though they’ve got a common name, they’re quite different from each other.
WordPress.org is a self-hosted version of WordPress where you get full ownership and control over your site. And the customization possibilities are just endless with oceans of options of third-party plugins and themes. Hence, making your dream website come true isn’t a big deal.
On the other hand, WordPress.com is a fully hosted version of WordPress where the hosting is taken care of for you. As a result, you’ve restricted ownership and control over your site with this platform.
Also, it has limited customization possibilities as you cannot install third-party plugins and themes unless you upgrade to their business plan. Free, personal, or premium plan users don’t have access to a third-party plugin or theme installation with WordPress.com.
In conclusion, WordPress.org is the best choice for creating a website. Thus, in this WordPress website tutorial, we’ll be using WordPress.org to show you how to set up a website with WordPress.
B. Creating a Website with WordPress (Step-by-Step)
That being said, it’s time to start our step-by-step guide on how to build a website using WordPress. Let’s get going!
Step-1. Get a Domain Name & Web Hosting
Getting a domain name and web hosting is the foremost and crucial step for creating a WordPress website.
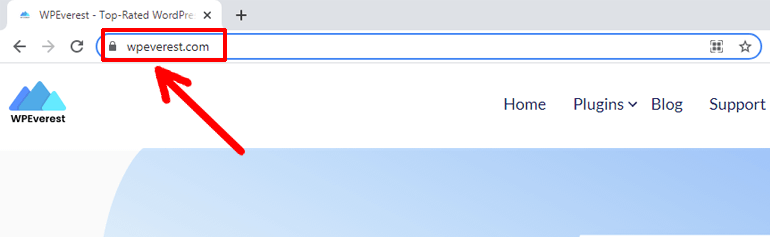
A domain name is simply a name you provide to your website. In other words, it’s the identity of your site with the help of which users will recognize and know your site.
For example, wpeverest.com is the domain name of our site. Likewise, other similar examples are amazon.com, Wikipedia.org, livedoor.biz, and so on.
Besides getting a domain name for your site, you also need to rent a space on the web where your website can reside.
So basically, web hosting is nothing but space on the webserver for storing your website files and data. Once you sign up for web hosting, your site becomes accessible via World Wide Web (WWW) to all the users.
Now, in this WordPress website tutorial, let’s briefly talk about how to select a domain name and web hosting service for your site.
Choosing a Good Domain Name
Domain name not only serves as your site’s identity but also has a direct influence on your blog’s branding and marketing. Also, your target audience will reach out to you using the same name. Therefore, your domain has to be unique and catchy.
Here are some important points that you should consider while selecting a domain name:
- Keeping domain names short and simple: Short and simple domain names can be easily pronounced and memorized. Hence, it’s a good idea to choose such names.
- Avoid adding hyphens, numeric, or special characters: Hyphens, numbers, or the special characters may make your domain name appear complex and unprofessional. So, it’s wise to avoid them.
- Avoid names with copyright infringement issues: Go for a unique name that doesn’t collide with the existing domains to avoid any copyright infringement issues in the future.
- Pick a suitable domain extension: There are different domain name extensions available for various purposes. For example, .com for commercial, .edu for education, and so on. So, choose an appropriate domain extension that best compliments the purpose of your site.
- Consider using blog name generators: Blog name generator tools like Domain Wheel, Panabee, and so on can provide you with creative domain name ideas to come up with a perfect domain for your website.
Choosing the Best Web Hosting Service
A web hosting service should provide all the features required to build a full-fledged WordPress website. Fortunately, you get the option to choose from the different web hosting types as per your site’s requirements. They’re briefly explained as given below:
a. Shared Web Hosting: Most basic and cheapest hosting plan. Multiple websites share the same space and resources.
b. Cloud Web Hosting: Dynamic hosting solution. Uses multiple servers for better performance and security of your site.
c. Virtual Private Server (VPS) Hosting: Uses virtualization technique to partition a single server to multiple servers. You’ll be provided with a portion of the server that you don’t have to share with anyone.
d. Managed WordPress Hosting: Every aspect of the server is maintained by the hosting company itself. It takes care of your WordPress site’s maintenance, security, backup, and more.
e. Dedicated Hosting: Most expensive hosting plan. Suitable for large enterprises. Provide unlimited resources, full storage, bandwidth, etc.
Only choosing the hosting type with favorable bandwidth, server space and other such features for your site won’t suffice. You should also consider other important aspects of the web hosting service to build a robust WordPress website.
For instance, good hosting should provide good uptime to make your website available 24×7 to your users. It should also facilitate a fast page loading speed. Moreover, it should offer reliable customer service and must fit your budget.
If you don’t know where to start, you can choose from the best hosting services as given below:
- Bluehost: $2.95/mo for Shared WordPress Hosting
- SiteGround: $6.99/mo for Shared & Managed WordPress Hosting
- DreamHost: $2.59/mo for WordPress Basic
These web hostings are officially recommended by WordPress as well. So you can use any one of them without any doubt.
Buy Domain and Web Hosting
After choosing the suitable domain name and hosting service for your site you need to purchase them. Below, in our WordPress website tutorial, we’ve briefly explained how to buy a domain and web hosting for your site.
How to Buy a Domain Name?
Your domain name can be registered using the domain name registrars. Several companies providing domain name registering services are available today.
However, you need to choose the best domain registrars that offer quality and cheap domain names.
Some of the best domain name registrar companies are listed as given below:
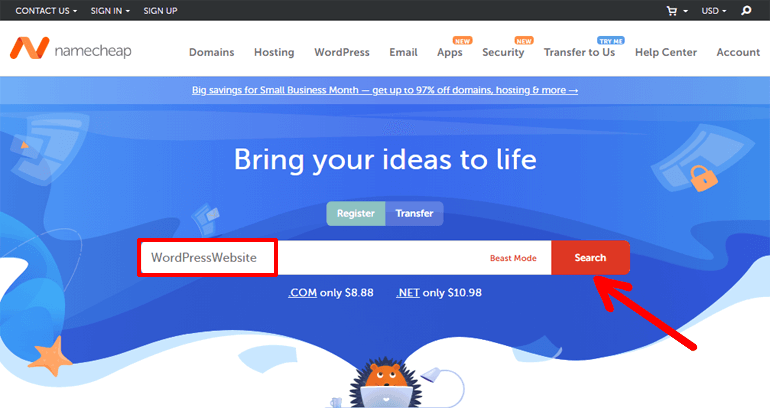
In this WordPress website tutorial, we’ll be using Namecheap as it’s one of the most popular and cheap domain name registering sites of all time.
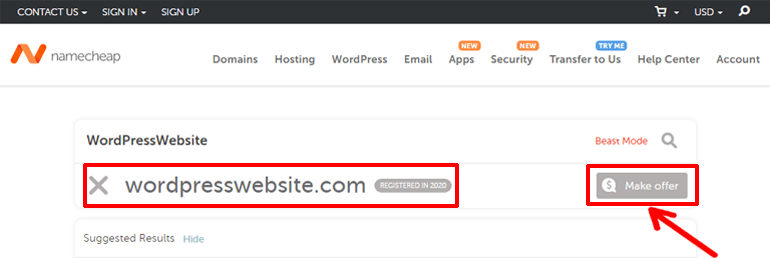
Firstly, visit the Namecheap official site and quickly check if your domain name is available for purchase or not. For this, type in your domain name in the search box and hit the search button.
Unfortunately, if it’s not available, then you may need to come up with another name for your site. Alternatively, you can also make an offer to get the same domain name if you’re lucky enough and it’s available for sale or whatsoever.
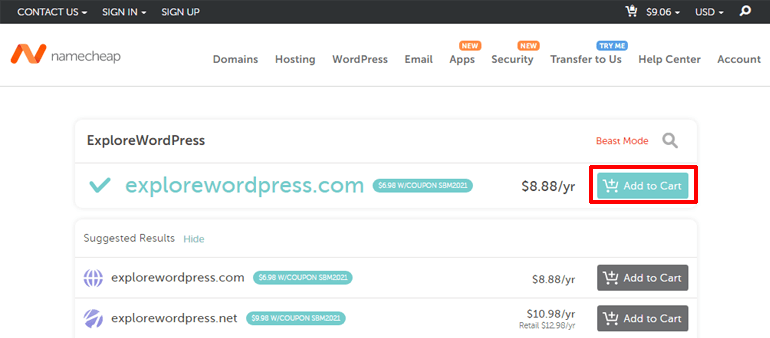
In case the domain name is available, you can immediately hit the Add to Cart button to buy it.
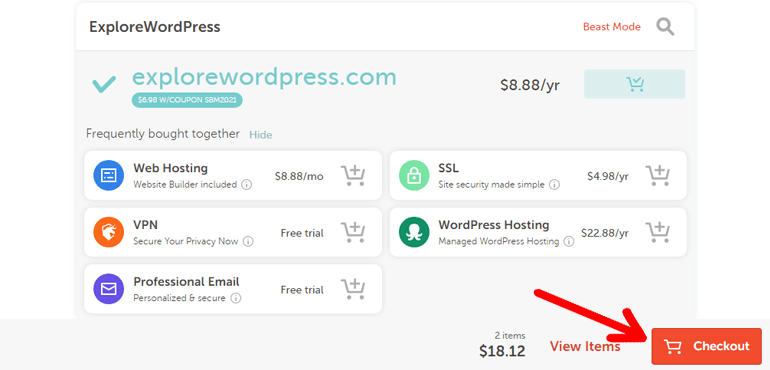
After that, simply click on the Checkout button as you can see at the bottom left.
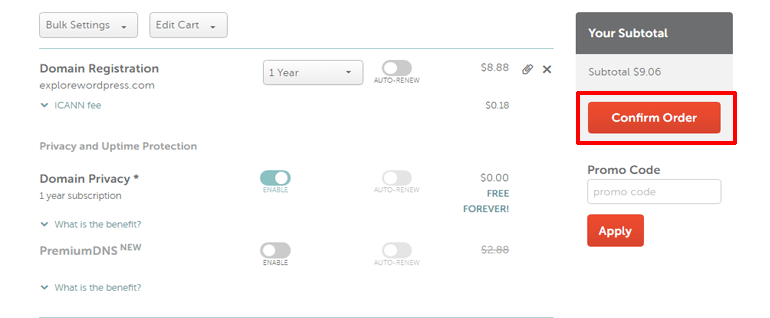
On the next page, you’ll get an option to specify the number of years you would like to register your domain name for. Not to mention, you can also enable or disable the auto-renewal of your domain once it’s expired.
Besides, you can even choose to enable/disable and auto-renew Domain Privacy and PremiumDNS options. When you’re done with all the settings, you can hit the Confirm Order button to confirm your domain registration.
After that, you can finally sign up for a Namecheap account to finish your domain registering process.
How to Buy a Web Hosting Service for Your Site?
Web hosting is the foundation of every website. It determines the speed, uptime, security, and overall performance of your site. Hence, you should choose the web hosting for your WordPress website carefully.
Bluehost is one of the leading WordPress hosting services with affordable pricing options. Hence, in this WordPress website tutorial, we’ll be using Bluehost to guide you through the process of how you can buy a web hosting service for your site.
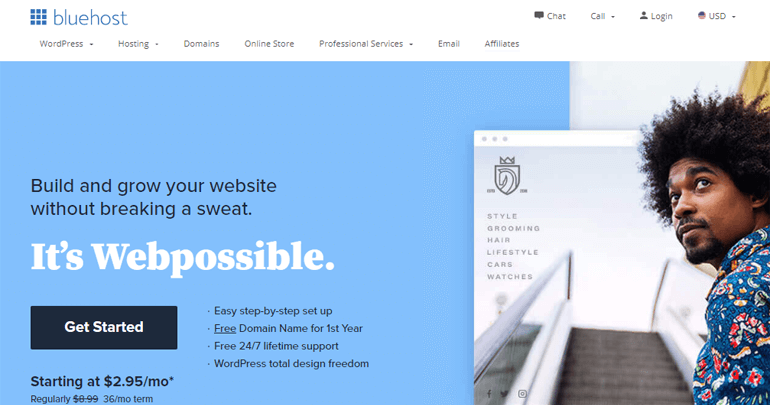
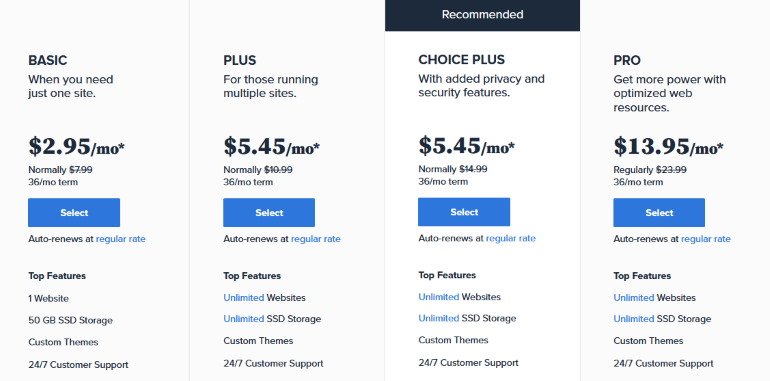
Firstly, visit the Bluehost official page and click on the Get Started button. Now, carefully go through the top features and pricing options provided by each plan and select the one that best compliments your website.
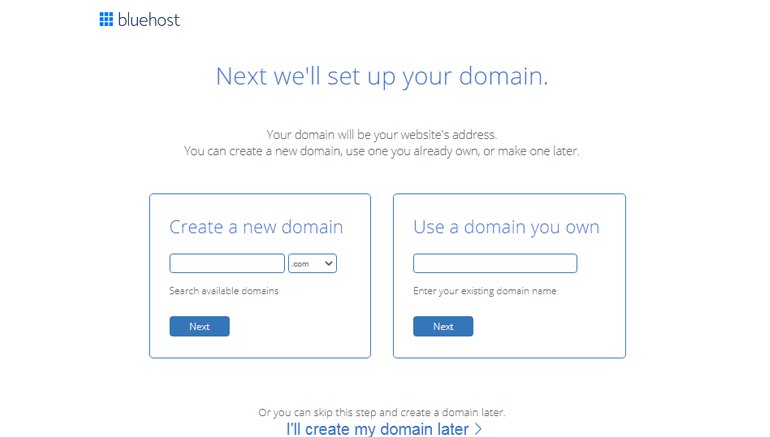
Next, you need to enter the domain name that you purchased earlier in the Use a domain you own bar. If you haven’t purchased a domain name yet, then you can also get a domain name from Bluehost itself. The best part is Bluehost offers a free domain name for a year while purchasing web hosting.
Once you enter your domain and hit the Next button, you’ll be directed to the Bluehost account page. Here, you’ve to fill in all the necessary details such as your personal information, package information, payment information, and so on.
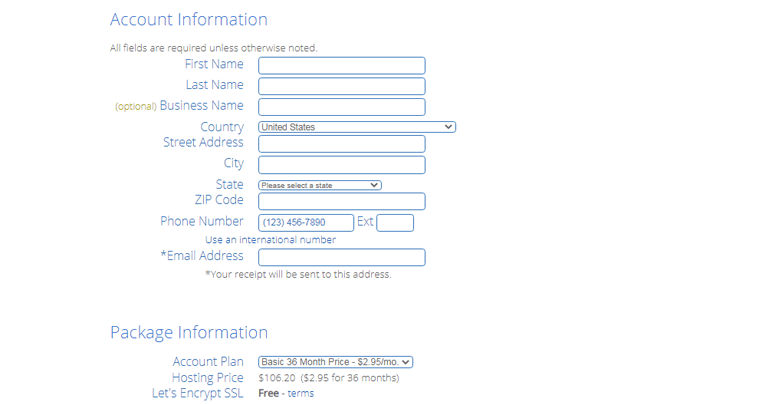
After that, agree to Bluehost’s terms and conditions and finally click on the Submit button.
Step-2. Install WordPress and Log into WordPress Dashboard
Next, in our step-by-step tutorial on how to create a WordPress website, it’s time to talk about WordPress installation and the login process.
As you’ve already purchased the domain name and hosting for your site, you’re now all set to install WordPress. And once you complete the installation process, you’ll be able to log into its dashboard from where you can start building your own WordPress site.
Installing and Setting up WordPress
With a great hosting solution like Bluehost, WordPress installation is just a walk in the park. It’s because Bluehost comes with a WordPress auto-installation feature.
Didn’t find this feature? Don’t worry. Bluehost also has a one-click installation option to get your website started quickly.
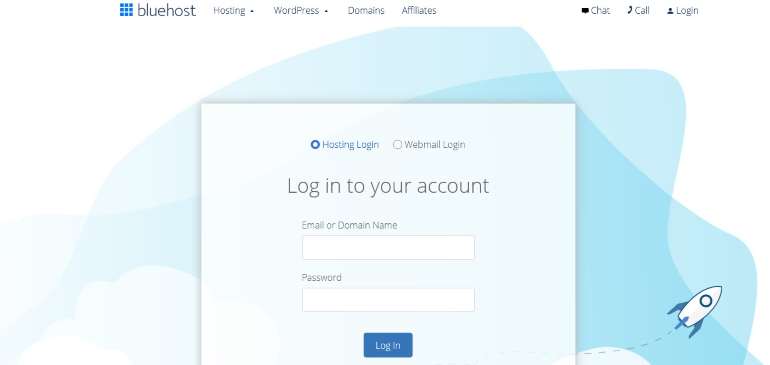
For this, visit Bluehost.com and hit the Login button at the top right. Now, enter the email and password that you’ve received when you signed up for Bluehost. Thereafter, you should be able to log into your hosting account.
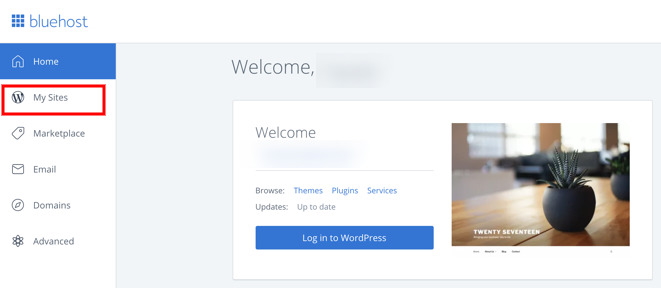
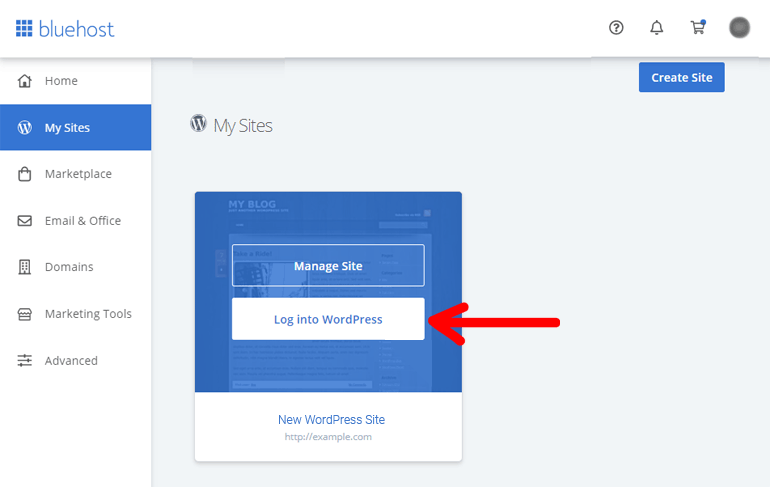
Next, from your Bluehost dashboard navigate to the My Sites section on the sidebar. Then, click on the Create Site option at the top right corner.
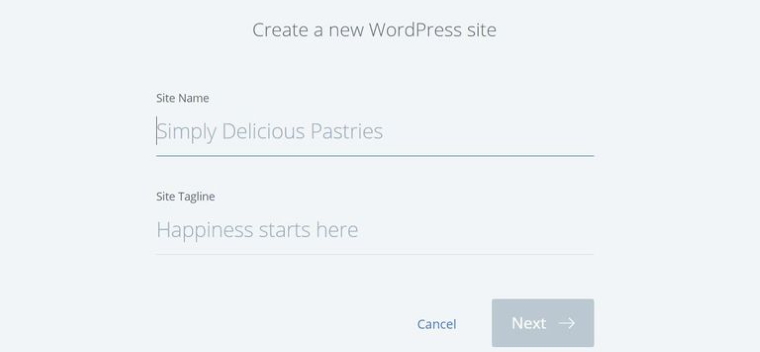
Now, you’ll be asked to enter the Site Name and Tagline for your brand new WordPress site. After that, hit the Next button.
On the next page, click on the drop-down menus to select the domain name you’ve purchased earlier and click on the Next button once again.
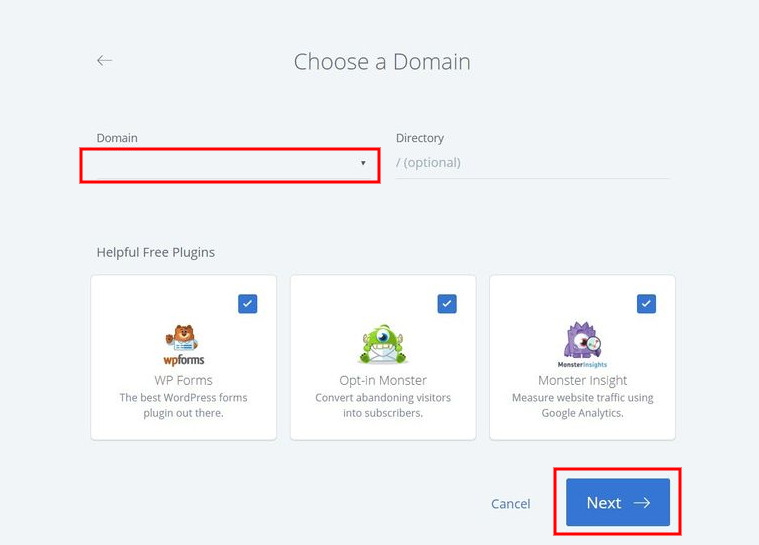
On doing so, Bluehost will now automatically install WordPress for you. Not to mention, you also need to enter the username and password for your WordPress website. Make sure you save these credentials in a safe place as you’ll need them later when you log into your WordPress dashboard.
Logging Into WordPress Dashboard and Getting Familiar
After the installation of WordPress, you’re now ready to log into your WordPress dashboard. For this, simply click on the Log into WordPress button.
Logging to your hosting account each time to log into your WordPress website is time-consuming. But don’t worry. There’s an alternative way to help you out.
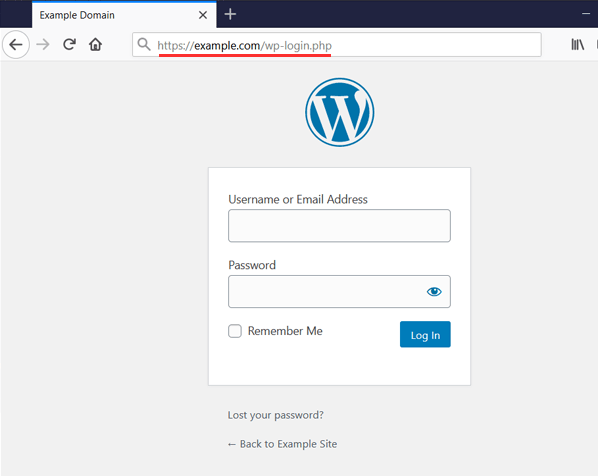
You can also log into your WordPress dashboard easily via WordPress login URL i.e. https://example.com/wp-login.php. Don’t forget to replace example.com with your own domain name and you should be able to see the login page which looks something like this.
Now, all you need to do is enter the credentials that you saved earlier. Congrats! You’ve finally made it to your WordPress dashboard from where you’ll be organizing every aspect of your WordPress website.
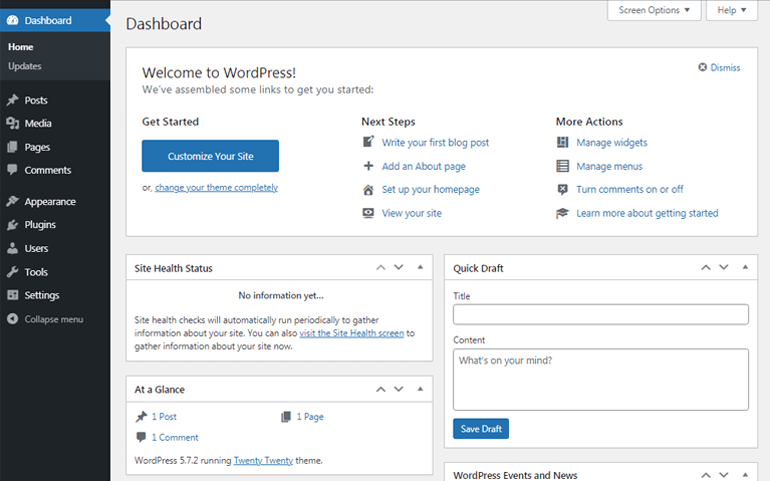
WordPress has a user-friendly dashboard with every option clearly defined on its left sidebar. Thus, even the beginner can navigate through its interface without any difficulty.
Having said that, let’s briefly discuss each of these available sections next.
Different Sections Available on WordPress Dashboard
- Posts: This option enables you to add content to your site. You can create, visualize, edit, and manage blog posts for your website from here. Posts are dynamic with the newest content being displayed at the top.
- Pages: From here, you can create, visualize, modify, and manage the Homepage, Contact Us page, About Us page, Services page, and so on. This option allows you to create static pages providing primary information about your website to the audiences.
- Media: You can upload and manage all your media files like images, videos, audio, and so on using this option.
- Comments: Under this section, you can manage all your posts’ comments from your users.
- Appearance: You can change the design of your site, customize widgets to add blocks, and even define your site’s menus from here.
- Plugins: This section allows you to install plugins to enhance the functionalities of your site. Besides, you can also update, deactivate, or delete the plugin as per your necessity.
- Users: From here, you can manage user accounts to decide who can access your website.
- Tools: It provides you with the options like import/export of data from other sites, your site’s health information, and export/erase personal data of users.
- Settings: As the name suggests, this option lets you configure necessary settings of your site like general settings, permalinks, media, discussion, etc.
Till now we’ve discussed the basic requirements for setting up the website with WordPress and got familiar with its working interface. Now, here comes the more interesting chapters on how to build a website using WordPress.
Step-3. Choose a WordPress Theme and Start Customizing
In this WordPress website tutorial, it’s time to know how you can design your WordPress website. Fortunately, WordPress is a super flexible platform that lets you design your dream website exactly the way you desire with the help of a WordPress theme.
WordPress themes are designed to provide a great look and feel to your website. They enable you to change your site’s appearance like color, layout, style, and so on. In short, WordPress themes affect the visual aspect of your site.
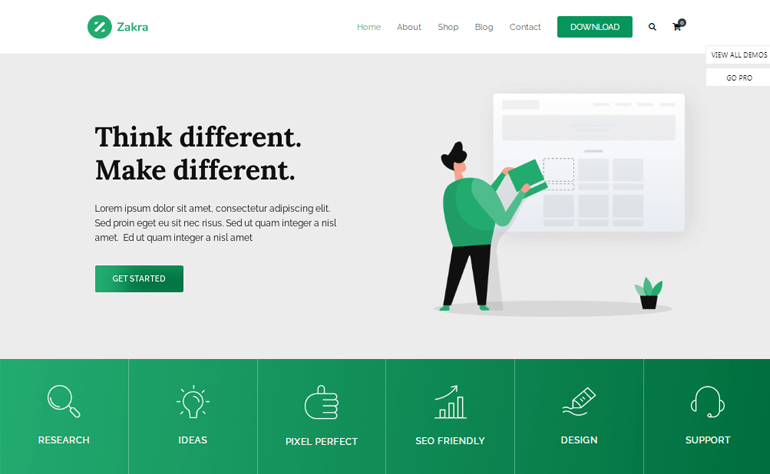
For instance, this is how your site looks when you use a Zakra theme.
How to Find the Best WordPress Theme for your Site?
Well, there are a plethora of options for WordPress themes available in the online market today. But you need to be aware as some themes may not be well-coded and of good quality. As we’ve already mentioned that your theme determines the overall look of your website it’s required that you choose your theme wisely.
Now the question is how can you select a theme for your WordPress website then?
No need to worry because we’ve listed the important points to take a sneak peek at before you download/buy a WordPress theme for your site.
a. Choose the Theme According to Your Site’s Niche
You may want to build a different kind of WordPress website like personal, magazine, or business site, etc. Be sure of the type of website you want to create and choose your theme accordingly. For instance, if you want to build a magazine website use magazine themes like ColorMag.
b. Check for the Ratings and Active Installations
User ratings and active installation can help you gain a quick insight into the quality of the theme. So, make sure to select the theme with good star ratings and a good active installation number.
c. Check the Last Update Date
Themes which aren’t updated regularly may not be compatible with the version of your WordPress. Moreover, it’s also not considered good for your site’s health and security. Hence, don’t forget to check the last updated date of a theme you choose.
d. Good Customer Support
It’s natural to run into some issues now or then while using the theme. So, you need to choose the theme with a reliable and friendly support team to instantly tackle the possible issues.
Best Places to Find the WordPress Themes
Besides the points mentioned above, one additional thing that you need to keep in mind is installing or buying the themes from reputed and trusted sites. Some of the best places to find the quality WordPress themes for your site are listed as given below:
Some of the Best WordPress Themes for Your Site
We’ve listed some of the best WordPress themes in our WordPress website tutorial to get started with your website. Let’s check them out:
- Zakra: Zakra is a leading multipurpose WordPress theme with awesome features.
- ColorMag: Trusted by over 10k users, ColorMag is a must-have WordPress theme for magazines, online news, and other websites.
- Flash: As fast as a flash, Flash is a stunning and powerful WordPress theme with endless customization possibilities.
- eStore: eStore is the best WooCommerce theme perfect for all types of online shops with power-packed eCommerce features.
- Astra: Astra is a popular multipurpose theme for WordPress with a huge library of pre-built templates.
- OceanWP: OceanWP is a modern WordPress theme with a clean and beautiful design and is perfect for any kind of website imaginable.
For more theme options, don’t forget to check our article on the best free WordPress themes and templates.
How to Install a WordPress Theme to Your Site?
After you decide which WordPress theme to use, you need to install it on your site. So, in our WordPress website tutorial, let’s briefly discuss how you can install a WordPress theme on your site.
Installation of a Free WordPress Theme
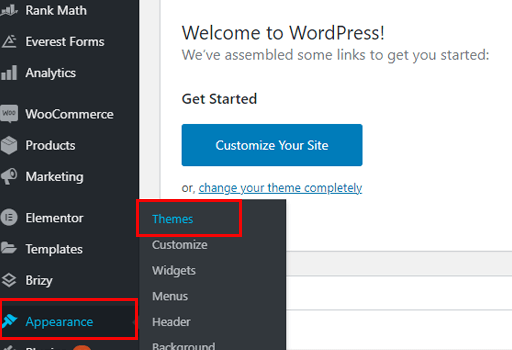
Free WordPress theme installation is as easy as ABC. You just need to follow a few simple steps for this. From your WordPress dashboard navigate to Appearance >> Themes.
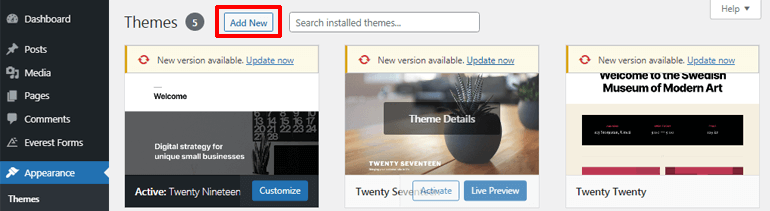
Click on the Add New button at the top of the Themes page and you’ll be directed to the Add Themes page.
Now type in the theme you want to download in the search box. Remember, you can only download the free themes available in the WordPress theme repository from here.
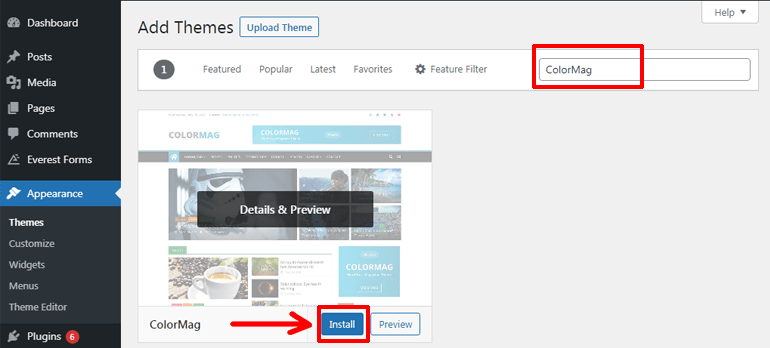
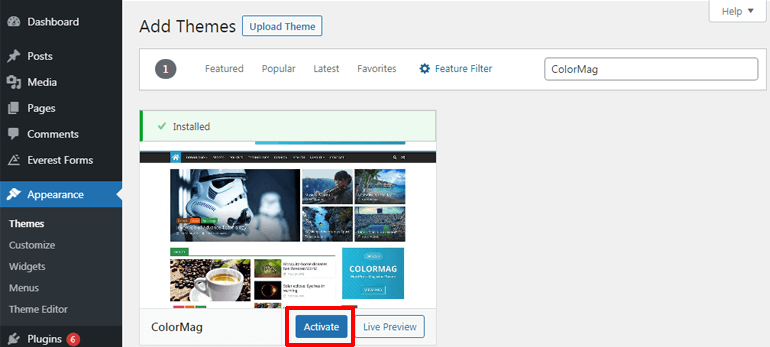
Hit the Install button when your theme is displayed. Once the theme is installed click on the Activate button to activate it to your site.
To install a premium theme, you need to purchase the theme first. After that, you should be able to download a theme file which will be available to you as a .zip file. Then you can proceed as given below:
Similar to before, navigate to Appearance >> Themes and hit the Add New button.
Now from the Add Themes page click on the Upload Theme button at the top.
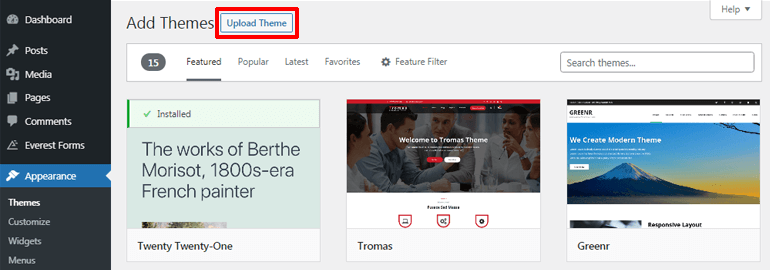
Click on select the .zip file that you purchased before. Next, click on the Install Now button. After a while, the theme is installed on your site.
Finally, press the Activate button and your theme is ready to be used on your site.
Customizing Your Theme
Since you’ve installed and activated the theme, it’s time to customize the theme as you see fit in this WordPress website tutorial now.
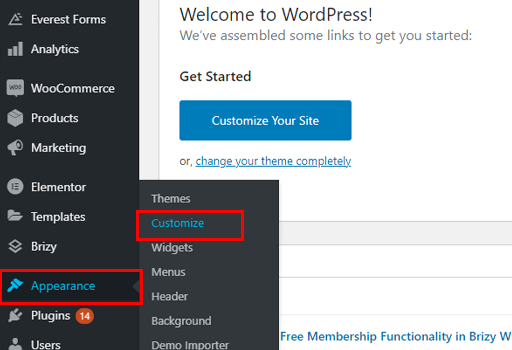
To start customizing, go to Appearance >> Customize. And you’ll be able to explore several customization options. Most importantly, you’ll get to live preview all the changes you make on your site.
Customization options may slightly differ depending upon the active theme on your WordPress site. Here, we’re using the ColorMag theme on our site, so the basic customization options provided by the theme are as follows:
- Global: Customize different aspects affecting your sites such as colors, backgrounds, typography, and more.
- Front Page: Choose to display the latest blog posts or static page content on the front page.
- Header: Configure the header of your site. You can set the color, layout, header media, and even set the site logos, title, tagline, etc.
- Content: Manage the appearance of your content by customizing typography, background color, design, sidebar, etc.
- Footer: Customize the footer area of your website. Enable or disable footer widgets, set up widget colors, styles, and more.
- Additional: Enable or disable social icons, schema markup in ColorMag, and more.
- Menus: Add, delete, or customize menus of your website.
- Widgets: Add widgets to different parts of your website and modify them.
- Homepage Settings: Select what you want to display on the homepage of your site.
- Additional CSS: Further customize your site by manually adding custom CSS codes.
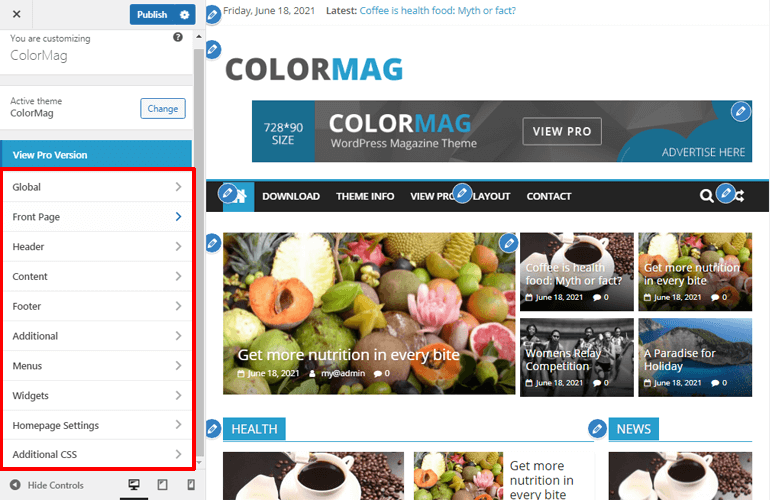
Further, the Hide Controls button at the bottom left of the page allows you to view how your site looks on different devices. And if you think you’re done just hit the Publish button at the top. That’s all.
You can explore the best free customizable themes for your WordPress site here.
Step-4. Add Posts and Pages to Your Website
The next important step to build a WordPress website is adding content to your site. You can add your content under two categories namely posts and pages.
Basically, under the WordPress posts, you can add dynamic content aka blog posts, articles, stories, and so on. You tend to frequently add such content to your site hence your newest posts appear at the top in this case.
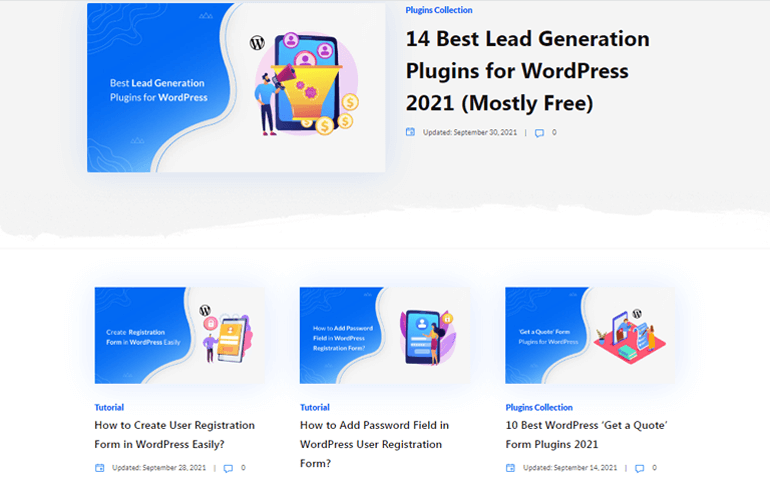
For instance, this is the blog section of WPEverest which provides you with handy articles relevant to the WordPress website. You can see the latest article being displayed at the topmost side of our site.
Contrarily, under the WordPress pages, you add timeless content that remains the same for a long time unless you want to change or modify it. So, here we’re talking about the static pages such as your site’s Homepage, About Us page, Contact page, Services page, and so on.
Now, let’s discuss how you can create posts and pages on this tutorial on how to set up a website using WordPress.
Creating WordPress Posts
To create your first post, navigate to Post options at the left-hand side menu of your WordPress dashboard. Then, click on the Add New button at the top.
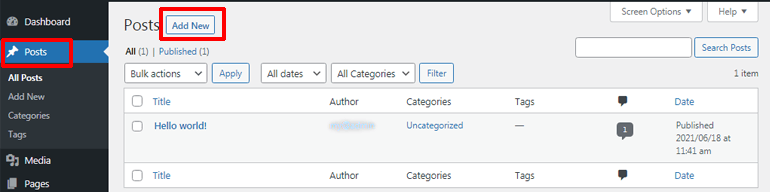
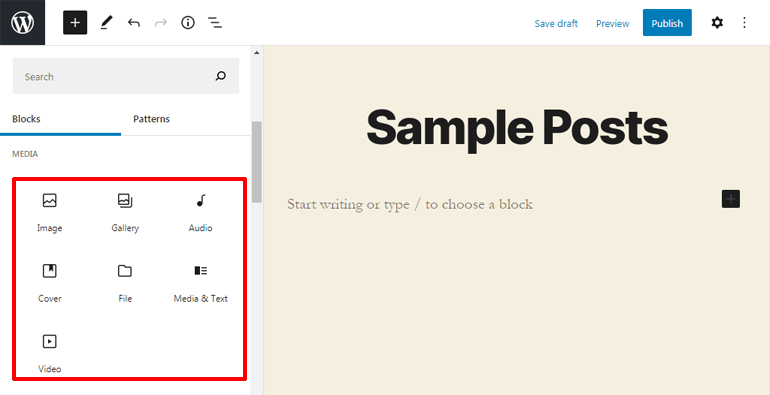
Now the WordPress Post Editor screen opens up and you can start adding your content. Adding, editing, and managing your content is a piece of the cake with the WordPress Post Editor.
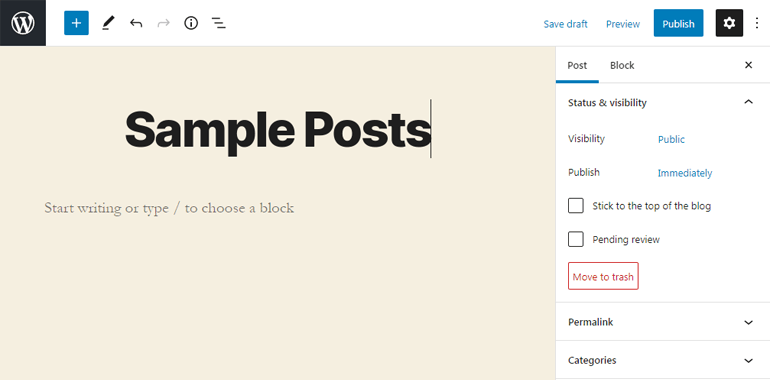
Additionally, it also allows you to add multimedia content to your site such as images, videos, audio, and so on to make your content engaging.
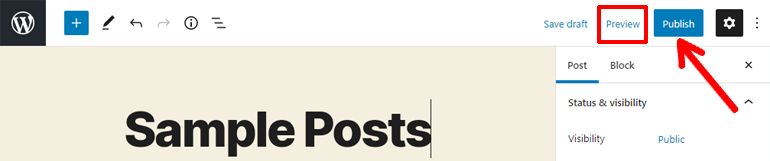
Once you complete adding content, you can view how your posts look by simply hitting the Preview button at the top. And if you’re satisfied, you can go ahead and hit the Publish button to make your blog posts go live.
Creating WordPress Pages
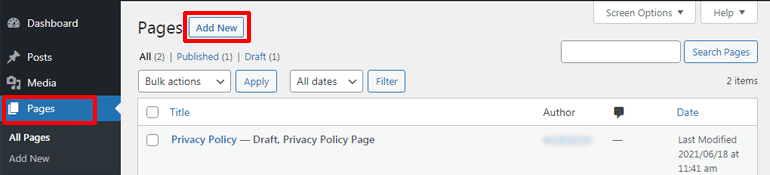
If you’re wondering how to build a WordPress website page then we’re here to show you how it’s done. Similar to your posts, go to Pages of your dashboard as you can see on the left-hand side menu bar. Then, click on the Add New button at the top.
This opens up a WordPress Page Editor screen. Soon after that, you can start adding content to set up different pages of your site.
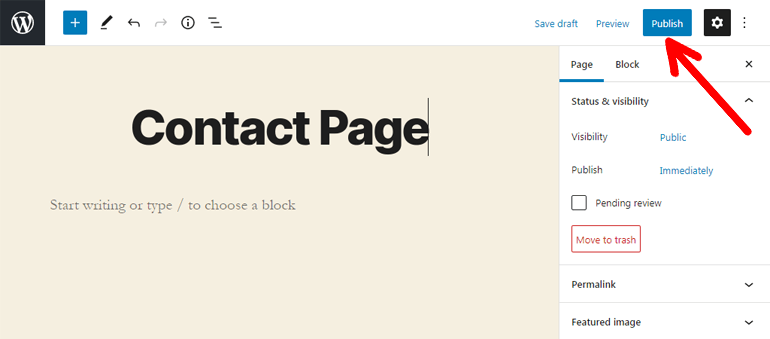
After finishing content addition, you can preview your content if you want to and make it go live by hitting the Publish button as before.
Set Up a Static Page for Your Homepage
Now that you’ve added content to your WordPress pages and posts, it’s high time to set up your site’s homepage. The homepage is simply the main page of your site where you can display important information about your products, services, and so on.
WordPress displays the page containing your blog posts as the homepage by default. However, it’s better if you choose the static page as the homepage for your site.
To set up your homepage, go to Settings >> Reading from your dashboard. After that, you’ll see the Your homepage displays option. From here, you can choose the Pages that you created before to set as your home/front page and posts page for your site.
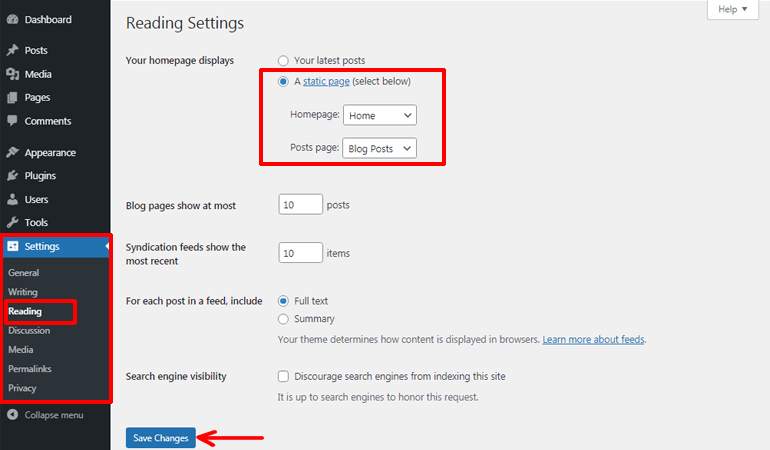
Finally, hit on the Save Changes button at the bottom to save your settings.
Step-5. Customize Your WordPress Website’s Main Settings
Till now in our tutorial on how to build a website with WordPress, you’ve learned to add the content to your WordPress website. However, you’ve got a lot more things yet to be done to build up a fully functional WordPress website. Hence, the next step is to customize your site’s essential settings to make it presentable to your visitors.
a. Set the Title and Tagline
If you remember, you get to choose the title and tagline for your site while you install WordPress. If not, you can always navigate to Settings >> General and add a suitable title and tagline that compliments your site at any time.
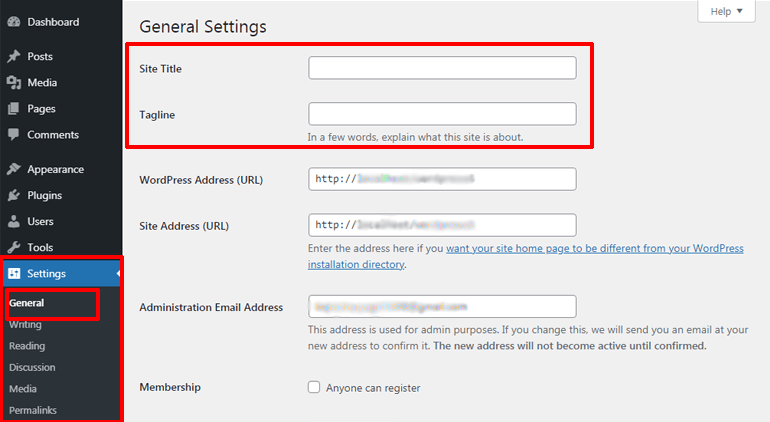
Your site title represents the name of your website while tagline is the short description of what your website is about, usually in a few words. Adding a tagline to your site is not a compulsion so you can also leave that field blank.
Once you set the title and tagline, don’t forget to hit the Save Changes button to save the changes you made.
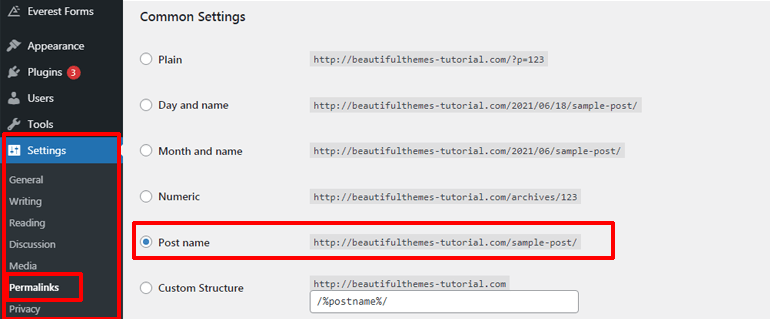
b. Setup Permalink
Permalink denotes the permanent link or URL of the pages or posts of your website. It plays a vital role in indexing your site in search engines thus you need to give proper attention to your permalink’s structure.
WordPress sets a URL that is chaotic by default. But it’s easy to set up an organized and well-structured permalink. For this, go to Settings >> Permalinks and choose the Post name option under Common settings. Then, hit on the Save Changes option to save your settings.
c. Make Your Site Public
WordPress has built-in functionality that can prevent your site from getting indexed in search engines. If this happens your site won’t be visible to your audience.
Hence to ensure that your site is visible, go to Settings >> Readings and check if the Search Engine Visibility option is unchecked or not. This box should be left unmarked to make your site go public.
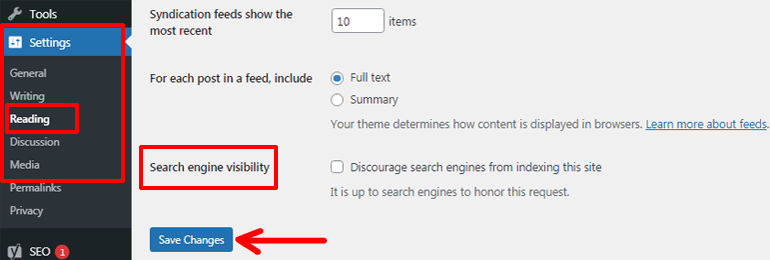
After that, you can click on the Save Changes button.
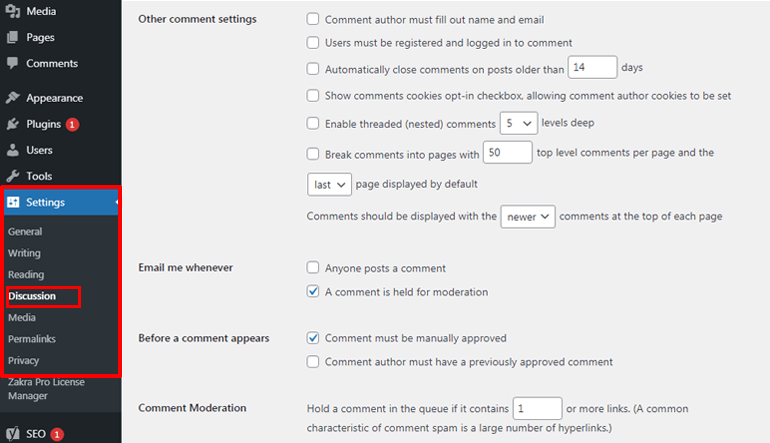
d. Configure Comment Settings
WordPress also comes with a built-in feature that enables you to configure the comment settings. Comments to your posts are an important part of the WordPress website as they allow users to interact with you as well as other site visitors. However, you should know that occasionally they can be spam too.
Thus, it’s equally important to moderate and secure your comments as well. From your dashboard navigate to Settings >> Discussions and enable or disable the comments the way you want. Lastly, make sure you click on the Save Changes button.
e. Create Navigation Menus
Without navigation menus, your WordPress site will look just like a maze to your visitors. Sounds funny but it’s true. It’ll be difficult for your users to navigate to specific pages or posts on your site without proper WordPress navigation menus.
No need to worry. We’ll show you how to add navigation menus to your site next in our WordPress website tutorial.
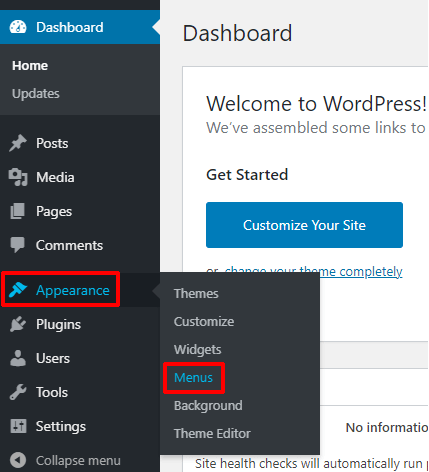
Firstly, go to Appearance >> Menus from your WordPress admin area.
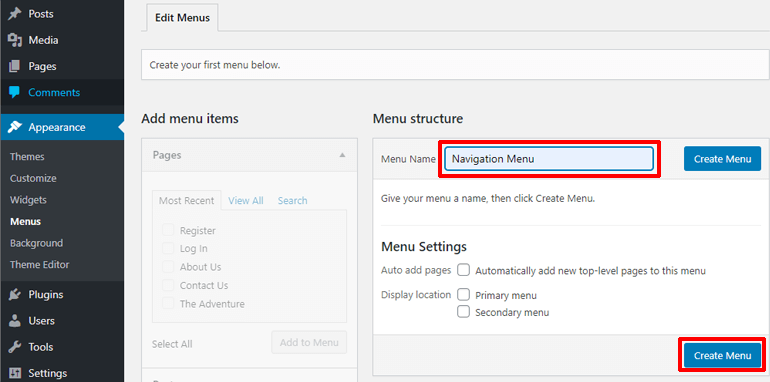
You’ll be directed to the Edit Menus page from where you can provide a name to your menu in the Menu Name bar. This bar is situated just below the Menu structure option on the right-hand side. After providing a Menu name (e.g. Here, Navigational menu) click on the Create Menu button.
On the same page, you can also see the option that says Add menu items on the left-hand side. Now, click on the Pages tab and choose all the pages you want to add to the menu of your website. Then, click on the Add to Menu option.
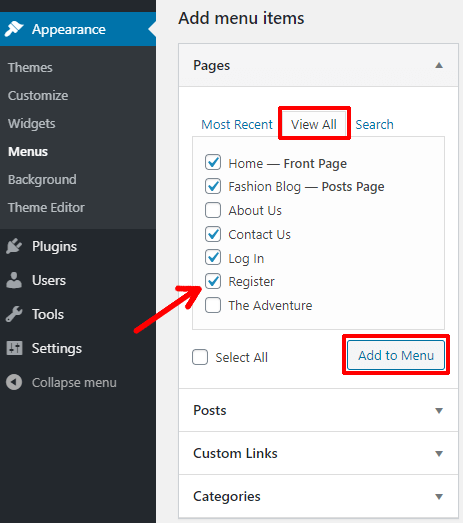
After that, the selected pages are added to the menu as you can see under the Menu structure tab. Not to mention, you can also drag and drop the items to order them as per your wish.
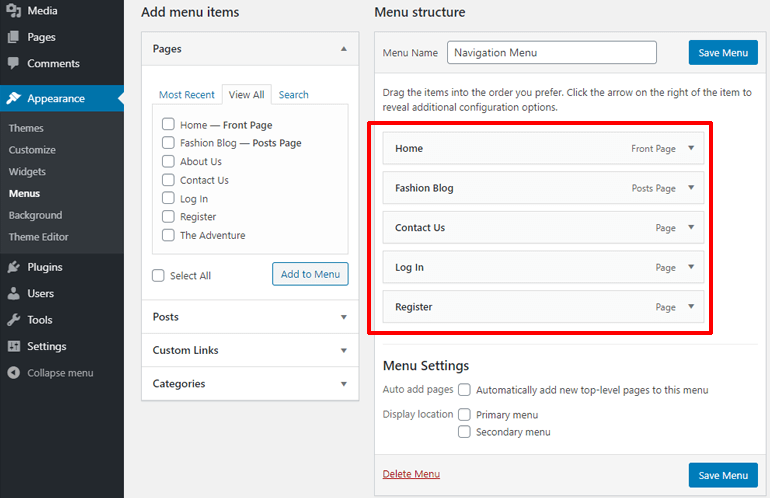
The only thing that’s left to do is to add a menu to the desired location. For this, simply checkmark the Display location from the Menu Settings tab.
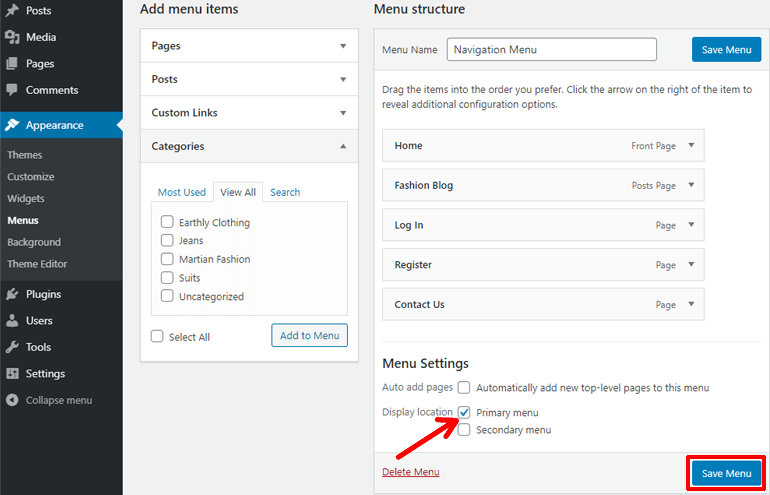
Next, click on the Save Menu button and your menu is published on your site. Finally, your visitors can see and use the WordPress navigation menu.
Now that you know how to build a website using WordPress and customize its main settings, you’re all set to enhance its functionality using WordPress plugins.
Step-6. Enhance the Features of Site Using Plugins
WordPress is designed in such a way that its functionalities can be enhanced by using plugins. As a matter of fact, our tutorial on how to build a WordPress website would be incomplete without talking about the plugins.
Simply, plugins are powerful add-ons or applications that extend the features of your WordPress website. In other words, they add a set of features to further strengthen and upgrade the power of your website.
Best of all, these WordPress plugins allow you to add extra functionalities to your WordPress site without having to know anything about coding. However, it’s a plus point if you’ve coding knowledge as you can tweak the code to adjust the features as per your necessity.
How to Find the Best WordPress Plugins for your Site?
There are quite a few options of WordPress plugins available in the market created for various purposes. For example, you can find SEO plugins, security plugins, contact form plugins, registration plugins, page builder plugins, and more for your site.
However, you need to know that just like themes, not all the plugins available are trustworthy. Choosing poorly coded plugins can hamper your site in many ways. Such plugins may slow down your site, expose your site to security vulnerabilities, and may even crash your site.
Hence, you should carefully choose the best WordPress plugins for your site by considering the following things:
a. Understand the Need of Your Website
You need to figure out the needs of your website and choose the WordPress plugin accordingly. For example, if you wish to add the contact forms to your site, you may choose the best form builder plugin like Everest Forms. Likewise, if you wish to add the user registration forms to your site, User Registration is the best option.
b. Check for Star Ratings, Active Installations, and Reviews
Taking a sneak peek at the star ratings, the number of active installations, and user reviews of the plugin can be of great help to understand the nature of the plugin. Thus, it helps to decide if the particular plugin is worthy of use on your site or not.
c. Check for Update and Compatibility
Just like in a theme, you should also check the last updated date for the plugin and its compatibility with the version of your WordPress. A plugin that isn’t updated regularly isn’t considered safe as it may introduce malicious code and other security issues to your site.
d. Check for the Customer Support
Though you choose the best WordPress plugins you’re still bound to face several issues while using them. For that reason, you must choose the plugins with good customer support so that you can get instant help whenever required.
For more details, please check our article on how to choose the best WordPress plugins for your site.
Best Places to Find the WordPress Plugins
Except for the essential points mentioned above, make sure that you install or buy a plugin from reliable and trusted sources. Some of the best marketplaces to find quality WordPress plugins for your site are as given below:
Some of the Essential Plugins for Your WordPress Site
To help you out, we’ve listed some of the essential WordPress plugins for your site in this WordPress website tutorial. They are as follows:
- Everest Forms: It’s the best drag and drop form builder plugin that allows you to create any kind of contact form without any hassle.
- User Registration: With the help of this WordPress plugin, you can effortlessly register users on your site and let them perform certain tasks like adding posts, editing, translation, etc. Easily create user registration and login forms, user profile pages, and start the work.
- Masteriyo: It’s a free WordPress LMS plugin powered by React JS to build a powerful eLearning website effortlessly.
- Easy Social Sharing: Just like its name, the plugin permits you to add the social sharing buttons easily to share your content across popular social media platforms.
- Elementor: Using this popular drag and drop page builder plugin you can create a perfect website in no time.
- WooCommerce: WooCommerce plugin enables you to convert your website into a robust online store so that you can start selling your products easily.
If you want to explore more plugins make sure you read our article on the best WordPress plugins & extensions.
How to Install WordPress Plugins to Your Site?
Since you know how to choose the best plugin and where to find it, you can now install the plugin. But wait, do you know how to install the plugin to your site? Well, installing a plugin is no different from a WordPress theme and it’s quite easy to be precise.
Hence, we’ll show you how to install a plugin on your site now.
Installation of a Free WordPress Plugin
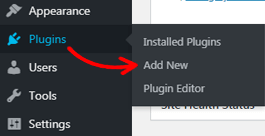
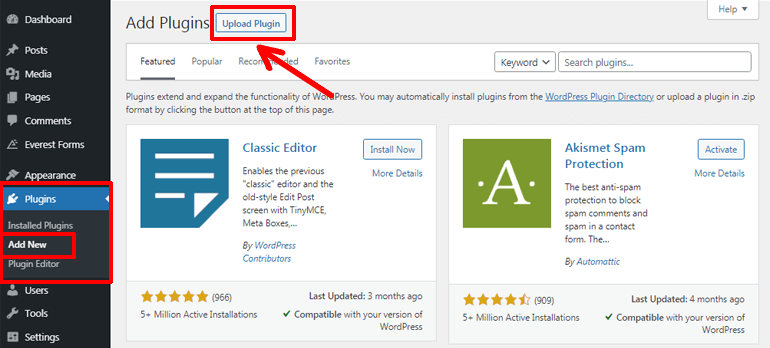
To install a free plugin to your site navigate to Plugins >> Add New from your dashboard.
Then, in the Add Plugins page type in the name of the plugin you want to install in the search box. From here, you can install all the free plugins available in the WordPress plugin repository.
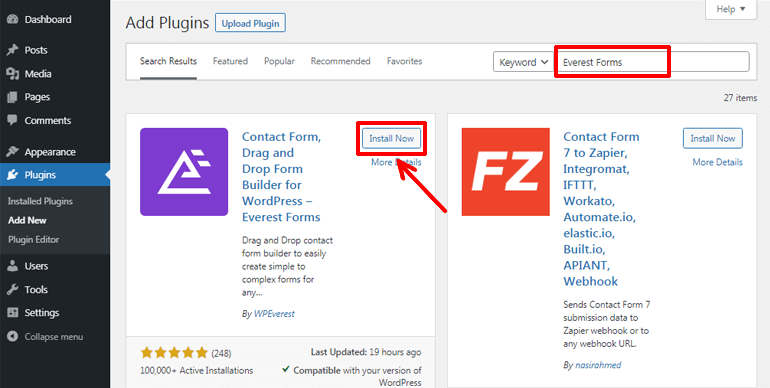
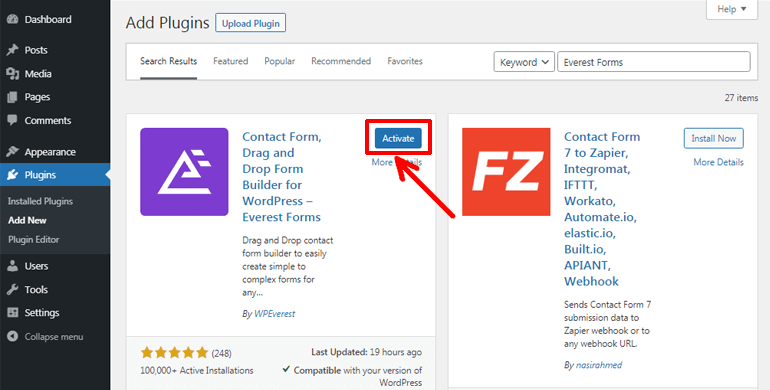
Once the required plugin is displayed, click on the Install Now button. After the completion of the installation process simply hit the Activate button. Now the plugin is ready to be used on your site.
Installing a premium plugin slightly differs from installing a free plugin as you need to purchase the required plugin at first. So, visit the official site of the premium plugin and purchase it. Then, you’ll get an installable .zip file of that particular plugin.
Now, similar to the free plugin, go to Plugins >> Add New. Here, instead of typing the name of the plugin in the search box, hit the Upload Plugin button at the top of the page.
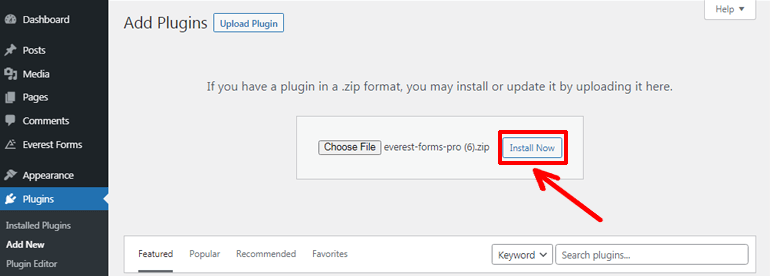
Next, choose the .zip file of the plugin that you purchased before and click on the Install Now button.
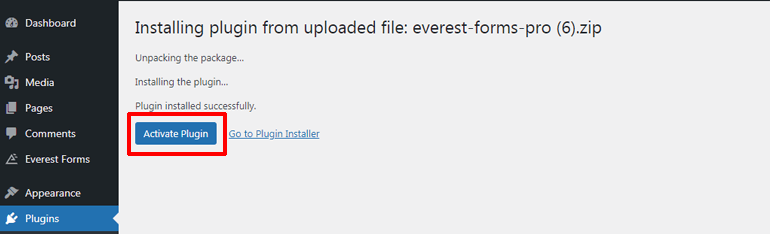
When the plugin is successfully installed, press the Activate Plugin button and the plugin will be activated to your site in a matter of seconds.
Step-7. Improve Your Website’s SEO
Just knowing how to build a website using WordPress isn’t enough. There’s a tight competition in the online world as well. So, to increase the visibility of your website to your users, you should make your site optimized for SEO.
Search Engine Optimization abbreviated as SEO simply means to prepare your site for the search engines (Google, Yahoo, Bing, MSN, etc.) for higher ranking opportunities. Search engines being the major source of traffic, SEO remains the essential topic for every WordPress website.
Hence, unless and until you make your site optimized for SEO, it’s doubtful that your site is visible to your users. But there’s nothing to worry about because WordPress offers many SEO plugins that can help you improve your site’s SEO without any hassle.
So, let’s briefly discuss some of the SEO plugins to build a well-optimized WordPress website now.
Best WordPress SEO Plugins to Optimize Your Website
SEO plugins are magnificent tools specifically designed to optimize your site and make it rank on the top of the Search Engines Results Pages (SERPs). So, here we’ve presented some of the best WordPress SEO plugins in our WordPress website tutorial that you can consider using on your site.
a. Yoast SEO
Yoast SEO is the frequently encountered name in the world of SEO plugins. It’s the comprehensive plugin that enables you to make your content better, optimize keywords, set an SEO-friendly title and URL, and more. In short, this plugin helps you manage every aspect of your WordPress SEO to ensure its ranking on SERPs.
Major Highlights of Yoast SEO
- Automatic XML sitemap generation
- Internal link suggestion
- Google Preview option
- Redirect manager
All in One SEO is a powerful WordPress SEO plugin. It comes with an easy setup wizard so that you can easily set up the SEO features in no time. Most importantly, it offers you advanced SEO features like XML sitemaps, webmaster tools integration, competitor site’s SEO analysis, etc. to improve your SEO and outrank your competitors.
Major Highlights of All in One SEO
- Keyword optimization
- Automatic image SEO
- Social media integration
- Canonical URLs to prevent duplicate content
Step-8. Boost Your Site’s Speed
Your site’s speed is another important factor that determines the ranking of your website in the top positions of the SERPs. Additionally, fast page loading speed is also a crucial element that delivers a great user experience. Hence, if you want to steal the show then you should make efforts to improve your website’s speed.
For your information, we’ve already discussed some essentials that have a direct influence on your site’s speed like a good web hosting company to host your site, and quality themes & plugins. Further, there are several great speed optimization plugins and CDN (Content Delivery Network) services that can take your site’s speed to the next level.
So, next in our tutorial on how to build a website using WordPress, we’ll briefly discuss some of the best speed optimization plugins and CDN services.
Best WordPress Speed Optimization Plugins for Your Site
Your site’s speed is an important factor that affects the growth and success of your website. Thus, we would like to refer to some of the best speed optimization plugins for WordPress to boost your website speed.
a. WP Rocket
Just like its name, WP Rocket makes your WordPress site load fast like a rocket in a few simple clicks. This all-in-one speed optimization plugin provides amazing features to make your site blazing fast. Some of those features are lazy loading, image and database optimization, caching options, and many more.
Major Highlights of WP Rocket
- Page and browser caching option
- Cache preloading
- Integrated with CDN
- eCommerce plugin compatible
b. Hummingbird

Hummingbird is a robust speed optimization plugin for WordPress. This plugin allows scanning of your site to find out the reason that’s slowing it down. Plus, it also helps you to make critical speed improvements. Besides, it has a full-page, Gravatar, and browser cache tools to further speed up your site.
Major Highlights of Hummingbird
- World-class caching options
- Compatible with Smush image optimization plugin
- Position, minify, or combine JavaScript and CSS files
- GZIP compression
Best CDN Services for Your Site
Other than the speed optimization plugins CDN services can also make a great contribution to improving your website load times.
CDN refers to the network of servers distributed in different locations around the globe and contains a cached copy of your website data. So, whenever the users visit your site the data is delivered from the nearest server quickly and easily.
Some of the best CDN services for WordPress are briefly explained as given below:
a. Cloudflare
Cloudflare is a powerful CDN service for speeding up content delivery to your users. It has over 200+ data centers spread over 100 countries for the fast and reliable delivery of your content. Besides, Cloudflare also protects your website data from Distributed Denial of Services (DDoS) attacks.
Major Highlights of Cloudflare
- Advanced control over your content caching
- Reduces bandwidth cost
- Fast delivery of video
- Supports HTTP/3
b. StackPath
StackPath is yet another popular CDN service to speed up your site. It has real-time analytics features for tracking bandwidth usage, delivery by the network, and more. Further, it comes with built-in Asset optimization tools like GZIP compression, large file segmentation, etc. to make your content ready for delivery.
Major Highlights of StackPath
- Fast and reliable download of large files
- Protection against DDoS, and mitigation
- Private or Free SSL certification
- EdgeRules to set content delivery rules
Step-9. Manage Your Site’s Security
You need to understand that your site is vulnerable to security threats from hackers and other such malware attacks. So, once you set up your WordPress site, you’re solely responsible for the security of your website too.
For that reason, managing your site’s security is an important topic that we cannot afford to miss in this tutorial on how to build a website using WordPress. Fortunately, there are a handful of applicable tricks and tips for securing your WordPress website.
So, this is exactly what we’ll be discussing next in our WordPress website tutorial.
a. Strengthen Your WordPress Login Page
Your WordPress login page is the most vulnerable site where hackers can attack easily. So, to prevent hackers from gaining access to your site you need to create a strong username and password. Likewise, you can also integrate two-factor authentication into your site.
Note: You can use a WordPress plugin called Google Authenticator to incorporate the two-factor authentication to secure your site.
b. Backup Your Site Regularly
You never know when your website may be hacked, crashed, or face other malicious issues. So, it’s better to be prepared rather than to regret it. Hence, it’s wise to backup your WordPress site regularly and let your mind be at peace. You can use the WordPress plugins like UpdraftPlus, Duplicator, etc. for this purpose.
c. Keep Your Site Updated
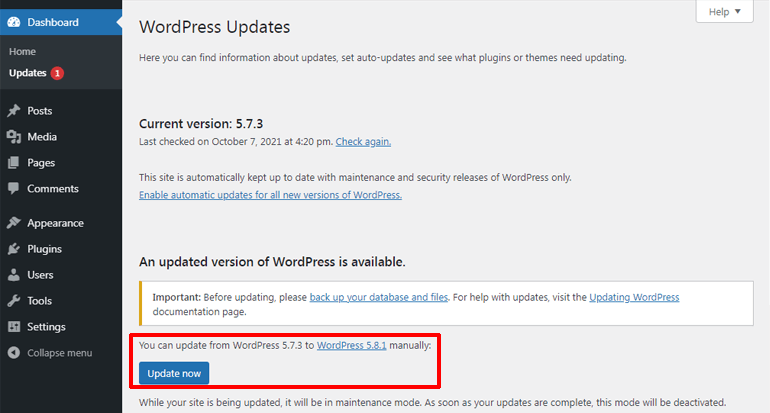
There is a release of the latest version of WordPress from time to time. The main purpose of the frequent update of WordPress is to protect your site from security vulnerabilities and enhance the existing features. So, make sure that you update your site regularly.
You can check for the release of the latest WordPress version from the Updates option of the dashboard. If the update is available simply hit the Update now button and your website will be upgraded automatically in no time.
d. Update Your Themes and Plugins
Just as for WordPress, there’s a frequent release of updates for the themes and plugins as well. Hence to avoid possible security threats, you also need to keep your installed themes and plugins updated.
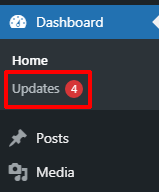
To check for the update information, go to the Updates tab from your dashboard as before.
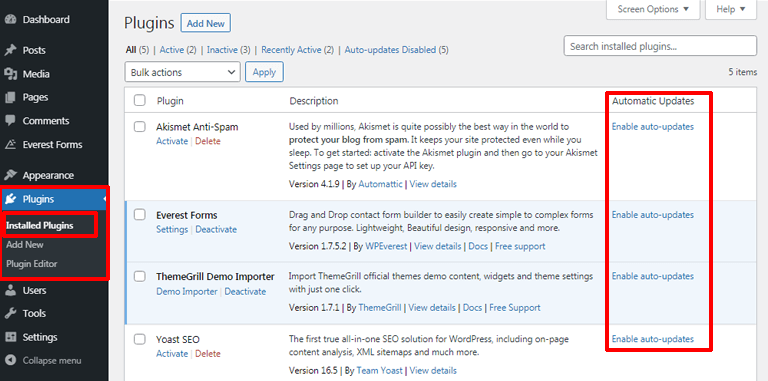
Alternatively, there’s also an auto-update feature available for plugins and themes nowadays. For plugins, you can go to Plugins >> Installed plugins and click on the Enable auto-updates link to enable its automatic update.
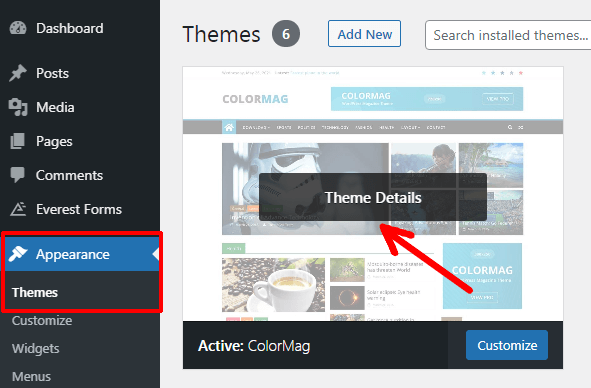
Similarly, for themes, go to Appearance >> Themes. Hover over the active theme and click on the Theme Details option.
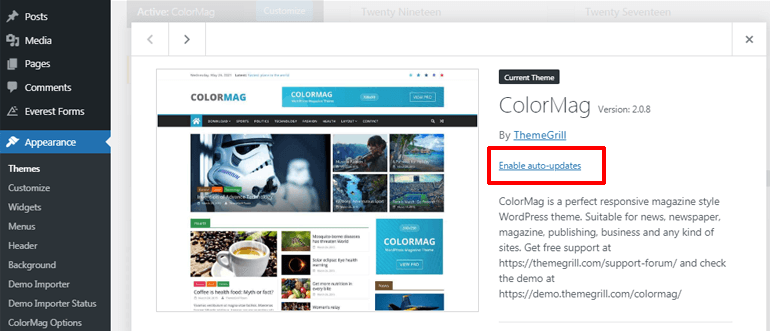
Now press on the Enable auto-updates option on the right-hand side to update it automatically.
Best WordPress Security Plugins for Your Website
Using a WordPress security plugin is yet another best solution to prevent your site from various security threats. It provides all the advanced security features that can help you to keep your site free from malware attacks. Now, let’s get to know some of the best security plugins for your site in this step-by-step guide on how to build a WordPress website.

Wordfence Security is amongst the most popular and complete security solutions available for WordPress. It comes with a firewall & malware scanner that identifies and blocks the malicious code, bad URL, spam, etc. on your site. Further, advanced manual blocking stops the suspicious network and human or robot activity.
Major Highlights of Wordfence Security
- Protection against leaked password
- Two-factor authentication
- Monitor hack attempts
- Real-time firewall rule and malware signature updates
b. All In One WP Security & Firewall
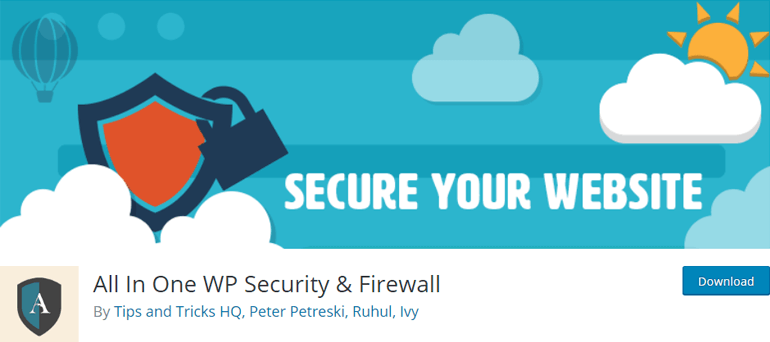
All In One WP Security & Firewall is a feature-rich yet 100% free security plugin. This plugin implements the best security practices and techniques to ensure that your WordPress site is free of any security vulnerabilities. Moreover, it protects your site against Brute Force Login Attack with a cookie-based login lockdown feature.
Major Highlights of All In One WP Security & Firewall
- Firewall protection via htaccess file
- Blocks malicious query strings
- Blocks spam comments
- Prevents fake Googlebots from crawling your site
Step-10. Getting WordPress Support and Help
Well, you may know how to build a WordPress website but what if you face issues while using it? No doubt that WordPress is a user-friendly CMS platform. However, you may need to overcome some obstacles occasionally while using it and that’s when you’ll need support and help.
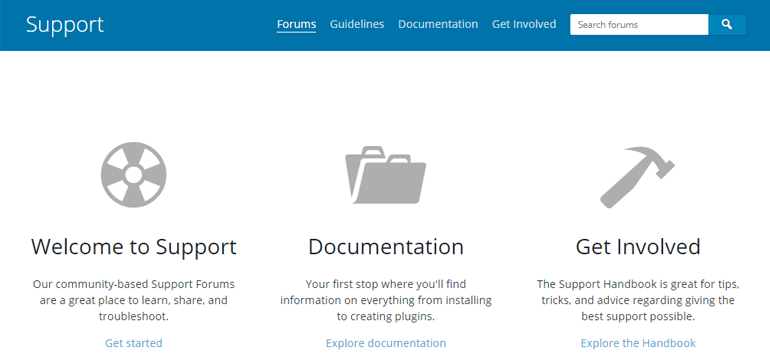
Relax! There are several ways to get WordPress support and help. And, one of the easiest ways is to visit the WordPress.org Support page. Here, you can find different types of support like forums, documentation, and handbooks for getting tips and advice relevant to WordPress.
Additionally, you can also search for WordPress blogs that can help you get answers to your queries. For instance, our WPEverest blogs provide handy tips & tutorials relating to WordPress. Other such blog websites include ThemeGrill, Zakra, WPBeginner, etc.
Likewise, you may also need help with WordPress themes and plugins installed on your site. In such cases, you can reach out to product-specific support forums available in the respective WordPress.org theme or plugin page.
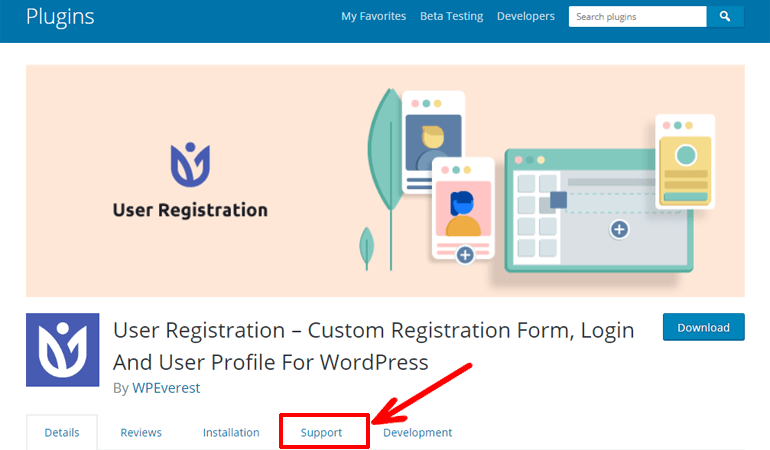
For instance, to get the support for the User Registration plugin visit the respective WordPress.org plugin page and click on the Support tab to go to its support forum page. And, if you cannot find an answer to your queries, you may also create a topic.
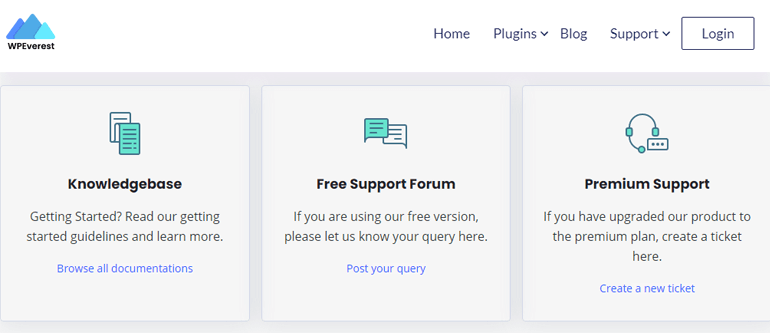
Moreover, you may go to the official theme and plugin website where you can get dedicated customer service. For our WPEverest plugins (Everest Forms & User Registration), you can get help via support forum, ticketing system, and live chat. Further, the knowledge base covers all the information from experts for getting started.
Conclusion
We believe that there cannot be any cheaper and easier way of setting up a website other than using WordPress. It’s a flexible website building platform perfect for advanced users as well as absolute beginners who want to create their own website without any technical skills.
So, let’s quickly revise the steps on how you can build a website using WordPress once again.
- Getting a domain name and hosting
- Installing WordPress and logging into WordPress dashboard
- Choosing a WordPress theme and installing it
- Adding posts and pages
- Customizing site’s main settings
- Enhancing features with plugins
- Improving website’s SEO
- Boosting site’s speed
- Managing the site’s security
- Getting WordPress support and help
And that’s a wrap for our WordPress website tutorial! Hopefully, now you know how to build a website using WordPress.
Please don’t forget to share this post on social media platforms if you thought it was helpful enough.
Have any say on this? You can leave your thoughts in the comment section below. Also, make sure to follow us on Twitter and Facebook for more updates.


![Zakra 3.0 | Zakra Pro 2.0 Release [Major Updates!]](https://i.ytimg.com/vi/g3rifl7kWvg/maxresdefault.jpg)