A key measure of securing your WordPress website is to prevent spam registration.
Doing this blocks all the registration attempts made by spam bots through the registration form.
Besides protecting your site from malicious intent, it also saves you from the headache of dealing with never-ending spam registrations.
This article will explore some easy ways to prevent WordPress spam registration.
Before that, let’s learn why it’s essential to stop spam registration and the best tool to help you do so.
Table of Contents
Why is it Important to Block WordPress Spam Registration?
Spam bots target the registration forms on your site by sending a large number of registrations within a short period.
It’s obviously a hassle to deal with such spam submissions. Here are a few more reasons why you should prevent spam registration in WordPress.
- Leaving spam registrations unchecked gives spam bots access to various parts of your site. This will compromise your site’s security significantly.
- All the fake registrations in your website’s database weigh it down and harm its overall performance.
- Spam registration lets spam bots post unwanted content in your comment and review section. This may affect your professional reputation among genuine users.
That’s why we also recommend enabling anti-spam protection for your registration forms.
Best Way to Prevent Spam Registration in WordPress
When it comes to preventing spam registrations, WordPress offers multiple solutions.
You’ll find anti-spam plugins that are designed solely for eliminating spam issues. On the other hand, there are registration form plugins that offer anti-spam features.
And one of the best plugins to stop WordPress new user registration spam is User Registration.

As the name suggests, it’s a registration form plugin that lets you create custom registration forms.
With its user-friendly drag-and-drop builder, you can build event registration forms, course registration forms, etc., in no time!
And if you’re a WooCommerce store owner, you’re in for a treat! User Registration provides a WooCommerce add-on to help create custom WooCommerce registration forms. No coding is needed at all!

Most importantly, you’ll be able to prevent spam registrations with its advanced security features against spam. Specifically, you get three anti-spam features:
- reCAPTCHA/ hCaptcha integration
- Anti-spam honeypot
- Whitelist domain registration
Thus, we recommend this incredible plugin for you to create custom registration forms and protect them from spam.
How to Prevent Spam Registration on WordPress?
User Registration offers three anti-spam features for your custom registration forms.
So, in this guide, we’ll show you how to use these features to prevent spam registrations.
Before proceeding, let us inform you that anti-spam honeypot and whitelist domain registration require the pro version of this plugin.
However, you can still integrate your forms with reCAPTCHA and hCaptcha through the free version.
With that said, let’s begin!
1. Adding reCAPTCHA or hCaptcha to The Registration Form
The first way to protect a registration form from spam is by adding reCAPTCHA or hCaptcha.
If you’re unfamiliar with CAPTCHA, it’s simply a tool to determine whether a user is a human or a bot.
There are various types of CAPTCHAs, so the method each CAPTCHA uses to separate a bot from humans is also different.
Just follow the steps below, and you’ll be able to implement CAPTCHA integration in your form in no time.
I. Install Free User Registration Plugin
The very first thing you need to do is install and activate User Registration on your website.
Since reCAPTCHA and hCaptcha integration is available in the free version, you can just install the free plugin.
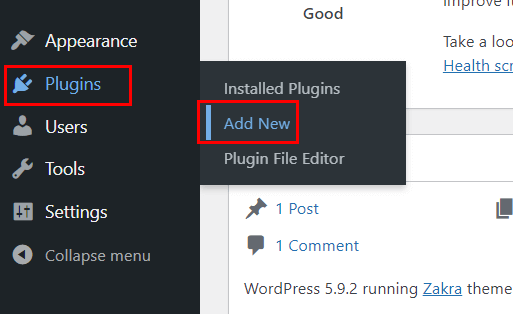
To do that, log into your WordPress dashboard. Navigate to Plugins >> Add New.
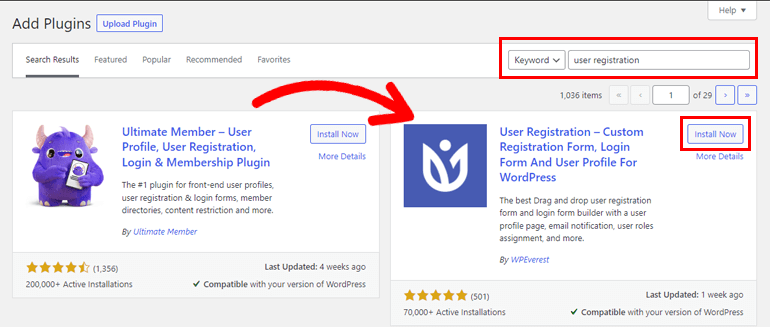
Now, search for the plugin and click on the Install button once it appears in the results.
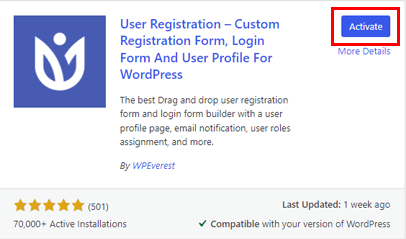
Then, Activate the plugin.
After the activation is complete, you’ll arrive at the Setup page. Here, you can either complete the setup or skip to the dashboard.

If you’re a new user, we recommend completing the setup process.
One thing you must not miss during setup is the Anyone Can Register setting. Enabling this option allows users to register on your site with a front-end form.
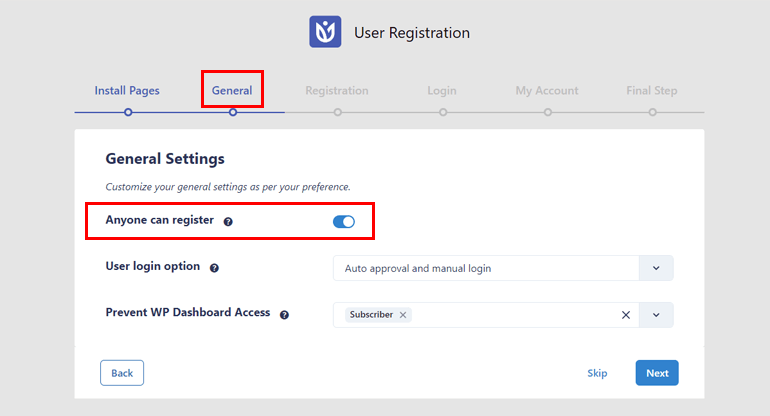
Otherwise, your users won’t be able to access the registration form.
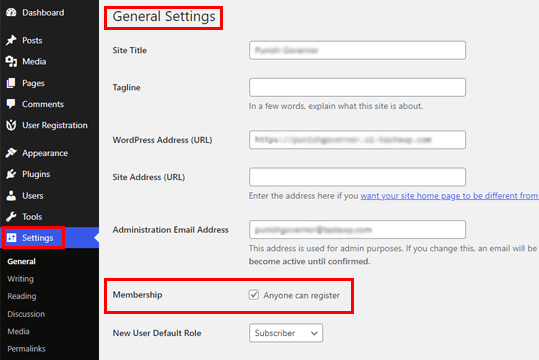
If you’ve already skipped the setup, navigate to Settings >> General. Tick the checkbox for the Membership option, and you’re done!
II. Create a New Registration Form
Next, you must create a registration form where you can enable CAPTCHA protection.
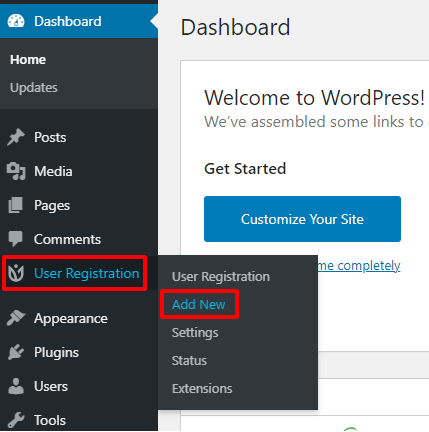
Go to User Registration >> Add New, and you’ll be taken to the form builder.
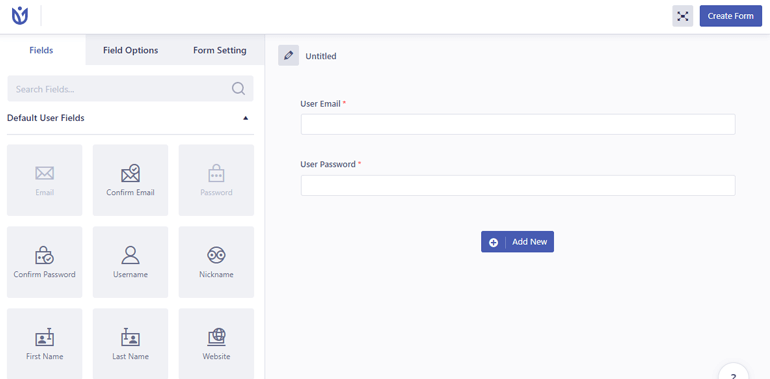
You can simply drag and drop the necessary fields to create a custom registration form.
Refer to our guide on creating a registration form with User Registration if you need help.
III. Integrate the Registration Form with reCAPTCHA or hCaptcha
After completing the registration form, open Settings >> Integration under the User Registration tab.
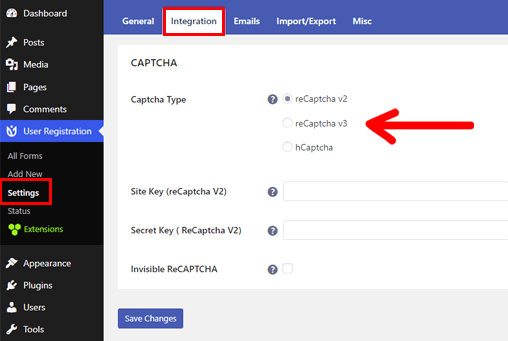
Here, you’ll find the three CAPTCHA types you can protect the registration form with:
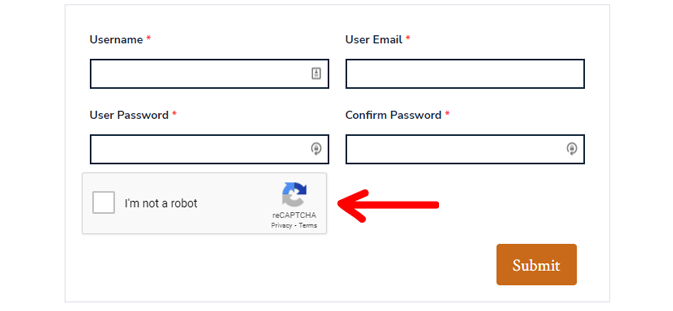
reCaptcha v2: This CAPTCHA asks users to tick an “I am not a robot.” checkbox or complete image challenges. It then analyzes the user’s actions to tell humans and bots apart.
reCaptcha v3: reCaptcha v3 works in the background and doesn’t ask users to perform any challenges.
It analyzes how a user interacts with your website and generates a score depending on the interactions. This score determines whether the user is human or not; a higher score indicates a genuine user.
hCaptcha: hCaptcha is similar to reCaptcha v2. But unlike v2, it doesn’t sell user data to third parties.
You can add any one of these CAPTCHAs depending on your requirements.
For a detailed guide, you can refer to our article on integrating CAPTCHAs with registration and login forms.
Adding reCAPTCHA to Registration Form
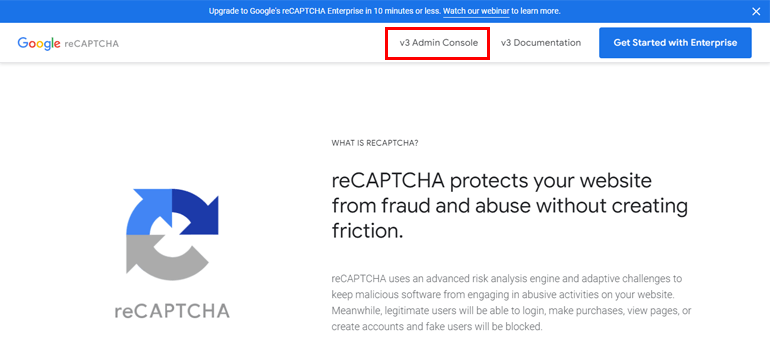
First, you must get the Site Key and Secret Key for reCAPTCHA from the official Google reCAPTCHA page.
Click on v3 Admin Console on this page and log into your Google account.
Once signed in, you’ll arrive at the Create page, where you can register your website. The website you register must be the one where you want to display the CAPTCHAs.
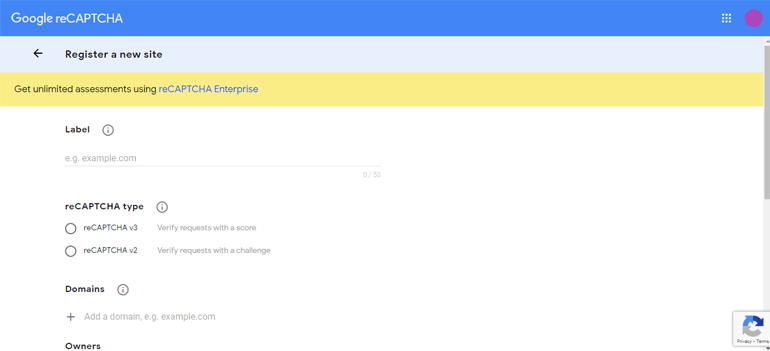
Enter the Label and choose between reCAPTCHA v2/v3.
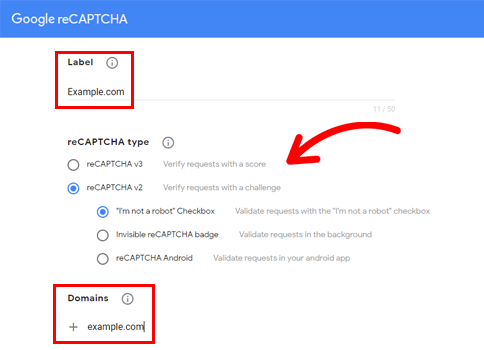
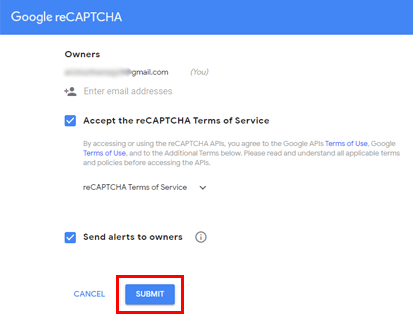
Then, enter the Domains, accept the terms and conditions, and click Submit.
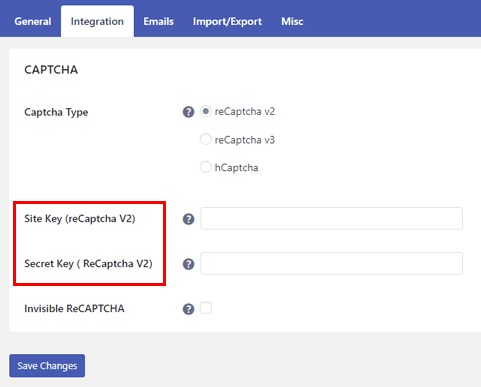
Google reCAPTCHA automatically generates a Site Key and Secret Key for you.
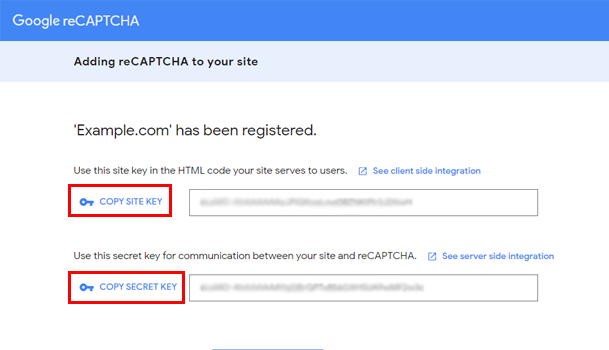
So, copy them and head back to User Registration >> Settings >> Integration.
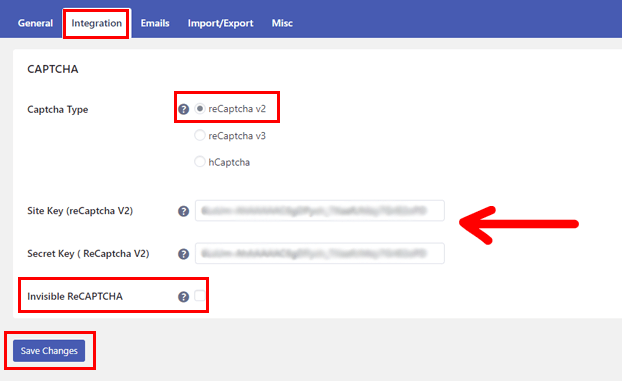
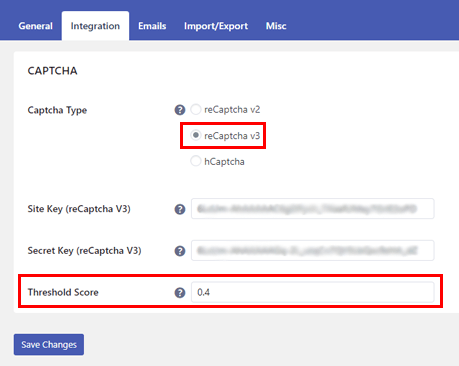
Now, choose the CAPTCHA Type you generated the keys for. Next, paste the keys into the respective fields and hit Save Changes. For reCaptcha v2, you get the choice to make it invisible.
For reCaptcha v3, you get to set a custom Threshold Score.
Adding hCaptcha to Registration Form
Likewise, you require the Site Key and Secret Key for hCaptcha.
You can get them from the official hCaptcha page.
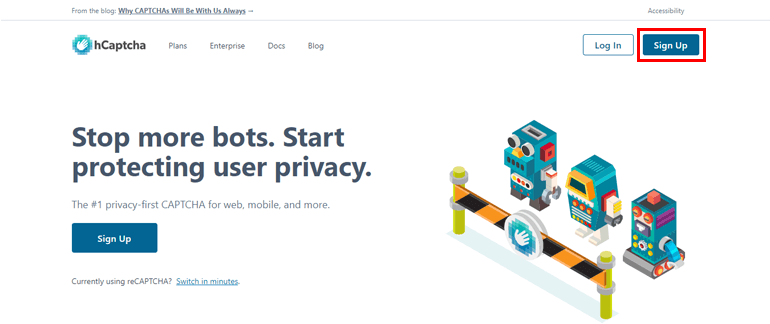
Click on Sign Up and choose Add hCaptcha to your service (free).

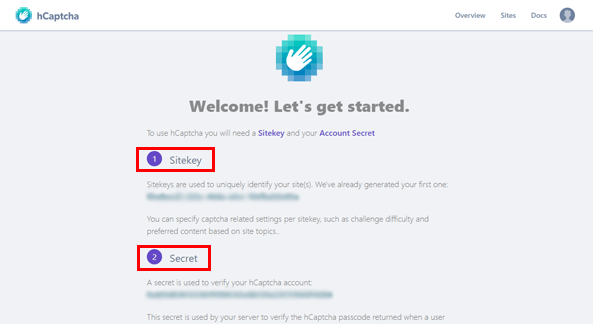
Complete the signup process, and hCaptcha automatically generates both Site Key and Secret Key.
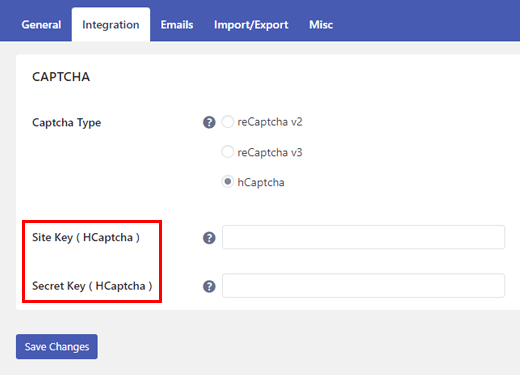
Copy these keys and go back to User Registration >> Settings >> Integration.
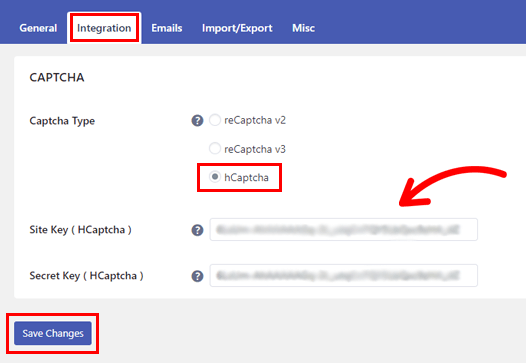
Choose hCaptcha in the CAPTCHA Type option, paste the keys, and save the changes.
IV. Enable CAPTCHA Protection for the Form
With the integration done, you still need to enable CAPTCHA protection for the registration form.
You can enable this protection for any form you’ve created with User Registration.
So, open the previously created registration form and go to its Form Setting.

In the General section, you’ll find the Enable Captcha Support option. Just tick the checkbox and click Update form.
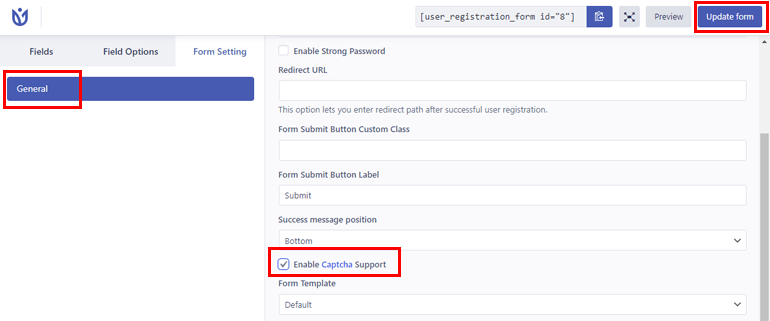
That’s it! You’ve successfully integrated your registration form with CAPTCHA and protected it from spam.
2. Using Anti-spam Honeypot
The second way of preventing WordPress new user registration spam in User Registration is its anti-spam honeypot feature.
It uses the honeypot technology to add an invisible field to the registration form. The hidden field is only visible to spam bots.
So, the form immediately detects and blocks a spam bot that submits the form with the field filled.
Follow the simple steps below to secure your registration forms with this method.
I. Install and Activate User Registration Pro
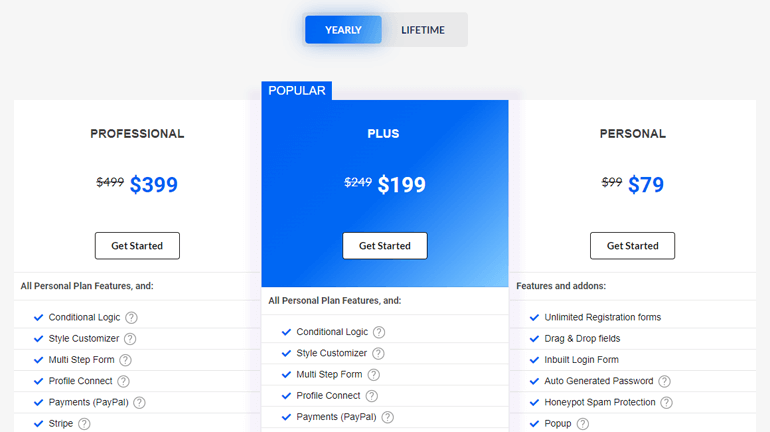
You’ll need User Registration Pro to activate anti-spam honeypot protection. So, go to User Registration’s official pricing page and purchase a suitable plan.
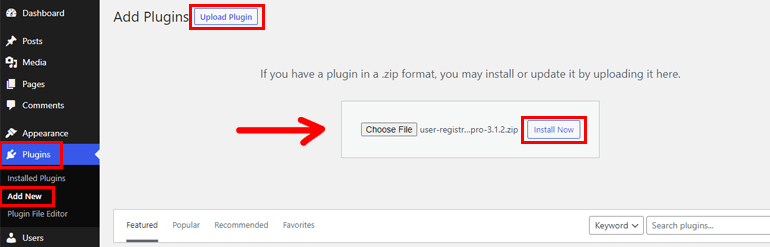
Once that’s done, log into your account and open Downloads. Here, find the User Registration Pro zip file and download it.
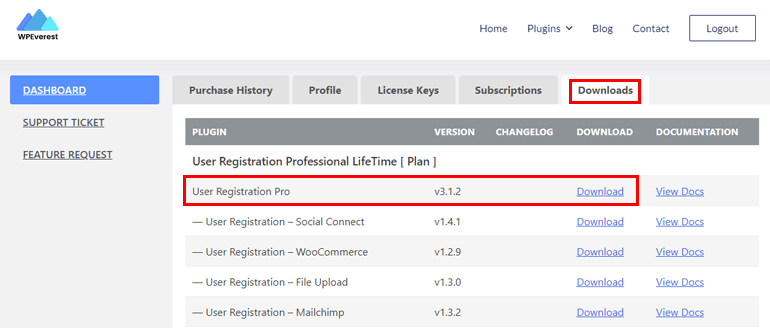
Back in your WordPress dashboard, go to Plugins >> Add New >> Upload Plugin and upload the file. Then, install and activate it.
Note: Similar to User Registration free, the pro version also asks you to set up the plugin. Whether you proceed with the setup or skip, don’t forget to enable the membership option.
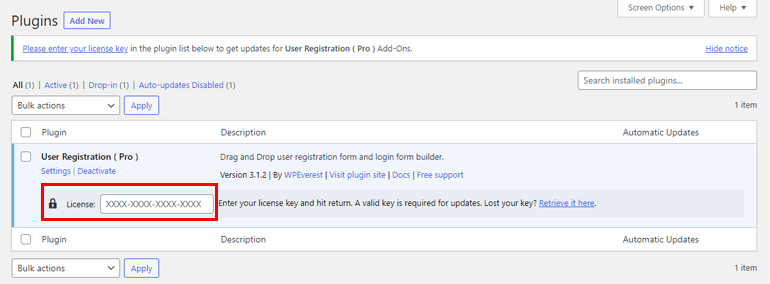
After that, copy the License Key from your account dashboard.
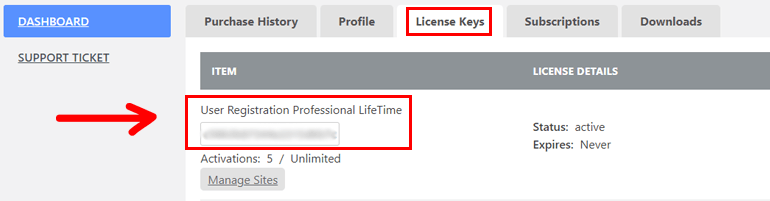
Next, go to the Plugins page and paste it into the field under User Registration Pro. Just hit enter, and your pro license will be activated.
And that’s it! The User Registration Pro setup is complete.
II. Enable Anti-spam Honeypot
Now, open the registration form you previously created. In the form builder, navigate to Form Setting >> Extras.
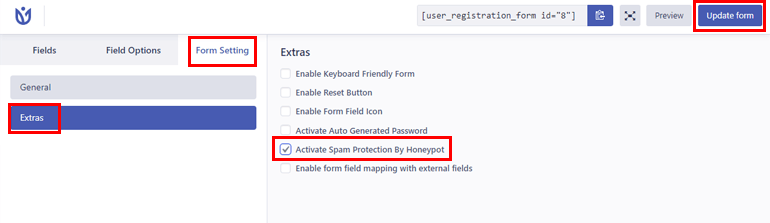
Here, you’ll find the Activate Spam Protection by HoneyPot option. Just tick the checkbox for it and click Update form.
That’s all you have to do to protect the registration form from annoying spam.
3. Using Whitelist Domain Registration Feature
With the whitelist domain registration feature, you can allow users with only specific email domains to fill out and submit the registration form.
Alternatively, you can also blacklist certain domains. This restricts users with the blacklisted domains from registering.
You can do this in two simple steps as explained below.
I. Install and Activate User Registration Pro
Similar to the Honeypot feature, you must have User Registration Pro set up on your site to access the Whitelist Domain feature.
So, follow the steps detailed in the section above to properly install and activate User Registration Pro.
You can then move ahead to the final step.
II. Enable Whitelist Domain Feature
First, open the registration form where you want to enable this option. Then, navigate to Form Settings >> Extras in the form builder.
In the list of options, you’ll see the Enable Whitelist/Blacklist Domain option. Tick the checkbox to enable this feature.
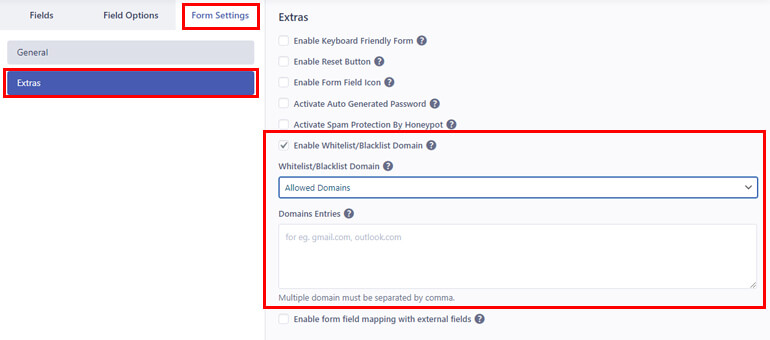
Choose whether you want to set Allowed Domains or Denied Domains from the dropdown.
In the Domains Entries textbox, list all the domains you want to allow or deny registration accordingly, and click Update form.
You must list only genuine domains such as gmail.com, outlook.com, etc. for the allowed domains. You can enter multiple domains; just separate each domain with a comma.
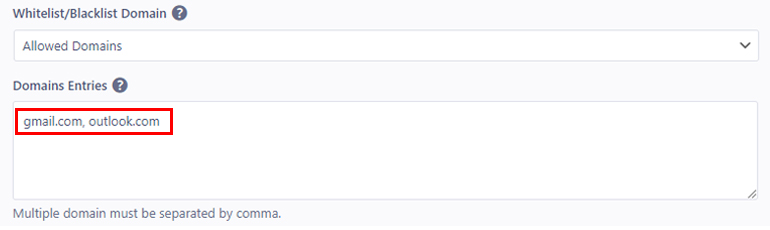
Thus, only the users with the whitelisted email addresses can register through the form. The domains not listed here are automatically restricted.
In case of Denied Domains, the email domains listed are restricted while the domains not listed are allowed to register on your site.
This way, you can quickly enable spam protection for registration forms through whitelisted or blacklisted domains.
Some FAQs About Preventing Spam Registrations in WordPress
How do I stop spam users from registering in WordPress?
There are commonly three ways to stop spam users from registering on your site.
You can protect your registration form with CAPTCHAs, whitelist or blacklist specific domains, or enable the anti-spam honeypot method.
How do I block a new user registration in WordPress?
If you want to entirely stop new user registrations, go to Settings >> General on your website’s admin dashboard.
Disable the Membership feature by unchecking the Anyone can register option.
This blocks new registrations from the default WordPress registration forms or third-party form plugins like User Registration.
How do I stop registration bots?
You can stop registration bots by verifying new registrations by email, using CAPTCHAs, using security plugins, etc.
How do I remove spam users from WordPress?
You can clear spam users from your database from the Users tab in your admin dashboard. Just bulk select the spam users and delete them with one click.
Does WordPress have spam blockers?
WordPress, by default, doesn’t have built-in spam blockers. However, you can use WordPress anti-spam plugins and security plugins to prevent spam registrations.
Wrapping Up
If you want a secure site, you must prevent WordPress spam registrations. Doing so blocks any fake registration and protects your site from malicious attacks.
A registration plugin like User Registration helps you build registration forms and enforce strict protection against spam bots.
For complete protection, you can use its reCaptcha or hCaptcha integration, anti-spam honeypot feature, and whitelist domain feature together.
If you just want spam protection, you can try anti-spam plugins instead.
You might also want to enable strong passwords during registration, create custom login URLs, and approve users after registration for extra layers of security.
And that’s it for this article! You can explore our blog for more WordPress-related articles. Also, follow us on Twitter and Facebook to receive updates on new posts.


![Zakra 3.0 | Zakra Pro 2.0 Release [Major Updates!]](https://i.ytimg.com/vi/g3rifl7kWvg/maxresdefault.jpg)