Want to learn how to create a customer support form in WordPress? Let us help you with an easy step-by-step guide that’ll assist you in making one for your WordPress website.
Customers are the most important part of any business. Therefore, to keep customers happy and satisfied, providing better customer service is very crucial.
There are so many ways to provide better support to a customer. Customer support forms on your websites, being the most modern ones.
But before we jump right into the subject, let’s have a brief description of why you require a WordPress support form.
Table of Contents
Why Create Customer Support Form in WordPress?
As mentioned earlier, if you want to support your customers through your website, a customer support form is a must-have component. There are so many benefits of adding a customer support form in your WordPress website such as:
- A customer support form enables you to engage in meaningful conversations across every channel, with every customer.
- It simplifies the user experience and puts customers back in control by offering them the expected support in their area of choice.
- It helps in building your email marketing list.
That’s why you need a support form as a business owner. And when it comes to building a form, Everest Forms is hands down the best form builder plugin you could ever come across.

The plugin offers a wide range of free pre-built templates which makes your form-creation process much easier and quicker. Likewise, you can use its customer support form template and customize it in no time.
So, without any further delay, let’s build a support form in WordPress using Everest Forms.
How to Create Customer Support Form in WordPress?
Step 1: Install and Activate Everest Forms
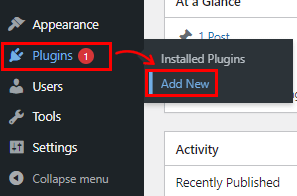
To get started, login to your WordPress dashboard and navigate to Plugins >> Add New.
Type Everest Forms in the search bar. After you find Everest Forms in the search results, click the Install Now button and Activate it.
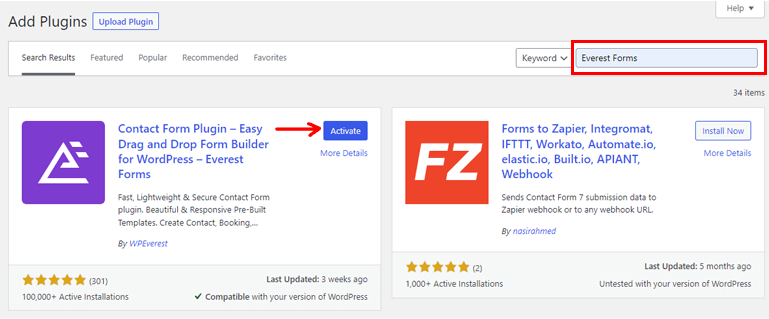
The free version of Everest Forms is now installed successfully.
Step 2: Create Customer Support Form in WordPress
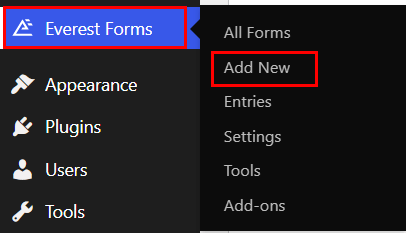
Once you’ve installed and activated Everest Forms, go to Everest Forms >> Add new.
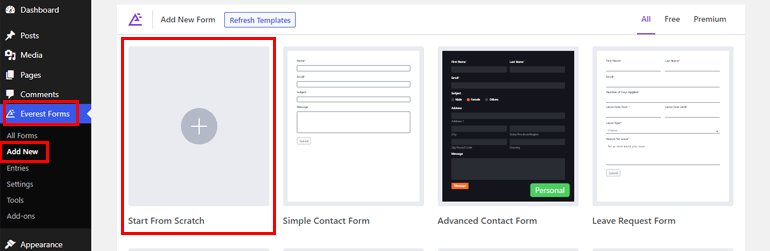
In the Add New Form page, you’ll find a collection of pre-built form templates as well as an option to start from scratch.
Creating a Customer Support Form from Scratch
Building a customer support form from scratch can be time-consuming and requires extra effort since you’ll be adding all the required fields on your own. However, if you’ve got time, it shouldn’t be that hard.
So, for that navigate to Everest Forms >> Add New from your WordPress dashboard. Then, click on Start from scratch.
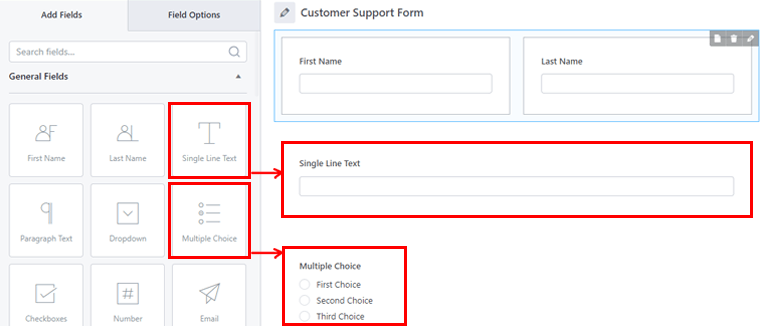
After that, start adding necessary fields such as Multiple Choice, Single Line Text, etc. using the drag-and-drop method. You can further customize the form according to your requirements.
Creating a Customer Support Form using Pre-Built Template
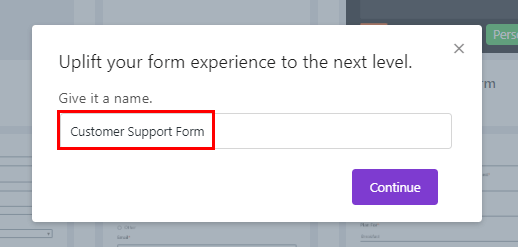
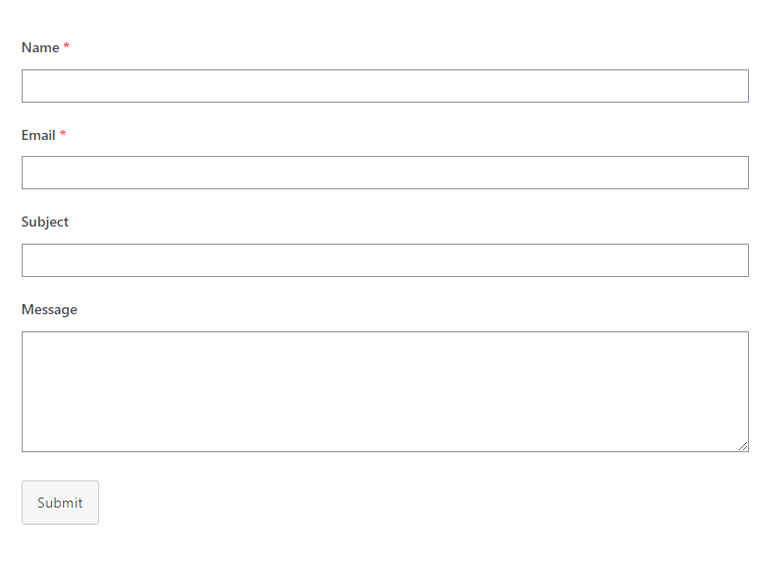
In the Add New page, search for the “Simple Support Form” template. It has all the important fields that you’ll require for your customer support form.
Now, just name your support form. Here, we’ll name it “Customer Support form” and press Continue.
As you can see, all the fields required for a simple support form are already added to the form.

If you wish to add more fields, you can simply drag your desired field and drop it into your form.
Step 3: Customizing your Customer WordPress Support Form
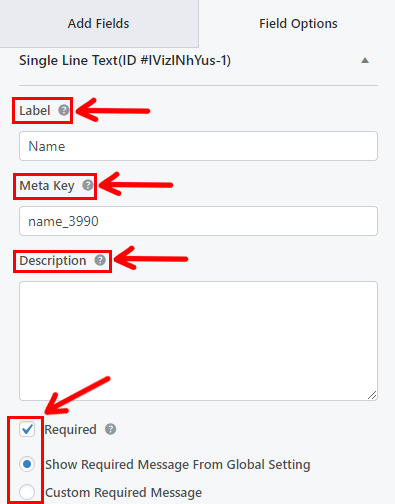
Regardless of which method you choose to create the form, you’ll be able to customize the form without any hassle. You just have to click on the Field and its Field Options will appear on the left.
Here, you can make changes in the field options as explained below:
- Label: You can change the field’s label by entering what you want your label to be.
- Meta Key: Meta key stores the field data in your database and retrieves it when necessary.
- Description: You can enter text for the form field description here.
Next up, you can tick the Required checkbox if the field is compulsory. You can also add a Required Field Message along with it.
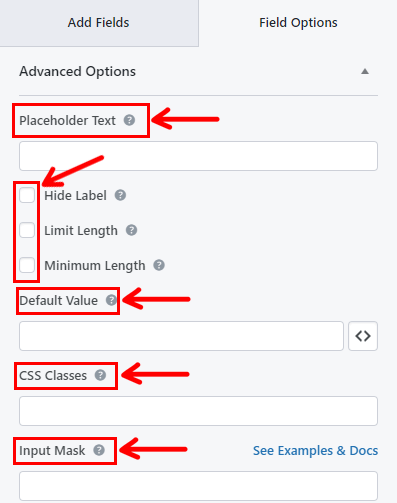
Now, scroll down for the Advanced Options where you’ll find:
- Place Holder Text: You can enter the text for the form field placeholder. For example, we’ve written, “Type your message here.”
- Default Value: Here, you can enter text for the default form field value or simply choose the required field by clicking on the <> button.
- CSS Classes: You can also add custom CSS classes for further customization.
But remember that the customization options for each field is different. So, customize each field in the form as required. Finally, you can hit the Save button.
Step 4: Configure Your WordPress Support Form Settings
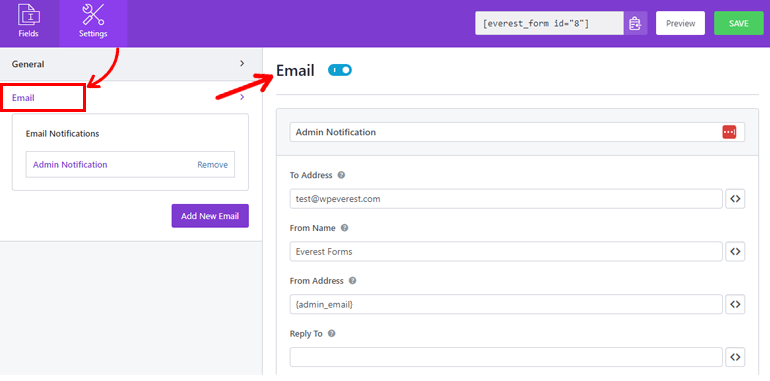
After your customer support form is ready, open the Settings tab of the form to configure its settings. Here, you’ll find 2 sections with various customization options.
- General: With the General settings, you can edit the Form Name, Form description, Form disabled message, Successful form submission message, and so on.

- Email: The Email settings allow you to create admin and user email notification templates.
Step 4: Display Your WordPress Support Form on the Website
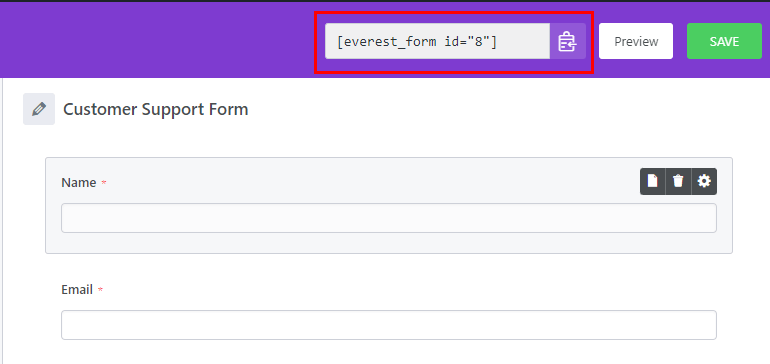
You’ve successfully created your form using Everest Forms to create a customer support form. But it won’t be visible to your users unless you display your form on your WordPress website.
The first way to display the form is by using its shortcode. For that, copy the shortcode from the top of the form builder.
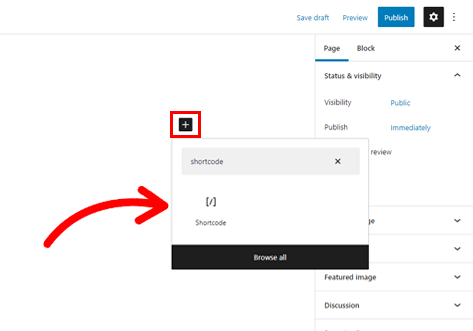
Then, create a new page or post, and you’ll get to the Gutenberg editor.
Press the Add Block (+) icon and search for the Shortcode block. Simply click on the block to add it to the page or post.
Finally, paste the shortcode you just copied into the block, and click on the Publish button.
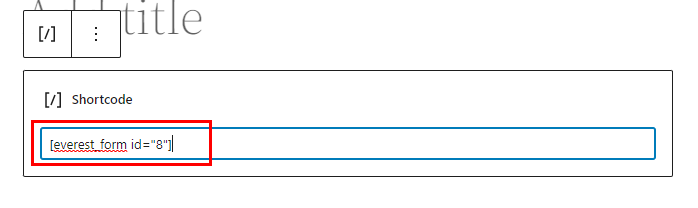
That’s it! Your form will be displayed on your site.
Alternatively, you can use the Everest Forms block to display your form. Click on the Add Block (+) button and search for the Everest Forms block.
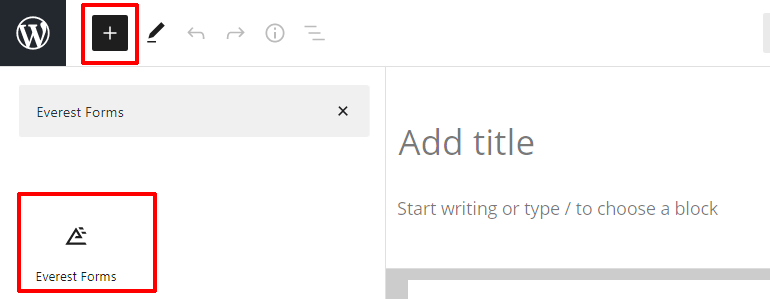
Add it to the page and select your WordPress customer support form from the drop-down.
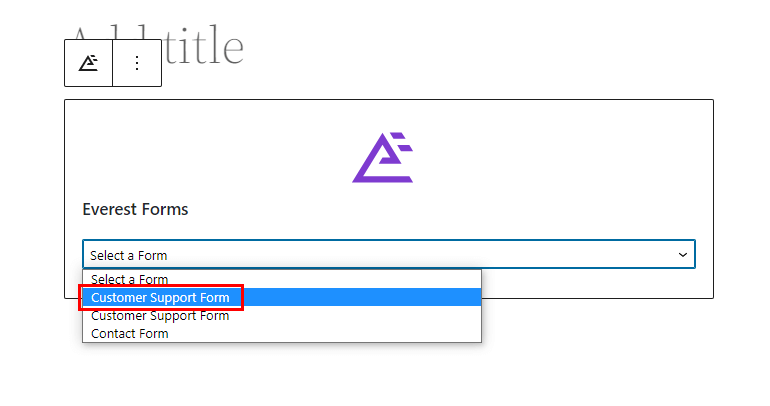
Finally, you can hit the Publish button at the top.
Wrapping Up!
And that’s a wrap for our guide on how to create a customer support form in WordPress. Everest Forms lets you easily create and customize customer support forms for your WordPress site. It’s even quicker with the pre-built form template it offers.
The free version of Everest Forms alone can do a lot. However, if yo u wish to unlock more features and add-ons get started with Everest Forms Pro.
You can use this powerful plugin to add WYSIWYG field in WordPress forms, enable entry preview in multi-part forms, and more.
Read more about Everest Forms on our blog if you’re interested. You can even check our YouTube channel for easy video tutorials.
Also, don’t forget to follow us on Facebook and Twitter for future updates.


![Zakra 3.0 | Zakra Pro 2.0 Release [Major Updates!]](https://i.ytimg.com/vi/g3rifl7kWvg/maxresdefault.jpg)