If you’re planning to restrict content on your WordPress website, you must know how to do so for registered users as well. When we think of content restriction, we assume it’s only to keep non-registered users out.
But what if we told you that you could give varying levels of access to registered users on your site? Well, it’s possible with the incredible User Registration plugin.
Thus, in this article, we’ll be guiding you on how to restrict content to registered users only in WordPress using User Registration. So, let’s get started.
Table of Contents
Best Way to Restrict Content in WordPress to Registered Users Only
Restricting content based on WordPress user roles is quite common. WordPress comes with six default user roles that you can assign to the users on your site based on the varying levels of access you want to grant them.
However, you might need to place more levels of restriction, such as email domains, registration source, etc., for your registered users. And if you weren’t aware, WordPress doesn’t facilitate this option by default.
That’s why you’ll need a WordPress plugin like User Registration, a free registration form builder plugin, for that.
User Registration comes with a highly user-friendly drag and drop form builder to help you create custom forms with custom fields in no time. Not to mention the ease of customization and configuration due to its intuitive interface.
But what about content restriction? Well, the User Registration WordPress plugin offers the Content Restriction add-on to help you restrict access to registered users based on specific criteria.
You can place the most basic level of restriction on your entire website or specific pages and posts. Otherwise, you can create custom access rules for advanced content restrictions.
So, there’s no doubt that the User Registration plugin is the best way to restrict content to registered users in WordPress.
And how do you that? To answer your question, we’ve prepared the following step-by-step guide on restricting content to registered WordPress users only. Now, let’s jump right into it!
How to Restrict Content in WordPress to Registered Users?
It’s easier than you can imagine restricting content in WordPress, especially when using the User Registration plugin. You just have to follow and implement the following steps carefully:
1. Install and Activate User Registration Pro
Before we dive into content restriction, you’ll need the User Registration Pro plugin installed and activated on your website.
The Content Restriction add-on is an extension available only in the premium version of the User Registration plugin. User Registration Pro is a standalone plugin that you can use by buying any of User Registration’s premium plans. Once you’re a premium user, you can access the Content Restriction add-on file to use for your website.
So, head on over to the User Registration’s official pricing page and choose the plan best suited for you. Then, log into your account through the link sent to the email address you provided during the purchase.
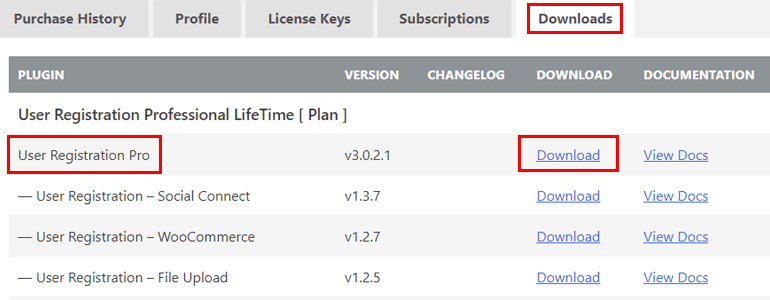
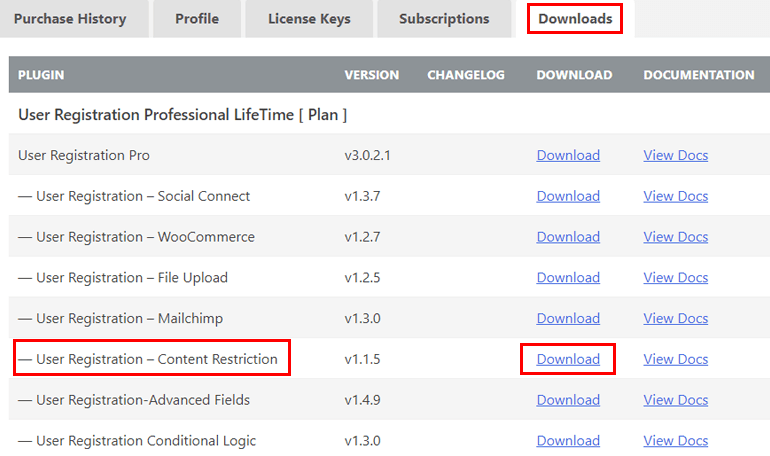
In your account dashboard, you’ll see your license key as well as the downloadable premium add-ons. Find the User Registration Pro file under the Downloads tab and download the ZIP file on your device.
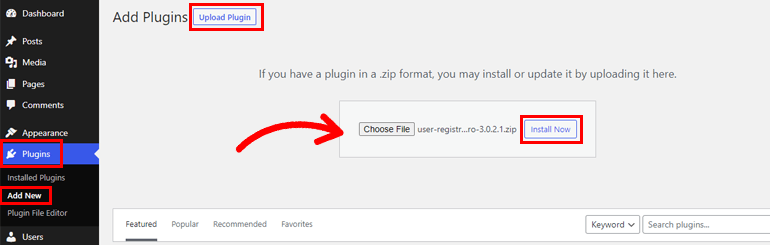
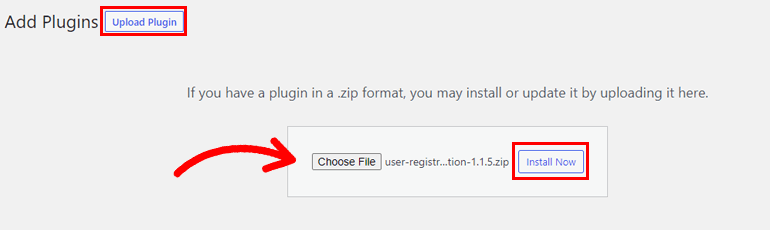
Back in your WordPress dashboard, navigate to Plugins >> Add New >> Upload Plugin. Then, choose the file you just downloaded and click the Install Now button.
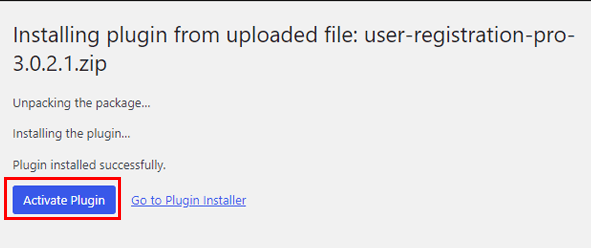
Right after the installation is complete, press the Activate Plugin button to activate User Registration Pro on your site.
2. Download and Install the Content Restriction Add-on
Next, you’ll have to download and install the Content Restriction add-on. It simply adds content restriction functionalities to the core plugin.
So, go to your WPEverest account again and download the Content Restriction ZIP file from your Downloads tab.
Now, install and activate the add-on file as you did with the User Registration Pro file.
If you go to the Plugins >> Installed Plugins page, you’ll see that a field under the User Registration (Pro) plugin asks for your license key.
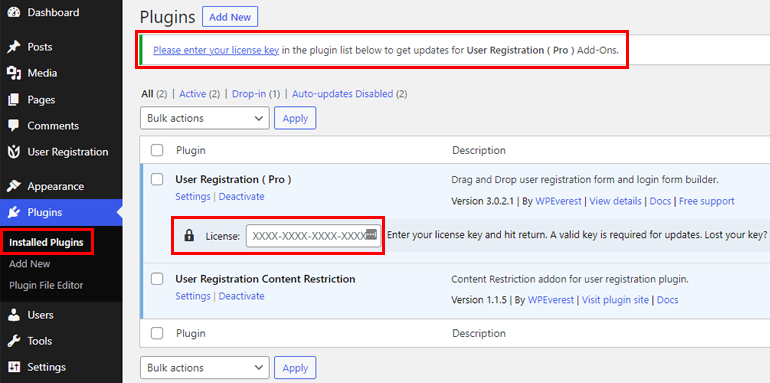
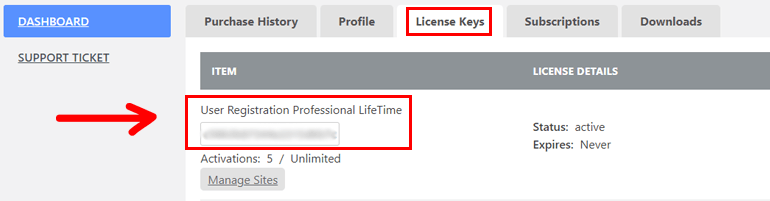
Remember the License Keys tab on your account dashboard? You just have to copy the key and paste it into this field. We recommend doing this without fail since it’s the key to getting regular updates for all premium User Registration add-ons you’re using on your site.
And with that, you’ve successfully installed both the free version of the User Registration plugin as well as the Content Restriction add-on.
3. Restrict Content to Registered Users
Before we start with the content restriction, make sure you have the Membership option on for your users.
If you haven’t already done that, simply open Settings from the left and go to the General section. Here, you’ll see the Membership option, which enables or restricts users from registering with a front-end form.
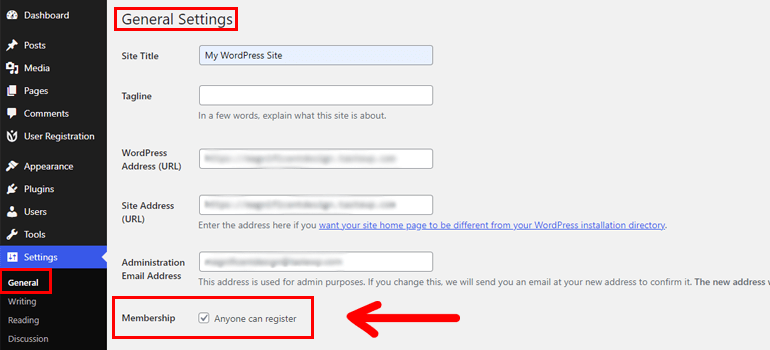
Now, all you have to do is tick the checkbox.
This is important because User Registration’s core purpose is to build registration forms through which users will register on your website. Thus, this step is mandatory if you plan to add front-end registration forms to your website using this plugin.
You’re now ready to actually apply content restrictions to registered users on your website.
But wait, where’s the registration form to register users in the first place? Well, you can use the default form the plugin comes with if you’re short on time.
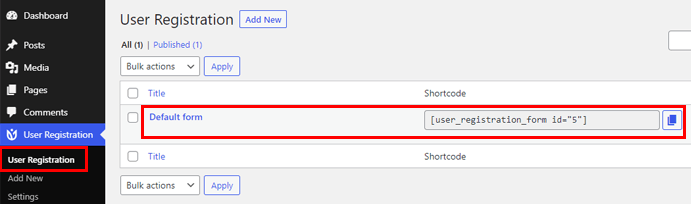
However, if you’d like to build a custom and detailed registration form for your site, then check our complete guide on how to create a registration form in WordPress.
Once you’re done, you can proceed with the rest of this guide.
Currently, there are two ways you can restrict content to registered WordPress users with User Registration. We’ve discussed both of them in detail below.
I. Enable Basic Content Restriction
For those looking for basic content restriction, User Registration has it covered. You can choose between full content restriction and partial content restriction.
We’ll walk you through both full content and partial content restriction to help you understand how to implement them on your site.
Full Content Restriction
Restricting full content means revoking access to an entire page or post based on specific criteria. You can apply a full content restriction to individual pages and posts or make global rules.
Global Settings
If you want to apply the same restriction rules to all the pages and posts on your website, this is the way to go.
Simply navigate to the User Registration section on the left side of your WordPress dashboard.
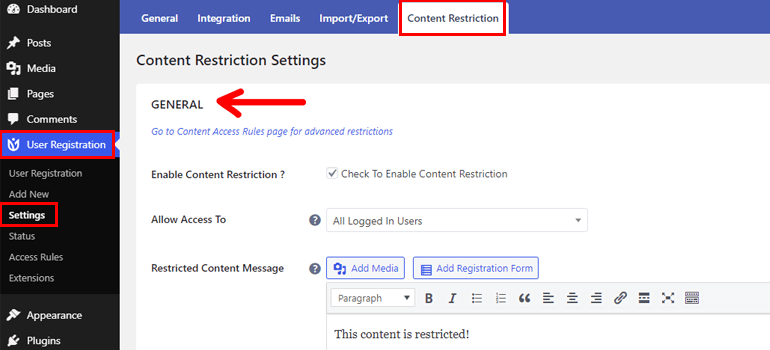
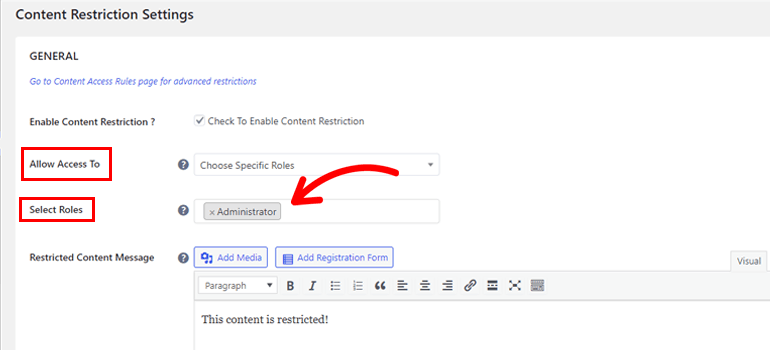
Open Settings and click on the Content Restriction tab. Here, you’ll be able to set General content restrictions to your entire website content.
First, tick the checkbox to Enable Content Restriction. After that, from the dropdown, choose the criteria to allow access to your content. You can choose from All Logged In Users, Choose Specific Roles, and Guest Users.
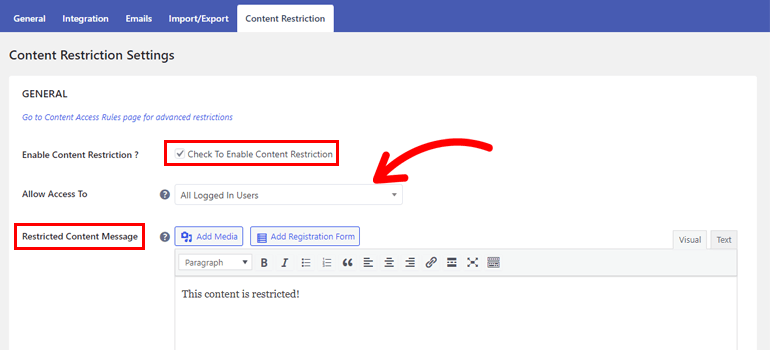
You can also type in custom messages to display in case a user who doesn’t meet your criteria tries to access the content on your site.
Suppose you want to set the Allow Access To option to people with specific user roles. You’ll need to select Choose Specific Rules from the dropdown. When you click on the said option, a new option to choose a user role appears below. Once that’s done, hit the Save Changes button at the bottom.
This will apply the restriction to all the pages and posts on your WordPress site. Hence, registered users with only the user role you chose will be able to access the content.
Individual Pages/Posts Settings
Now, you might also need to set different restriction rules for different content on your site. In that case, you can open the individual pages and posts and configure their restriction settings.
It’s pretty simple; we’ll show you how.
Go to Pages or Posts on your WordPress dashboard depending on where you want to apply restrictions. Here, open a page or post of your choice, then scroll down to the bottom.
You’ll see the Restrict This Content section with two options. First of all, tick the checkbox for Restrict Full Content. You can also see a little information about partial content restriction, but we’ll come to that later.
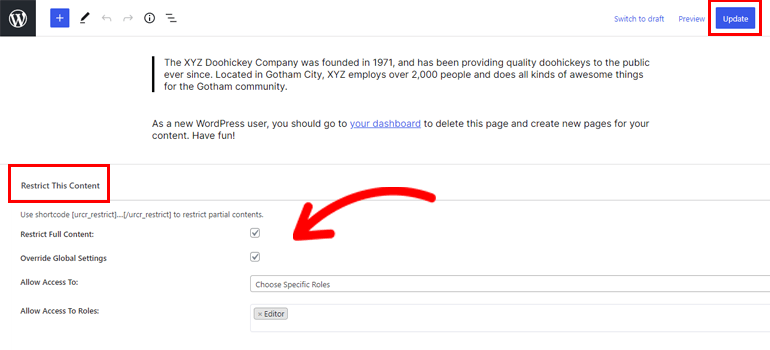
Next, you’ll have to Override Global Settings so that the individual settings can be in effect. The individual settings you just configured won’t be implemented if you don’t do this since the global settings have a higher priority.
When you override the global settings, you must also choose the new option in Allow Access To, as we did before. After that, click the Update button to save the changes.
So, if the global settings allowed access to only logged-in users, you can set the individual setting here to Guest Users. While the rest of the pages and posts will be accessible to all logged-in users, this particular page will be available specifically to guest users.
Partial Content Restriction
Partial content restriction is your friend for a situation where you need to restrict only certain parts of your content.
You can set the partial content restriction by enclosing the content you want to restrict with this shortcode:
[urcr_restrict]…[/urcr_restrict]
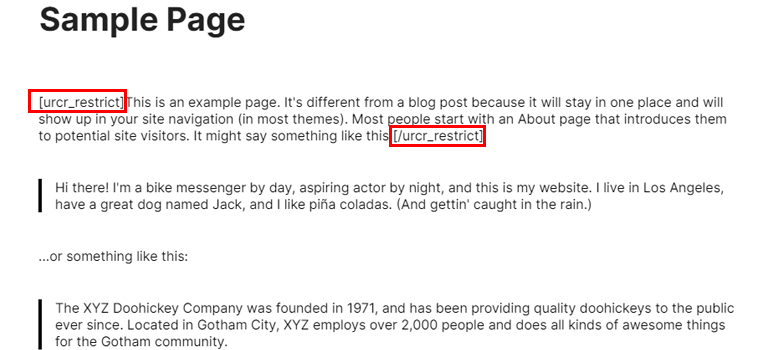
Easy as that!
Even better, you get to set parameters defining who should get access to said content. For example, suppose you set the access_role parameter for the shortcode as below. In that case, it’ll allow access to only users with the Subscriber user role.
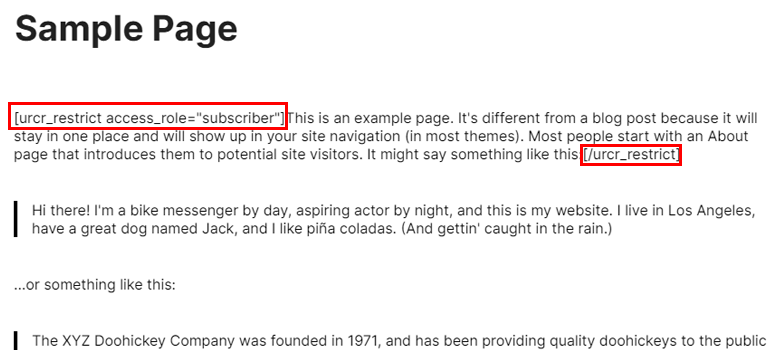
In the same manner, you can limit access to other user roles. You’ll be able to grant access to multiple user roles as well. Just separate the roles by a comma.
Similarly, using the parameter all_logged_in_users, you can grant access to all user roles who’re logged in.
Remember that when you set these access_role parameters, you’re overriding the global settings you’ve previously set.
II. Create Advanced Content Restriction Rules
Now, you may be wondering, what about advanced content restriction? No worries, with User Registration, that’s quite simple as well.
First of all, you’ll need to open the Access Rules page under the User Registration tab on your WordPress dashboard.
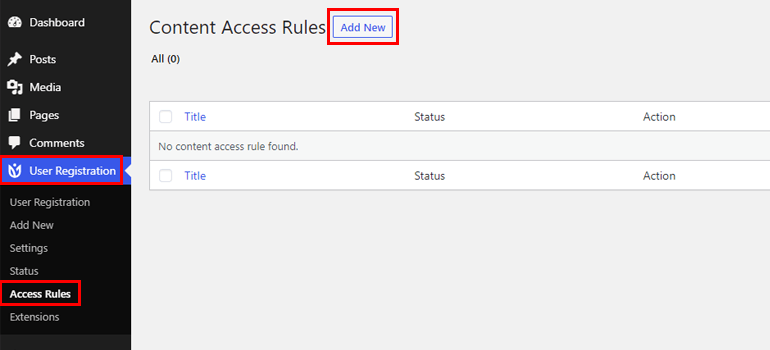
You’ll end up on the Content Access Rules page, which as you can see, is empty right now. To add one, click on the Add New button on top.
Now, you can start creating your custom rule.
Let’s start with the naming. You can give the custom rule a simple and comprehensive name to avoid confusion when you create multiple access rules.
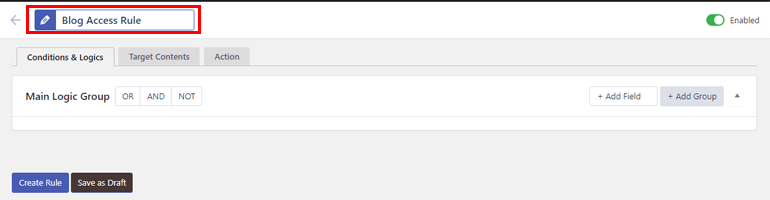
Below the title, there are 3 tabs: Conditions & Logics, Target Contents, and Action.
For a clearer picture, let’s go through them one by one.
Conditions & Logics
This section lets you add a Main Logic Group and multiple Sub Logic Groups with OR, AND, and NOT. You can then add fields to these logic groups to create access rules.
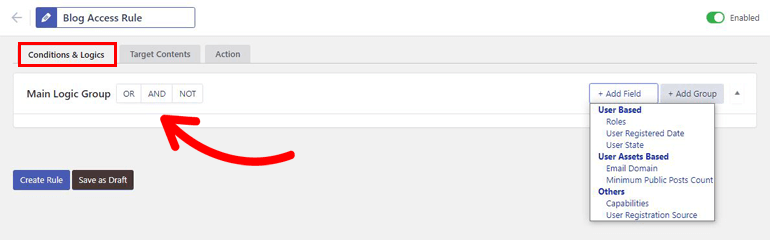
All the available fields are:
User Based:
- Roles
- User Registered Date
- User State
Others:
- Capabilities
- User Registration Source
User Assets Based:
- Email Domain
- Minimum Public Posts Count
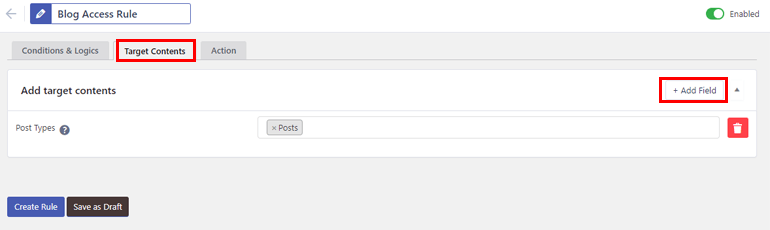
Target Contents
From Target Contents, you can allow a WordPress user access to specific post types, taxonomies, individual pages, and posts.
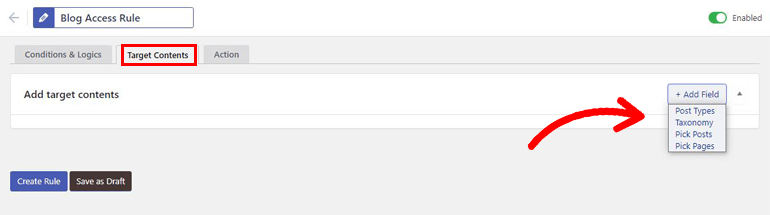
There are 3 Post Types: Posts, Pages, and Media. Likewise, you get Categories, Tags, and Formats under Taxonomy.
The restriction rule will be applied to only the content you’ve set as target content.
Action
With the Action option, you’re able to dictate what happens when a user who doesn’t satisfy the access rule tries to view the private restricted content.
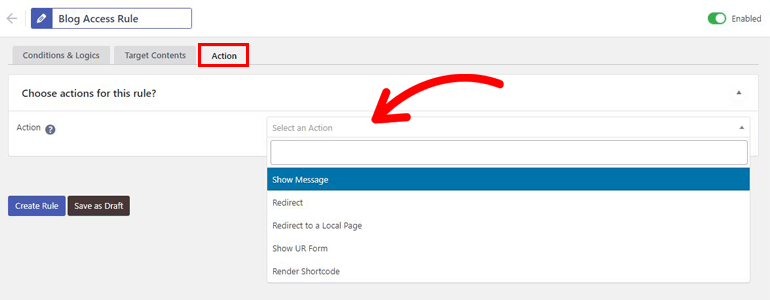
There are the following options to choose from:
- Show Message
- Redirect
- Redirect to a Local Page
- Show UR Form
- Render Shortcode
With the brief introduction done, we can now move onto the actual process of creating a new access rule to restrict content to WordPress registered users only.
The first thing you need to do is click the Add Field button and choose the criteria for user access in Conditions & Logics. For example, you can select User State and Registration Source. Let’s set the user state to logged in and registration source to the custom registration form for this guide.
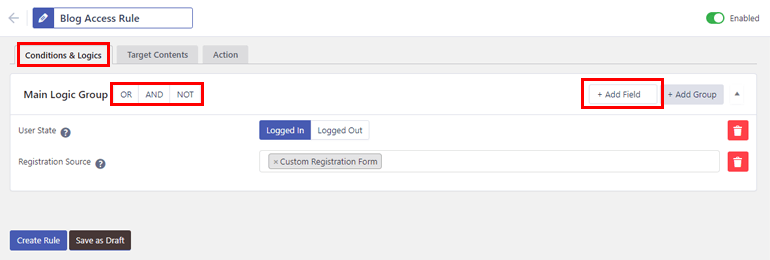
Then, decide which logic you want to apply to these fields. The logic is OR by default which means, in our case, users who are either logged in or registered through the custom registration form will be granted access.
The AND logic means a user has to be logged in as well as registered through the custom registration form.
Similarly, the NOT logic grants access to every other user except those who are logged in and registered through the custom registration form.
Now, what about when you need to combine two different logics in a single rule?
Suppose you want to allow access to users who are logged in, registered through the custom form, and don’t fall under the Author user role.
This is when the Sub Logic Group option comes in handy. You can simply create the Main Logic Group with AND. Then, click the Add Group button to add a new sub logic group.
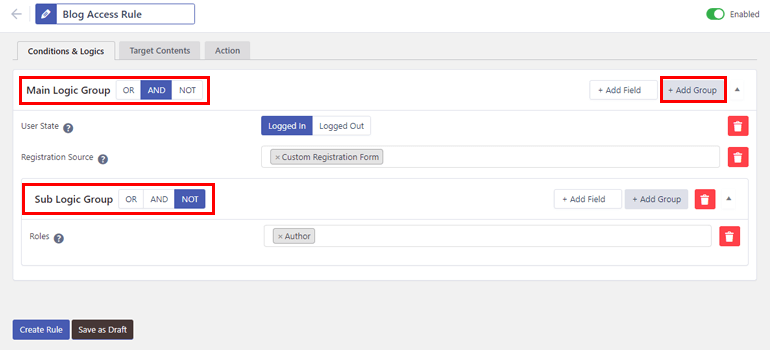
Once the group is created, add fields to it as we did previously. In this case, choose User Role and set it to Author. Next, set the logic to NOT. This makes sure that only users who aren’t authors and are both logged in and registered with a custom form can access your content.
Also, don’t forget to set your Target Content and Action as well.
Finally, hit the Create Rule button. That’s all! You can also save it as a draft if you plan to make further changes later.
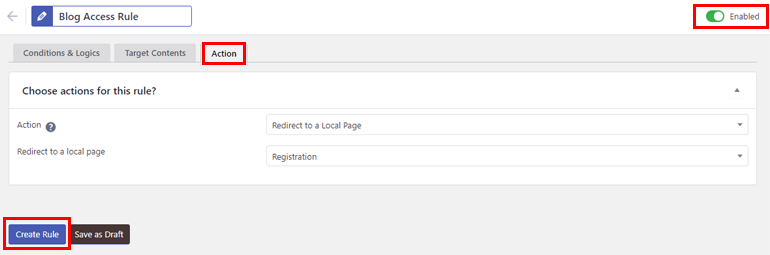
Note that this is just an example. You’ll be able to create as many Sub Logic Groups as you want for your rule. You can also choose which access rule to enable or disable with the toggle button on top.
And with that, you’re done. You’ve now successfully created advanced access rules for your website content to restrict WordPress registered users only.
Wrapping Up
Having a WordPress plugin like User Registration at hand makes it easy to restrict content to registered users. It enables you to create and apply basic content restrictions or advanced access rules to posts and pages on your website.
Moreover, rather than sticking to basic criteria like user roles and user states, User Registration offers restrictions based on email domain, user registration date, and more.
And with this plugin’s beginner-friendly interface, you’ll have no problem applying content restriction quickly on your site.
But content restriction is just one of the many remarkable features of User Registration. There are many more additional features for you to use, such as enabling a strong password, approving users after registration, allowing guest posts, etc.
So, we recommend you give this amazing plugin a chance to take your site to a whole new level.
And if you’d like to read more, do visit our blog for more informative articles on WordPress.


![Zakra 3.0 | Zakra Pro 2.0 Release [Major Updates!]](https://i.ytimg.com/vi/g3rifl7kWvg/maxresdefault.jpg)