Publishing quality blog posts by guest authors is a powerful content marketing strategy to gain more audience and promote your website. So, if you’re curious to know how to allow users to guest post on WordPress, you’ve come to the right place.
In this tutorial, we’ll show you two easy methods to permit guest post submission on WordPress. Let’s start with a brief discussion on why allow users to post articles on your WordPress blog without further ado.
Table of Contents
Why Allow Guest Authors to Post on Your WordPress Blog?
We all are aware that content is the king of every website. Thus, you should constantly deliver high-quality content to retain your position on top of the search engines and attract your audience.

Allowing guest post submission on WordPress can improve the quantity as well as the quality of the content on your site. Moreover, the chances are high that these user-generated content might interest your audience more than the regular content on your site.
Hence, publishing guest post articles can work wonders to drive tremendous traffic and boost your site’s ranking.
Some other benefits of guest post submission on WordPress are:
- You can analyze and learn the important tactics and skills from contributing authors and refine your writing expertise.
- Guest posting brings about the opportunity to extend your network by connecting with other authors of similar or different niches.
- Publishing quality guest blogs on your site helps to build and grow your online authority.
- You tend to get more backlinks from different sites, thus strengthening your website’s backlink profile.
- It improves your brand awareness in the blogging community.
That being said, it’s time to learn the easy ways to allow users to post on your WordPress site.
How to Allow Users to Post Guest Articles on WordPress?
Here, we’ll be discussing two different methods to allow users to post guest articles on WordPress i.e. via easy registration process and front-end post submission forms.
The first method is suitable for receiving many articles in a row by your guest bloggers. On the contrary, the second method is ideal for accepting posts from the guest authors for a single time and without giving them access to your dashboard.
Now, let’s dive into the details of both methods.
Method 1. Register a User and Allow Publishing on Your WordPress Site
In this method, you need to allow your WordPress users to register at first. After that, they can log in to your WordPress dashboard and create the content.
You can follow the simple instructions given below to allow users to register and submit the guest post on your WordPress website.
Step I. Choose the Best WordPress Registration Plugin
First, you need to choose the right WordPress registration plugin to create a custom registration form. No wonder, User Registration is the best plugin for this purpose. The reasons? There’s plenty.
User Registration is a minimalistic yet powerful WordPress registration plugin with an intuitive drag and drop interface. Anyone, including a beginner, can create beautiful registration and login forms in a flash with this plugin. Furthermore, it’s stuffed with amazing features such as:
- Different user login options after registration
- Assign user roles directly from the registration form
- Email notification for admin email, registration approved email, confirmation email, etc.
- One-click sample login and My Account page import
- Option to restrict content to specific users on your site
- Beautiful and well-designed user profile page
These are just a few examples of the features you get with the free User Registration plugin. Additionally, the benefits you get from the premium version are limitless.
Step II. Install and Activate User Registration Plugin
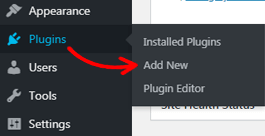
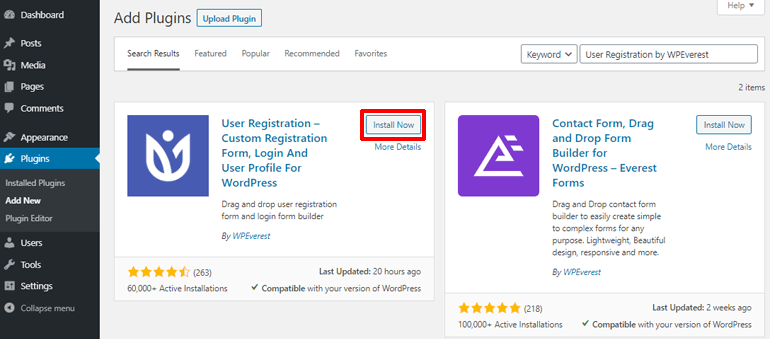
Now that you know which plugin to use, it’s time to install and activate the plugin on your site. For this, log into your WordPress dashboard and go to Plugins >> Add New.
On the Add Plugins page, you’ll see a search box where you can type in the plugin’s name. Once the User Registration plugin is displayed, hit on the Install Now button.
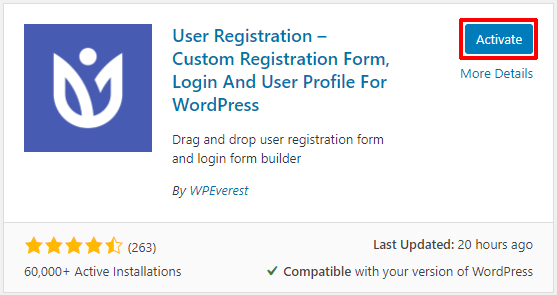
After the installation part is completed, click on Activate. Doing so will activate the plugin on your site.
And that’s it. You’re all set to create a registration form now.
However, one important thing to remember before you jump into anything else is to enable the Membership option. That’s because WordPress by default doesn’t allow users to register to your site for safety purposes. Thus, you need to enable this setting at first so that users can access the registration form on your site.
For this go to Settings >> General and scroll down to the Membership option. Then, tick the checkbox that says Anyone can register. Lastly, don’t forget to click on the Save Changes button.

Step III. Create a New User Registration Form
Before going to the topic of the registration form creation, let’s talk about the in-built sample pages that User Registration provides.
As soon as the plugin is activated, a welcome message is shown at the top of the dashboard. There, you’ll also see the Install User Registration Pages button.
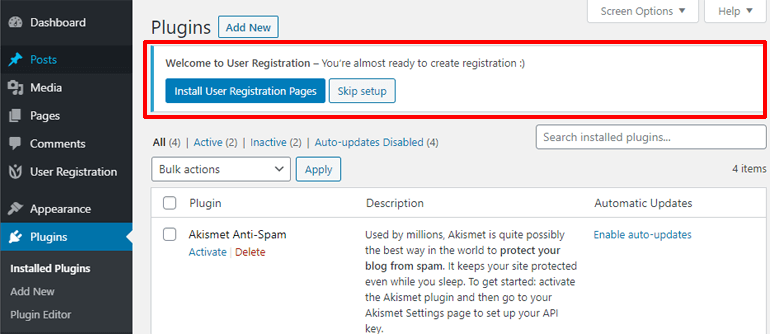
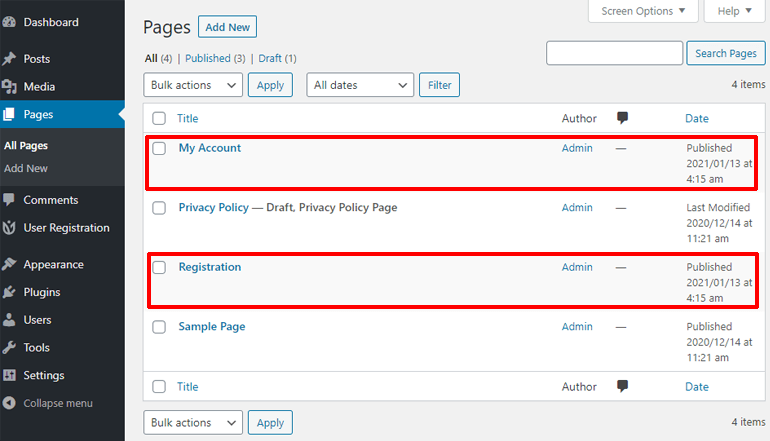
Clicking on the button automatically creates the sample pages like My Account and Registration on your site’s Pages menu. The best part? You can edit them to your liking, just like any other page on your site.
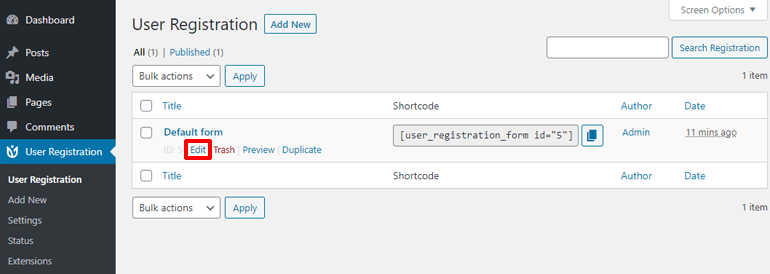
Not to mention, the plugin also has a default registration form for your site. Thus, it eliminates creating a form from scratch.
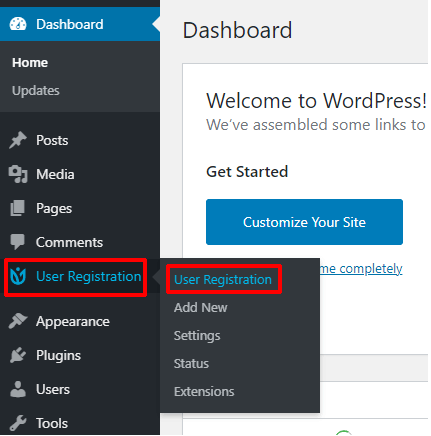
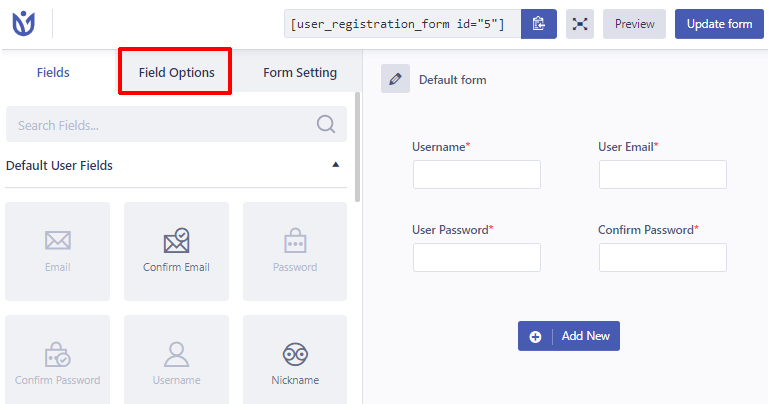
However, to make the registration form up to the mark to your specific need, you may like to edit it. For this go to User Registration >> User Registration.
Then, click on the Edit button under the Default form.
A form editor window will open up. Now, you can start editing your form as you see fit. You can also add the additional form fields easily using the drag and drop interface of the plugin.

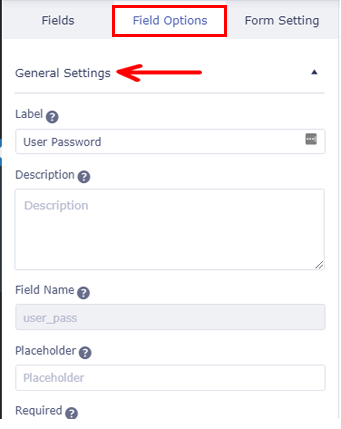
Besides, you can click the Field Options tab to edit each form field effortlessly. Field Options comes with two setting options i.e. General and Advanced.
Under General Settings you can edit a label, description, placeholder, etc.
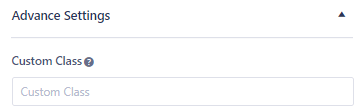
Likewise, under Advance Settings, you can add a custom class for your form field.
For a more detailed guide, make sure you check our article on how to create a WordPress registration form.
Step IV. Assign a User Role and Configure Other Form Settings
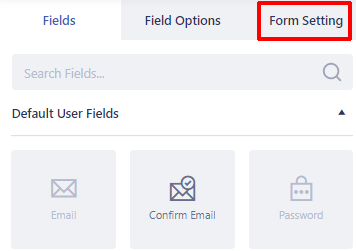
Setting specific user roles enables you to restrict the roles and permissions of your users. Thus, you get complete control over how users access your WordPress website. To designate the user roles, all you need to do is click on the Form Settings tab at the top.
General Settings panel will open up to your right-hand side. Now, click on the Default User Role option. By default, the role is set to Subscriber at first. But this doesn’t enable users to create content on your site. So, you need to choose between Author and Contributor roles.
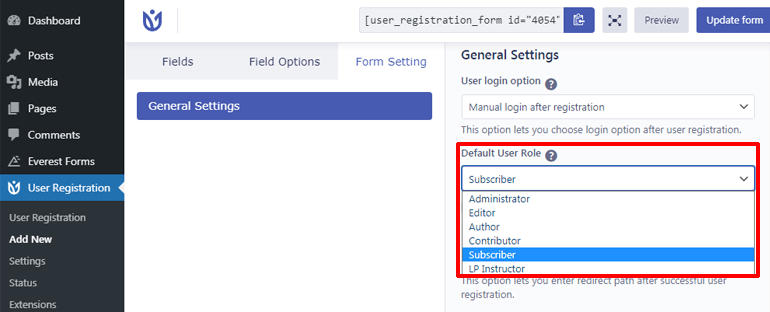
Assigning users an Author role will allow them to create, edit, and even publish or delete their posts. However, if you want users to limit to add and edit content only, you can assign them a role of a Contributor. That way, you can hold the content in moderation and check it by yourself before publishing.
Also, there’s a User login option to decide how you want to approve users in WordPress after front-end registration. By default, it’s set to manual login after registration, meaning users need to log in manually after registration. Other options include email confirmation to login, auto-login after registration, and admin approval after registration.
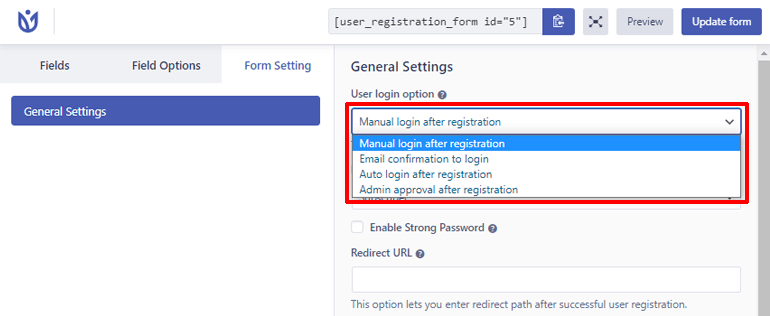
It’s a wise decision to restrict the registered users from logging into your site unless you approve them. That’s because not every user may be the genuine one. Thus, to prevent form spam submissions and unwanted users, it’s best to choose the admin approval option.
Besides, there’re several other form configuration options like enabling strong passwords, redirect option, form template, reCaptcha, and more.
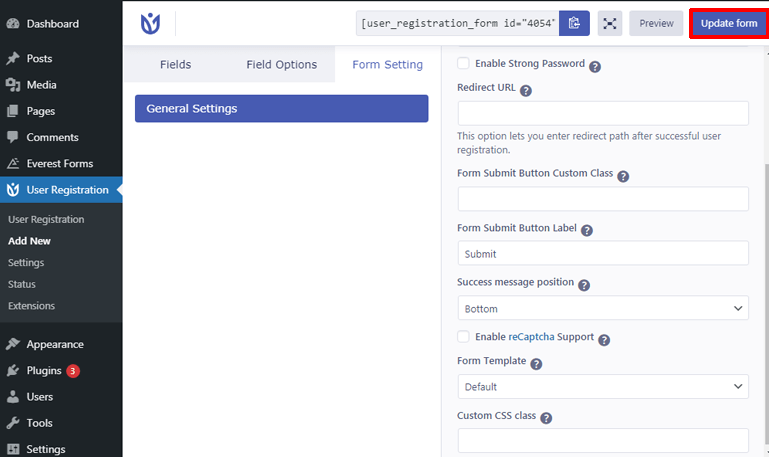
Once you’re done with all the settings, don’t forget to click on the Update form button to update all changes you made.
Step V. Publish Your User Registration Form on Your Site
We’re done with the major parts for allowing guest post submission on the WordPress blog. Now, the only thing you need to do is publish the registration form on your site so that users can register.
Firstly, go to Pages >> Add New.
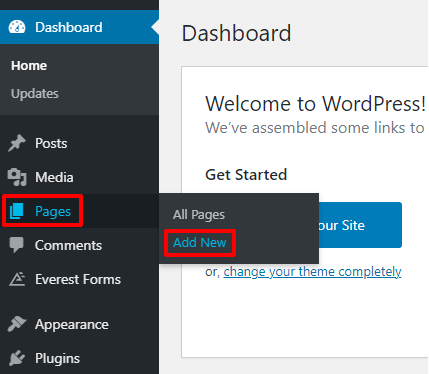
A page editor window will open up. Now, provide your page with a suitable title and click on the add block button (+).
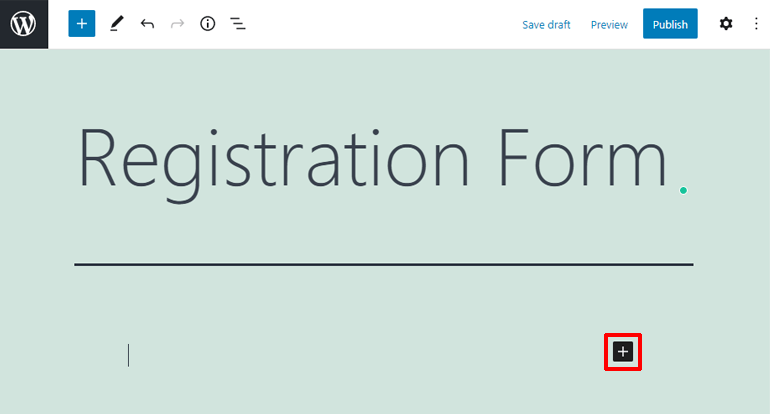
Next, choose the User Registration block and click it.

Then, press the dropdown menus and select the required form.

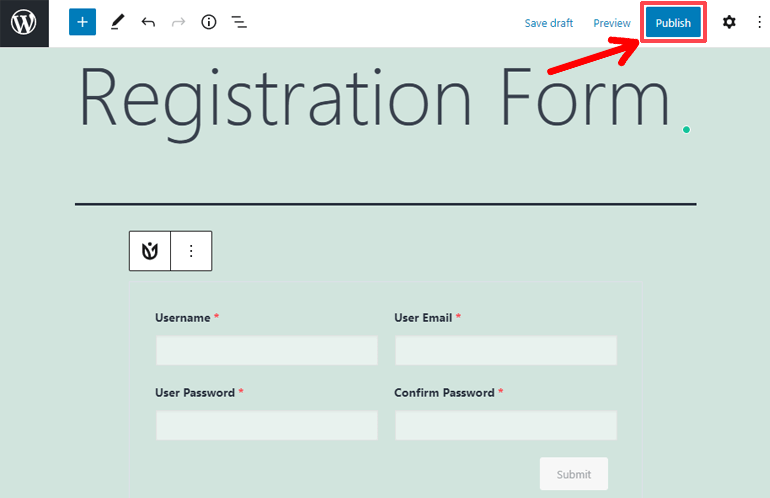
Finally, press the Publish button at the top to make your registration form go live.
Step VI. Review the Submissions & Approve the Right Authors to Allow Posting
After you publish a registration form, there’ll be a flood of registrations by users on your site. As we’ve discussed earlier, not every user is trustworthy to be approved on your site. Therefore, you need to review all the form submissions and approve the relevant guest authors who can bring about the real benefits to your site.
For this, navigate to Users >> All Users. From here, you can view all the users who registered to your site and approve or deny as per your desire.
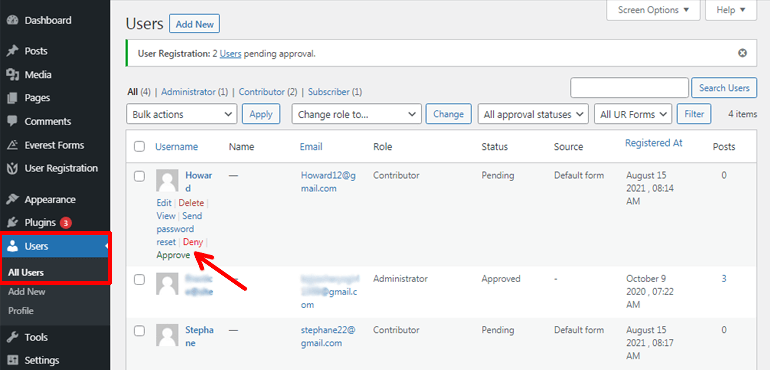
Once you accept the right users, they can log in to your site and start posting content.
Method 2. Ask Guest Authors Submit Articles via Post Submission Forms
In this method, you can allow users to submit content from the front-end without accessing your admin area.
To enable guest post submission on WordPress via forms, you need to follow the simple steps as given below:
Step I. Choose the Best WordPress Post Submission Forms Plugin
To create a submission form effortlessly and enable users to submit their post from the front-end, you’ll need the WordPress post submission plugin. And the best option you can get for this purpose is Everest Forms.
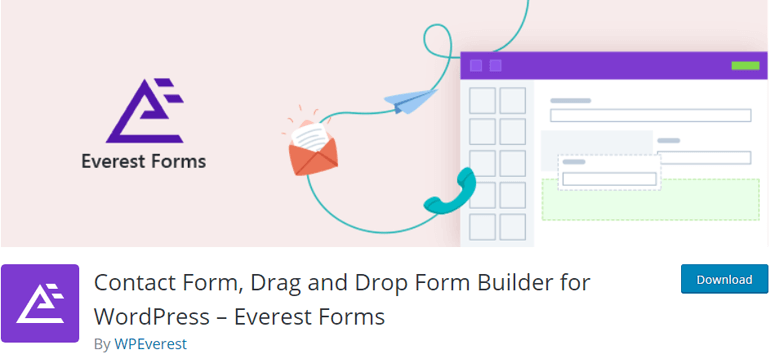
Everest Forms is the popular drag and drop form builder plugin for WordPress built with simplicity in mind. Building simple to advanced contact forms is a piece of cake with this plugin and creating the post submission form is not an exception.
Using this plugin, you can easily integrate the post contents by your users via the Post Submission add-on. Some other remarkable features offered by the plugin are as follows:
- Create unlimited forms
- Add custom fields to match your branding
- Real-time email notifications
- Easy form field customization options
- Form entry management from dashboard
- Ajax form submission
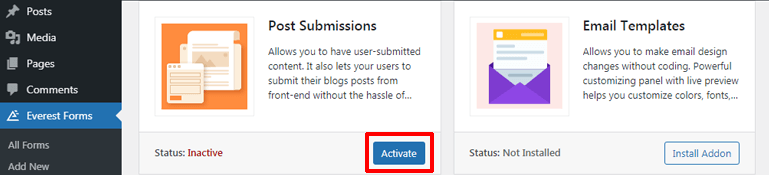
Step II. Install and Activate Everest Forms and Post Submissions Add-on
First, you need to install the Everest Forms plugin and Post Submission add-on to your site. So, let’s get to know how it’s done in detail.
Installing Everest Forms on Your Site
From your WordPress dashboard, go to Plugins>>Add New.
Then, search for Everest Forms by typing the name of the plugin in the search bar. Next, install the plugin on your site.
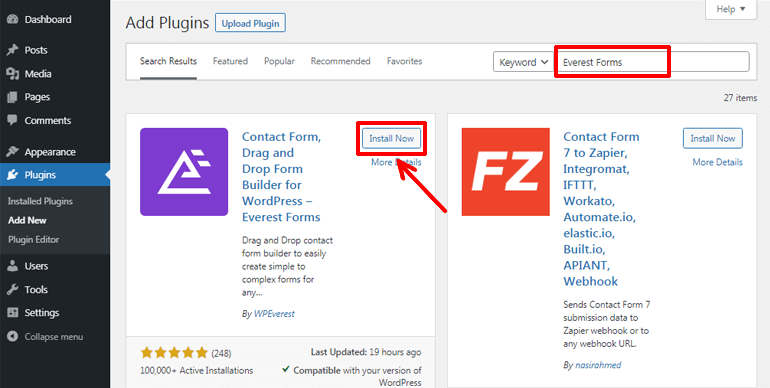
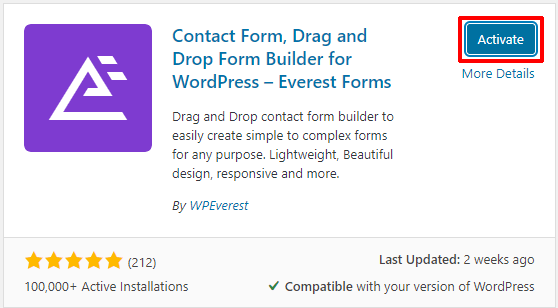
After the installation, click on the Activate button to activate the plugin.
You’ve successfully installed the free version of the Everest Forms. However, we need to use the Post Submissions add-on, which is only available in the premium version of the Everest forms.
Therefore, you need to visit the official website of Everest Forms at first and buy the plan that includes the Post Submissions add-on.
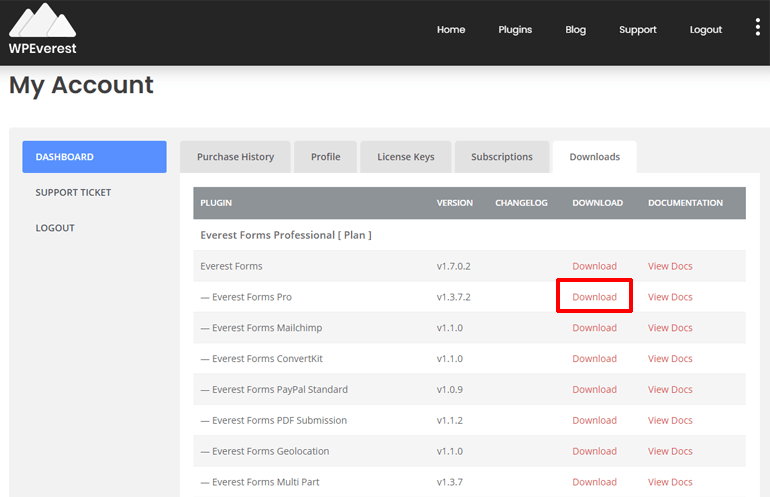
Then, you can create a WPEverest account and log into the account. After that, you need to go to your account dashboard and download the Everest Forms pro add-on. The plugin will be downloaded as a zip file.
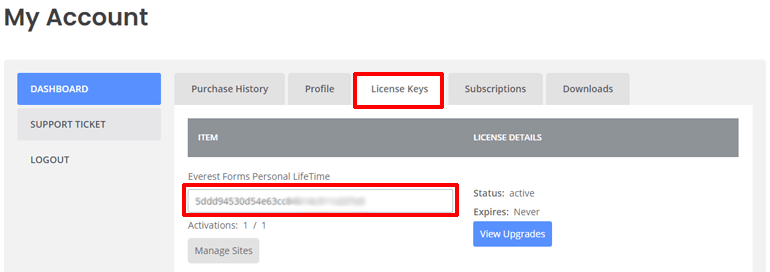
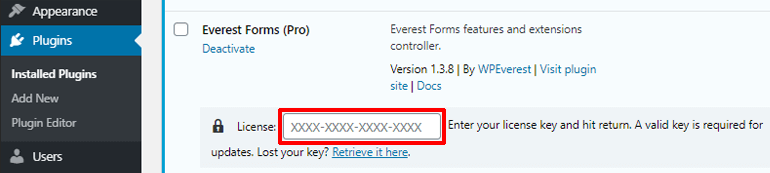
Next, copy the license key from the License Keys tab. You’ll need this license key later in the steps to proceed with your premium plugin.
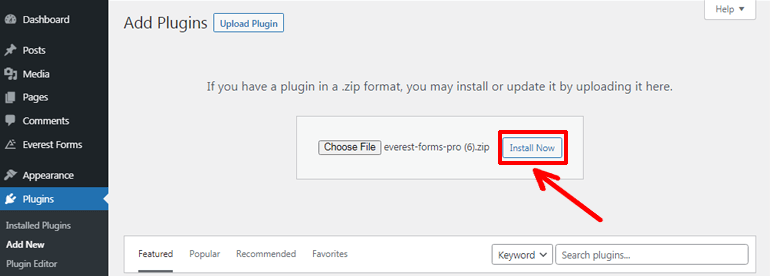
Again, from your WordPress dashboard, go to Plugins>>Add New and click on the Upload Plugin button.
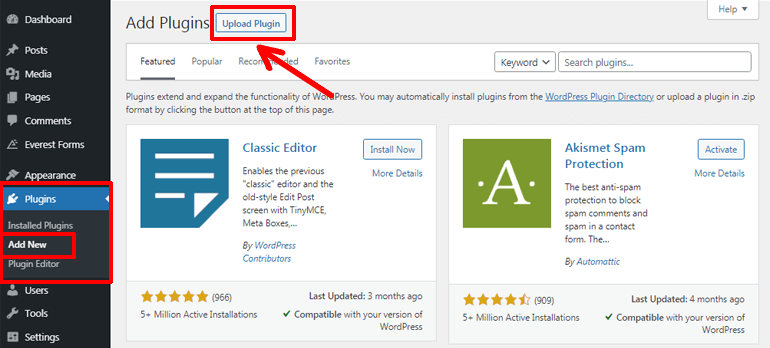
After that, choose the zip file of the premium Everest Forms plugin and press the Install Now button. Finally, activate the plugin on your site.
Now, you’ll be asked to enter the license key. So, paste the license key you copied before, and your premium plugin will be ready to use in no time.
Note: Installation of a free Everest Forms plugin is compulsory for Everest Forms Pro to function.
Installing Post Submissions Add-on
To install the Post Submissions add-on on to your site, navigate to Everest Forms>>Add-ons. Then, find the Post Submissions and press the Install Addon button.
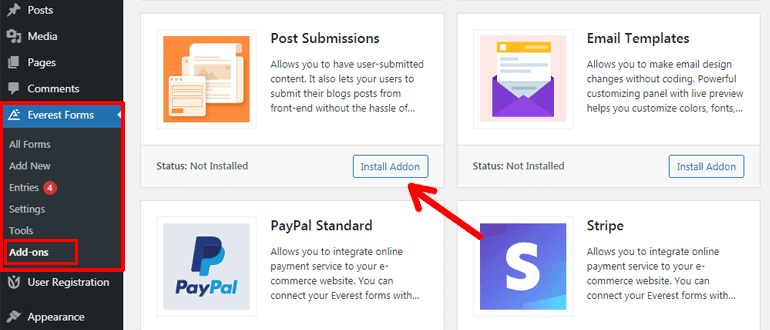
Once the installation completes, click on the Activate button to activate the plugin to your site.
Step III. Enable a Post Submission Add-on
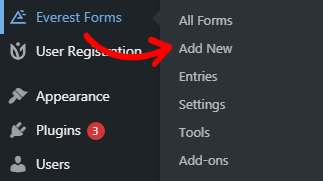
You’ve activated the Post Submission add-on to your site, but to use it, you need to enable it first. For this, go to Everest Forms >> Add New.
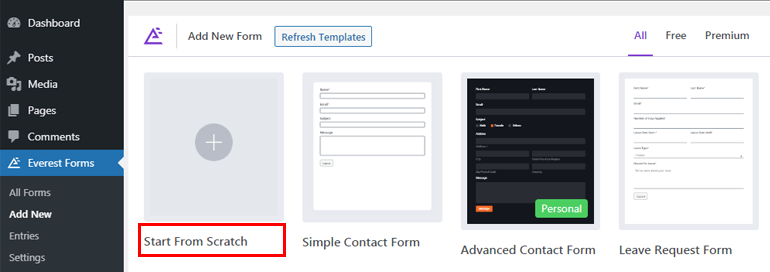
You can choose to create a post submission form either from scratch or by tweaking the pre-built templates. The choice is solely yours. In this tutorial, we’ll show you how to create a post submission form from scratch. So, click on the Start From Scratch option.
Once you name your form, a form editor window will open.
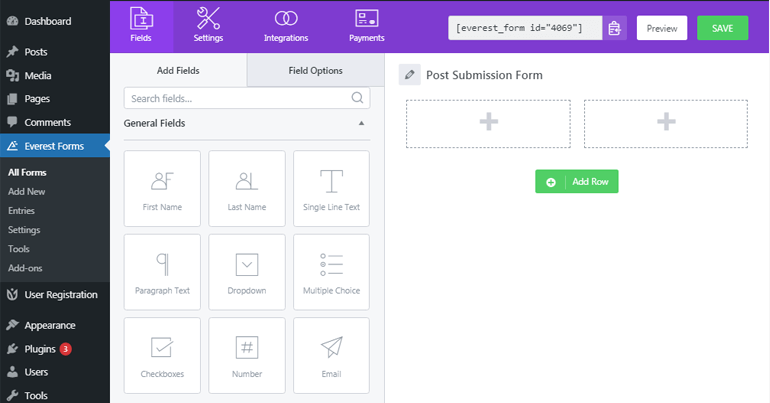
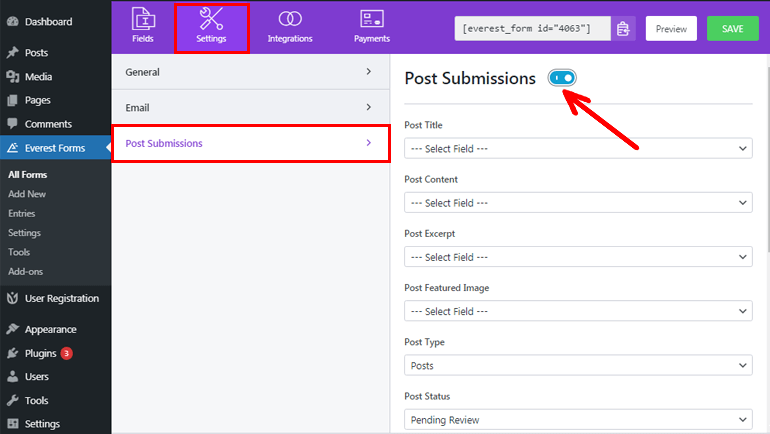
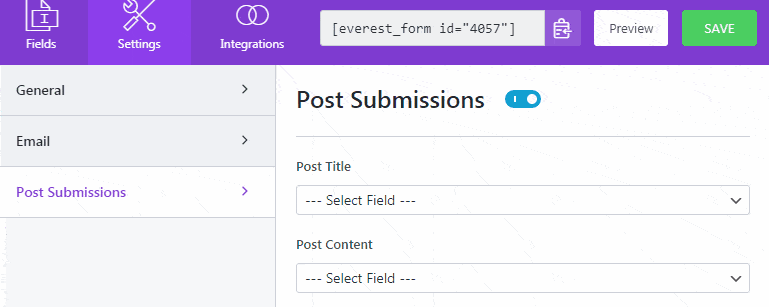
But before you start creating a form, click on the Settings tab at the top and navigate to Post Submissions. Then, toggle on the button to enable Post Submissions. Soon after that, you’ll be able to view all the available post submission fields.
Step IV. Create a New Post Submission Form
Now that you’ve enabled the Post Submission add-on, it’s time to create a form that includes all the post submission fields.
To start creating a form, click on the Fields tab at the top.

You can simply add the required fields to the blank form using the drag and drop editor.
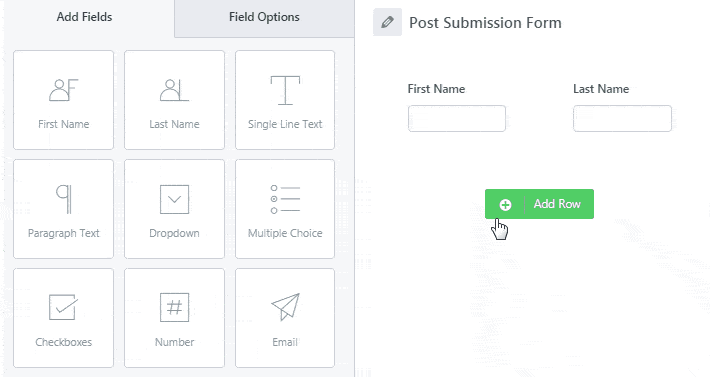
You can include the form fields like name, email, phone number, subject, etc., to gather the personal details of the guest author. Apart from that, you need to add single line text, paragraph text, and image upload fields to create form fields for the following:
- Post Title
- Post Content
- Post Excerpt
- Post Featured Image
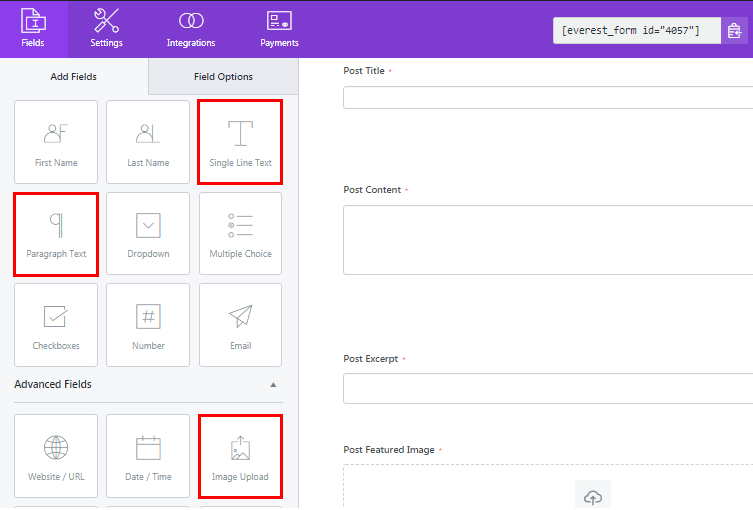
Likewise, you can click on each form field to edit the label, description, required field message, and so on to fit your purpose.
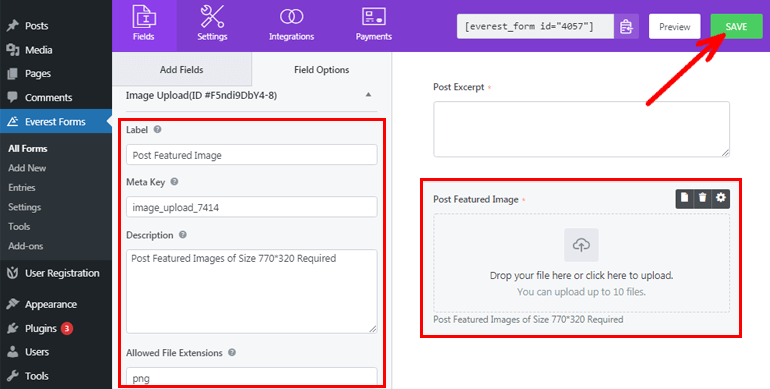
Once you’re done, don’t forget to save your form by clicking on the SAVE button at the top.
If you need more information on creating a form with Everest Forms, you can check our documentation.
Step VI. Map the Form Fields with Post Submission Fields
Next, in our tutorial on how to allow users to submit a guest post on WordPress, we’ll show you how to map the form fields with post submission fields. Doing so will pull the content of post submission fields directly on your WordPress website. So, you don’t have to add the user-submitted content to your site manually.
For this, go to the Settings tab once again and click on the Post Submissions. Now, connect the corresponding form fields with the post submission fields by clicking on the dropdown menus.
You also need to map the fields in similar ways for Post Content, Post Excerpt, and Post Featured Image.
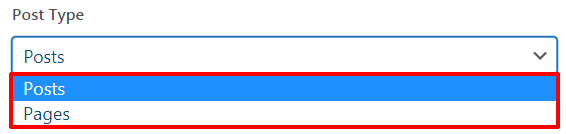
Next, under the Post Type option, select the post submissions type either as Posts or Pages. Depending upon the option you choose, user-submitted content will create a new post or page for your WordPress site.
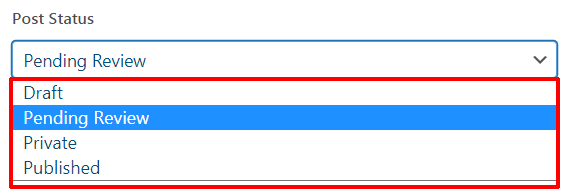
You get four options under the Post Status tab as Draft, Pending Review, Private, and Published. So, you can choose the status for the user-generated post as per your desire.
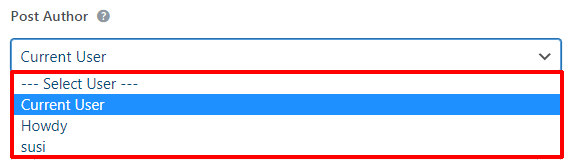
Post Author provides you an option to select the author for the posts. You can either select the specific user or the Current user. Choosing the Current User option will select the recent WordPress user who submits the post submission form.
Assign Taxonomies for the Post Submission Form
Taxonomies are defined as the technique of classifying the contents or the posts in WordPress. By default, two taxonomies are available for grouping the relevant WordPress posts. They are Categories and Tags.
Fortunately, Everest Forms makes it quite easy to assign the taxonomies for the post submissions forms.
From the Category option, you can either assign the category yourself or allow the users to choose the required category by themselves. For specifying a category by yourself, click on the dropdown menus, choose the Assign Category option and select a pre-defined category on your site.
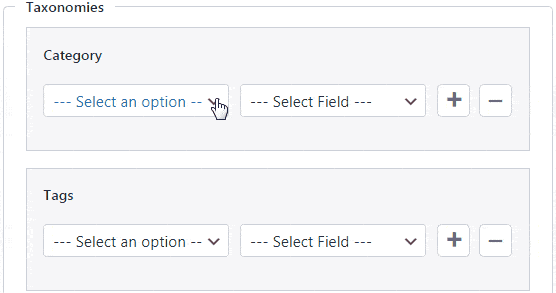
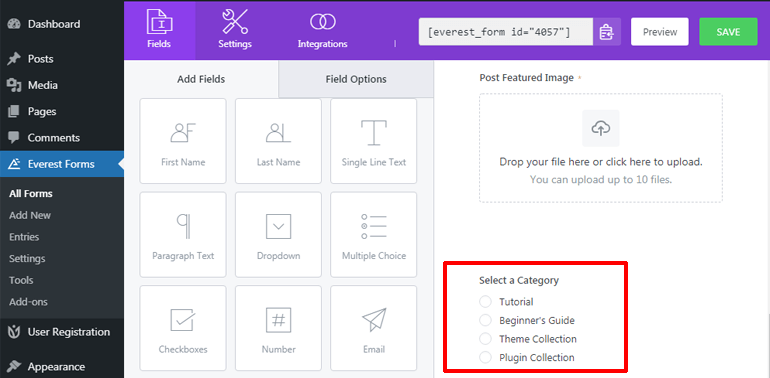
On the other hand, you can allow users to pick the category as per their requirements. For this, you need to add a field with the post category options to your form first. You may use the fields like dropdown, multiple choice, and checkboxes for this purpose.
Now, choose the Field value under Category and select the form field representing the category options.
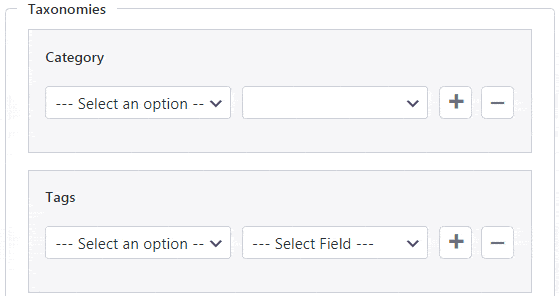
You can follow a similar procedure to assign the Tags for your post submission form as well.
Besides, Custom Post Meta allows you to create any fields to collect additional user information that isn’t included in the form already.

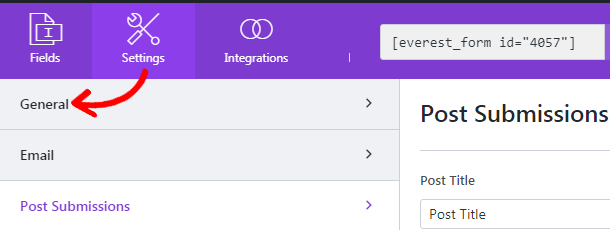
Step VII. Configure General and Email Settings
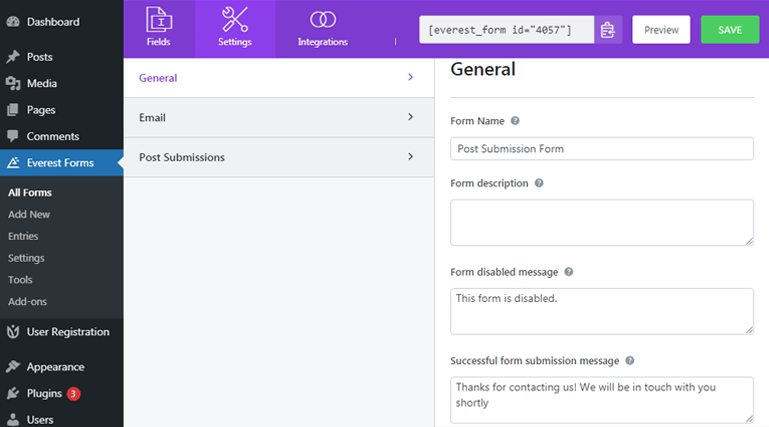
To configure the general and email settings for your post submission form, click on the Settings tab. Then, go to General to open the general form setting page.
From here, you can provide a name and description to your form and display a message whenever the form is disabled or submitted successfully.
Further, you can redirect your users to a page of your interest, choose layout design, and edit submits button text, processing text, etc.
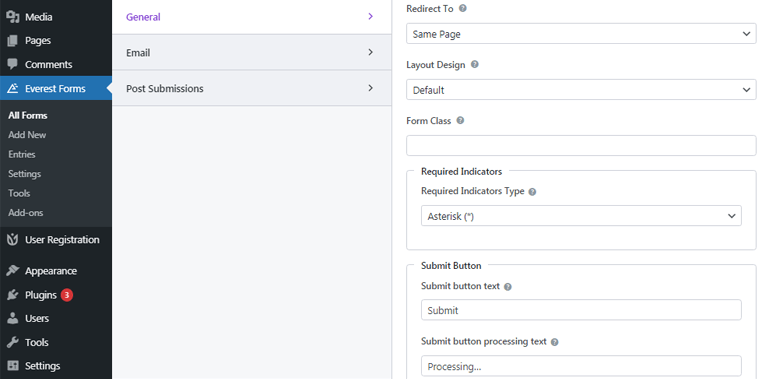
Besides, you have options to enable or disable anti-spam honeypot, Ajax form submission, form entry information storage, and more.
Likewise, for setting email notification, go to Email and toggle on the Email button if it isn’t enabled already.
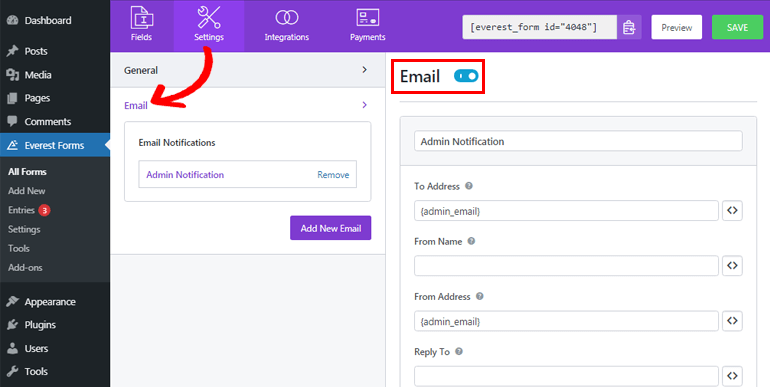
The email setting option allows you to set the To and From addresses for email. Additionally, it also enables you to add email subjects and messages. Moreover, you can enable conditional logic for your emails too.
Admin email notification is set by default for your ease. However, it’s a good idea to check the settings to ensure there isn’t any problem during email delivery.
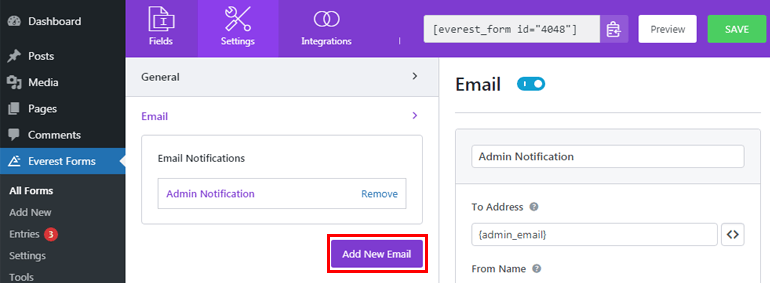
Everest Forms allows you to configure unlimited email notifications. Hence, you can click on the Add New Email button and configure user email notification or other email settings similarly.
Step VIII. Publish Your Post Submission Form on Your Site
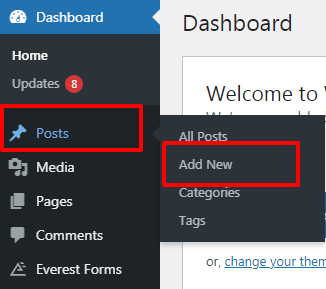
To see the post submission form in action, you have to publish it on your site first. For this, navigate to Posts >>Add New.
Once the posts editor window opens, click on the add block (+) to search for the Everest Forms block and press it.
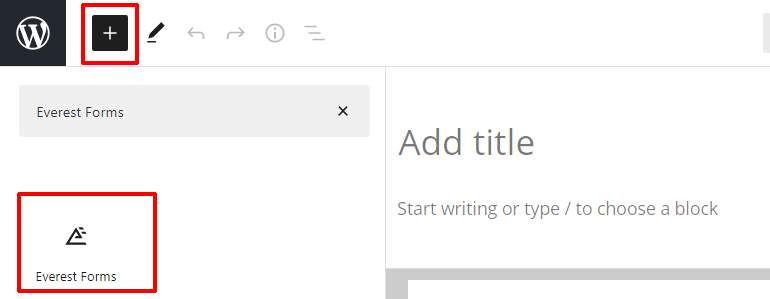
Next, from the dropdown menus, choose the post submission form.

After giving a title to your form, you can hit the Publish button at the top to make it go live.

And that’s it. You’ve successfully created a post submission form to allow guest post submission on your WordPress site.
Conclusion
We’ve explained the two easy methods to allow users to post guest articles on WordPress. Firstly, you can register the users and allow them to publish on your site. It’s a useful method if you want to receive content from your users in succession.
Alternatively, you can permit guest post submission on WordPress via front-end post submission forms. It’s useful when you want to accept the posts from users for a single time and don’t want them to access your dashboard. However, either method helps you to collect user-generated content without any hassle.
And that’s a wrap-up for our article on how to allow users to post guest articles on the WordPress blog. Hope you enjoyed reading it. If you did, please don’t forget to share it on your socials.
Also, make sure to follow us on Twitter and Facebook for more updates.


![Zakra 3.0 | Zakra Pro 2.0 Release [Major Updates!]](https://i.ytimg.com/vi/g3rifl7kWvg/maxresdefault.jpg)