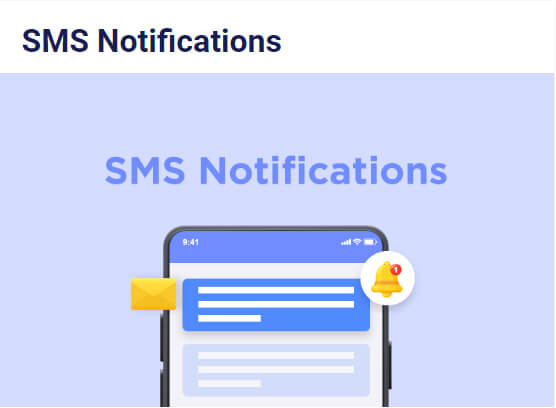
Wondering how to send SMS notification from a WordPress contact form? We’ll show you how.
SMS notification for WordPress forms refers to a text notification whenever a form is submitted on your website.
This immediately alerts you of new form submissions without having to check your website or email constantly.
Hence, sending SMS notifications from a WordPress contact form is a great way to stay informed about new inquiries from your site visitors.
Now, let’s see how to send SMS notification from your WordPress contact form (step-by-step).
Table of Contents
Best Way to Send WordPress Contact Form SMS Notification
You must be aware of WordPress sending the email confirmation for form submissions. But what about SMS notifications from a WordPress contact form?
Don’t worry, you can easily send SMS notifications to the required person as well. But again, how?
One of the best ways to send SMS notifications from a WordPress contact form is by using a plugin that integrates with SMS API, such as Twilio.
This is where the most innovative WordPress form builder plugin Everest Forms, steps in.
Everest Forms is a beginner-friendly form plugin that helps you easily create and manage any forms on your WordPress website.
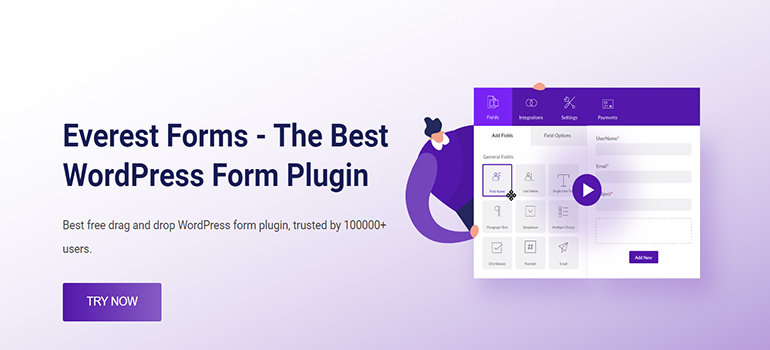
The wide range of options and features, like custom form fields, visual form builder, conditional logic, etc., makes it stand out from the crowd.
Best of all, Everest Forms offers you an SMS Notifications add-on. Thus, you can configure your form to send an SMS to a designated phone number whenever someone submits the Form.
Hence, we’ll be using this feature-rich plugin for our tutorial.
So without further ado, let’s dive into the content.
Send SMS Notifications from Your WordPress Forms (Step-by-Step)
To send SMS notifications using Everest Forms, follow the simple steps below:
Step 1: Install and Activate Everest Forms and Everest Forms Pro
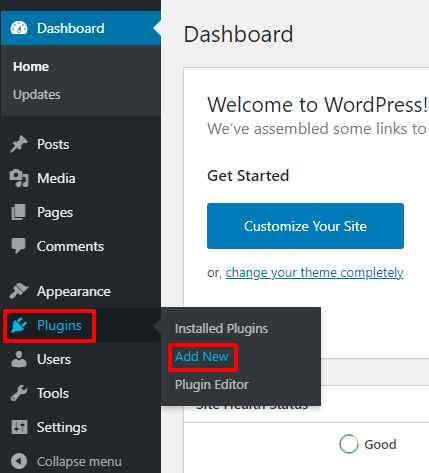
The installation process of the free version is pretty simple. Go to Plugins >> Add new from your WordPress dashboard.
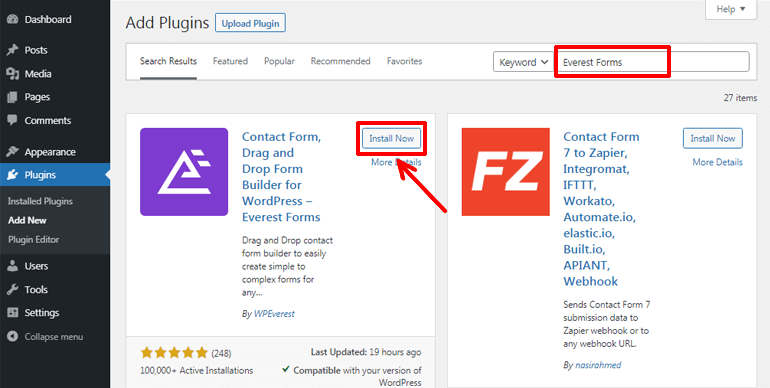
After that, search for Everest Forms. Then, install and activate the plugin.
You’ll require the plugin’s pro version, as the SMS Notifications add-on is only available on the Professional or Agency Plan.
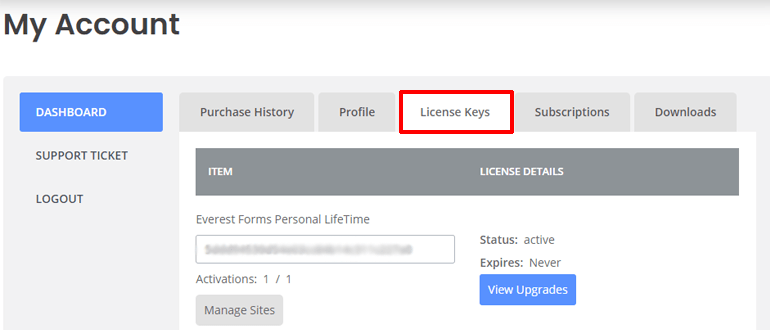
First, purchase Everest Forms Pro from its official website. You’ll receive your login details at the email address you’ve used during purchase.
Follow the link and you’ll get access to the WPEverest Customer dashboard.
Here, you can download the pro version of the plugin and get its license key the under the license key tab.
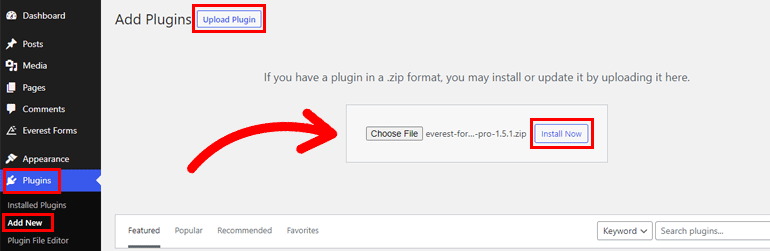
After that, go to Plugins >> Add New. Click on the Upload Plugin button. Choose the Everest Forms pro zip file you downloaded before and hit Install Now.
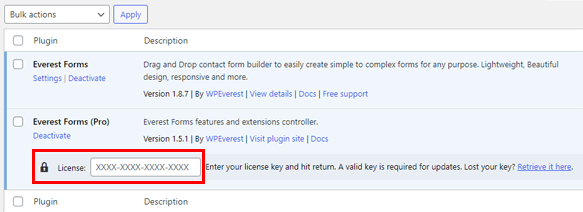
Now, paste the license key in the required area, and activate the plugin on your site.
If you need any clarification or need the entire installation process in detail, follow this link on how to install Everest Forms Pro.
Once you’ve set up the plugin correctly, you can move on to the next step.
Step 2: Install and Activate the SMS Notifications Add-on
With the setup complete, you can now easily install any Everest Forms add-on, including SMS Notifications. For that, navigate to Everest Forms >> Add-on.
Next off, search for the SMS Notifications add-on. Then, click on the Install Add-on button and press Activate.
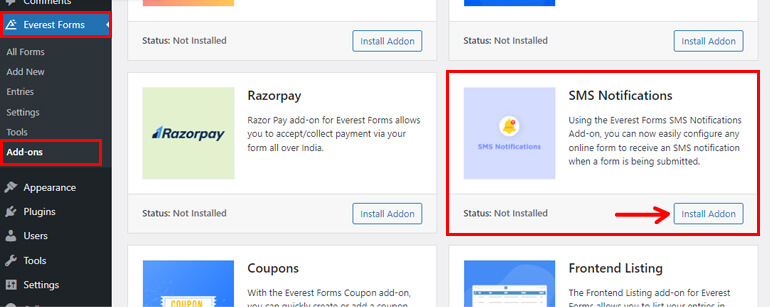
You’ll know the add-on is set in motion when the status says “Activated.”
Step 3: Set Up Twilio SMS Integration
The third and essential step is to set up Twilio SMS integration.
Twilio is a cloud communication platform. It provides various APIs and services for monitoring and managing real-time communication.

In general, it has all the necessary tools to build, test and deploy communication services at scale. Thus, it allows websites to communicate with their users through SMS.
Everest Forms supports a seamless integration with Twilio. And to complete the integration, you need to add the Twilio API keys to your form.
We’ve divided the integration process into two sections to make it more precise and easier for you.
Get Twilio API Keys
To get Twilio API keys, you need to log in to Twilio’s website. If you don’t already have an account, you can quickly sign up for free from the official Twilio page.
The sign-up procedure for Twilio is pretty simple.
Fill in all the required details and click on Start Your Free Trial. After that, verify your email, and you have your Twilio account.
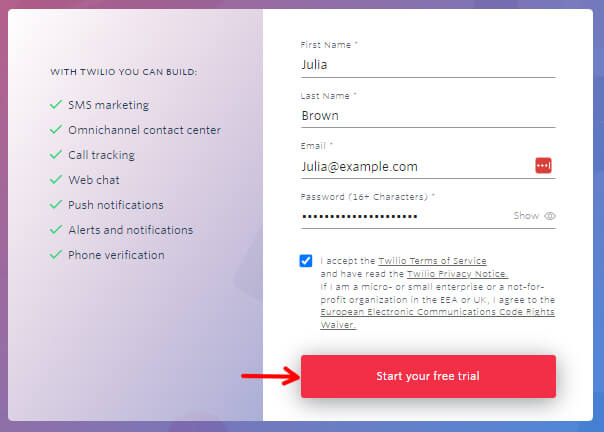
Immediately after that, you’ll find all the required keys and phone numbers under Account Info. You’ll find this at the bottom of your page.
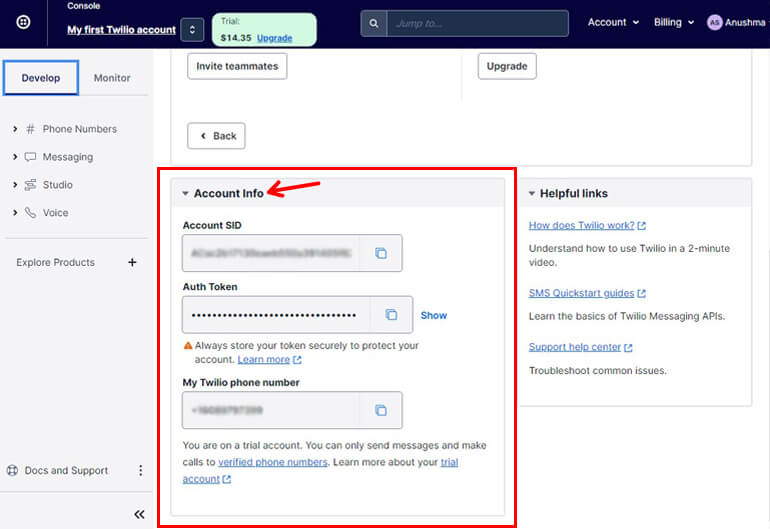
You’ll need these keys to integrate Twilio further in your Everest forms.
Add the API Keys to Everest Forms
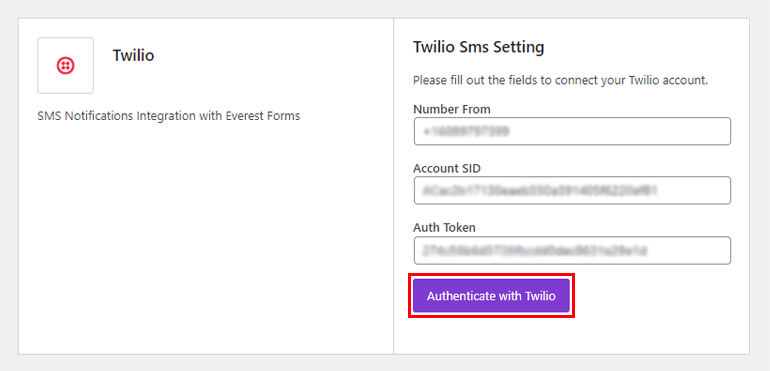
Now, go to Everest Forms >> Settings >> Integration and tap on Twilio.

The Twilio SMS Setting will now pop up. Here, you need to insert Number From, Account SID, and Auth Token, which we previously generated from a Twilio account.
Copy and paste those keys into the related fields and click on Authenticate with Twilio.
Finally, you’ve successfully integrated Everest Forms with Twilio SMS integration. Now, you can move on to the next step.
Step 4: Create and Customize Your Contact Form
After integrating Twilio SMS integration with Everest Forms, you need a contact form.
You can create a simple contact form by clicking Start from Scratch and customize it further. Otherwise, use the pre-built contact form templates to save you some time.
To use the pre-built template, go to Everest Forms >> Add New and choose the Simple Contact Form template.
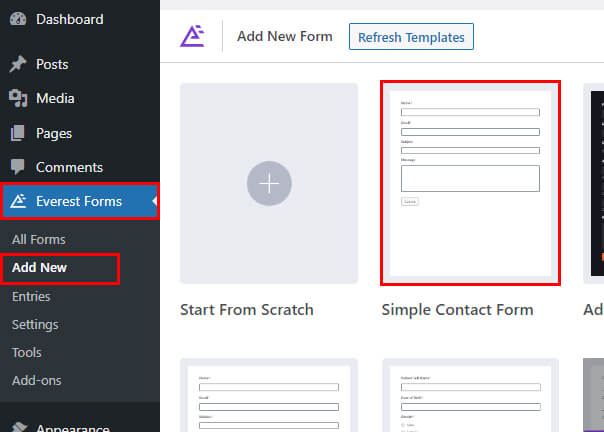
All the essential fields a basic contact form should contain are already present in the form.
However, adding a phone field can notify your form fillers about a successful submission. So, drag and drop the Phone field on your form, and you’re done.
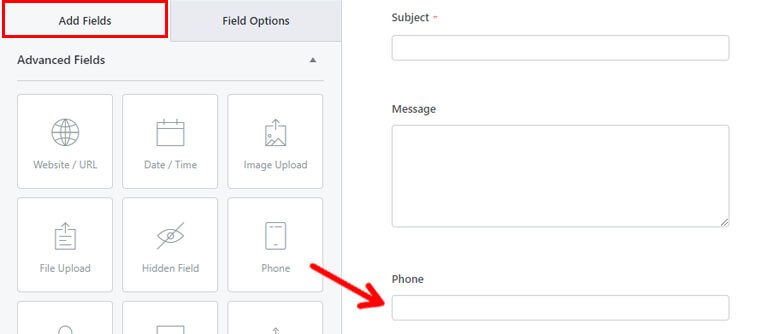
You can edit and customize more fields according to your form’s needs.
Once your contact form is ready, Save the changes and move ahead.
Step 5: Set Up SMS Notification for the Form
Now, it’s time to set up SMS notification for the form.
Everest Forms lets you notify admins and users about their successful form submissions.
To simplify, we’ll show you both the Admin and User Notifications setup.
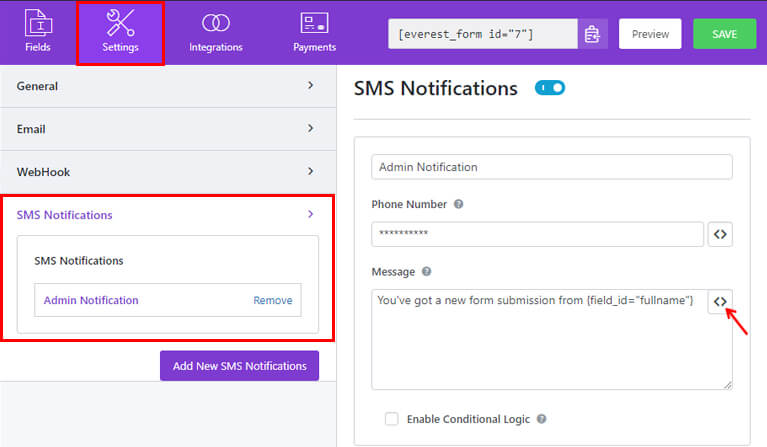
Admin Notification
Go to Settings >> SMS Notifications. You’ll see a default Admin Notification. You can change the name of the notification or leave it as Admin Notification.
On the right side of your screen, you can customize options like:
- Notification Heading Title: Set the title for the notification as or you see fit.
- Phone Number: Here, manually add the number of the admin who wants the form submission notification.
- Message: You can add a notification message you want to get after someone submits the form. You can also add fields from your contact form with the smart tag ‘<>’ option.
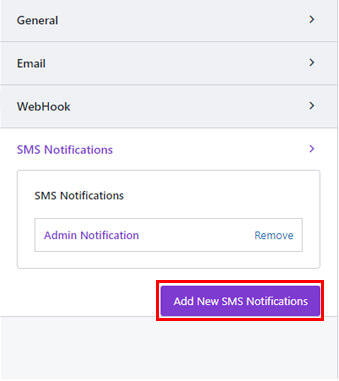
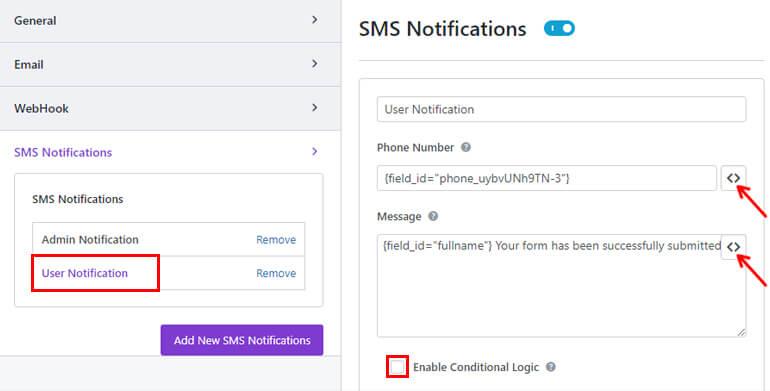
User Notification
If you want to send notifications to people submitting the form, press the Add New SMS Notification button.
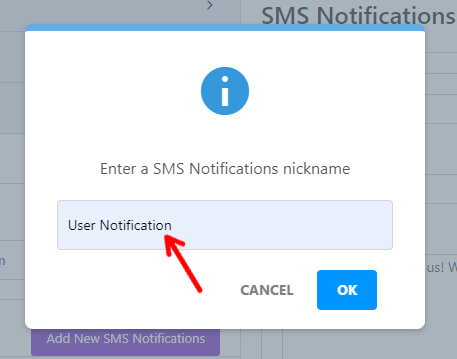
After that, you can add a user notification and add a title. Here we’ve named it User Notification.
Just like before, you’ll see more options like:
- Notification Heading Title: Edit the heading title of the SMS notification.
- Phone Number: Insert the Phone field from the <> button so that the form submitters can get notified about a successful form submission.
- Message: Add a statement you want to send to users after they submit the form. You can insert the fields from the form like First Name, Last Name, etc., on your message by clicking the <> button.
Similarly, you can apply conditional logic to your form by ticking the Enable Conditional Logic checkbox.
After setting up the SMS notification for both the admin and users for your contact form, hit the Save button again.
Step 6: Publish Your Form on Your WordPress Website
The final step is to add the completed contact form to your website.
You can use two methods to publish your form. We’ll teach you both methods in sequence.
Using Everest Forms Block
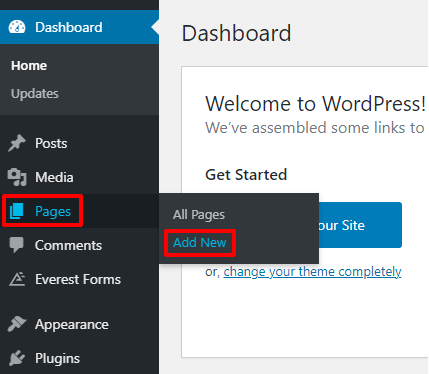
The first is using by using Everest Forms Block. Navigate to the Posts/Pages >> Add New for this process.
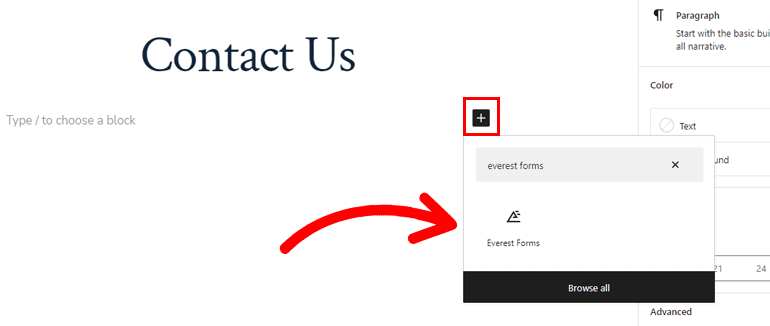
Then, click on the Add Block (+) icon, search for the Everest Forms block, and add it to the page.
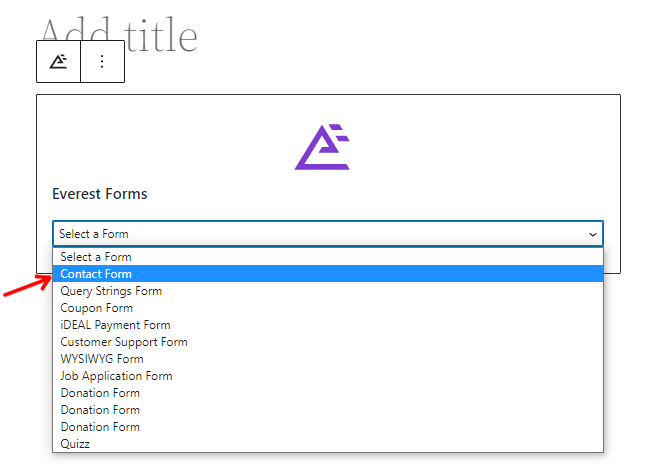
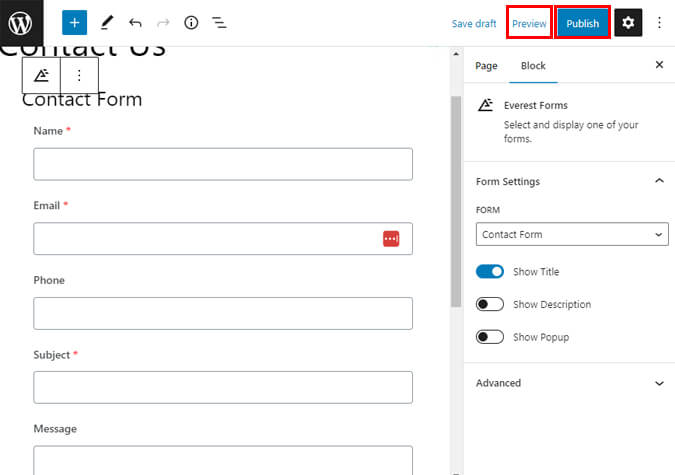
Once you’re done, select your WordPress Contact Form from the drop-down.
Before publishing the form, you can have a Preview of it. If you like how your form looks, you can hit the Publish button at the top.
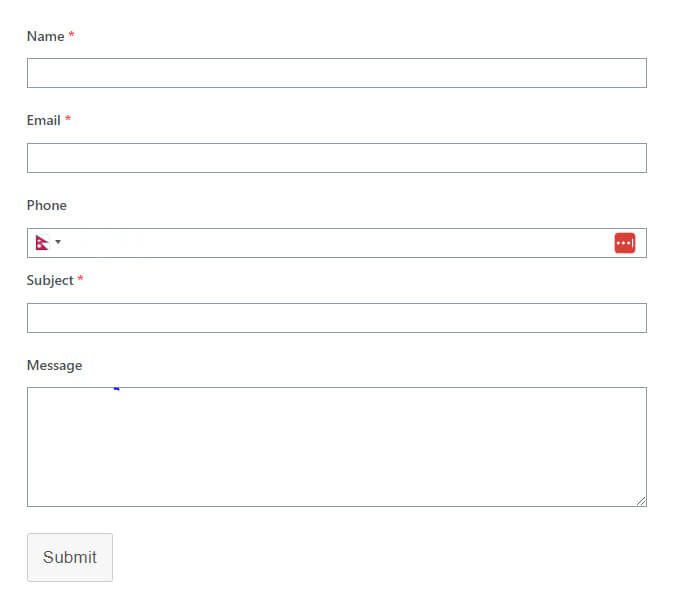
This is how your form appears in the front end.
Using Shortcode Block
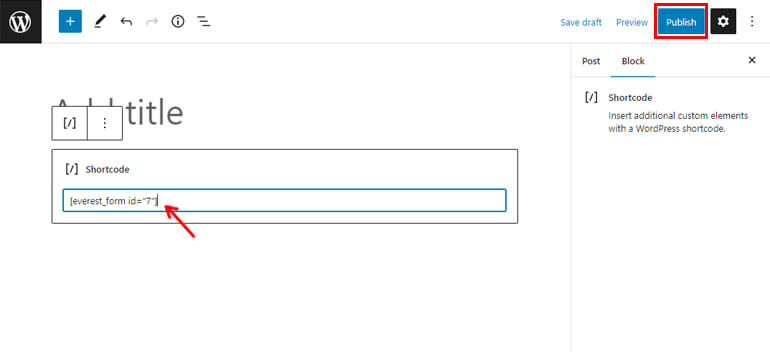
The next method is by using the Shortcode Block. For that, copy the shortcode of your contact form from the top of the builder.
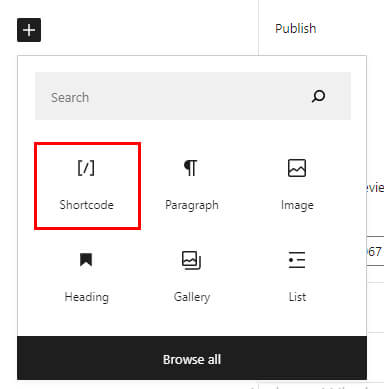
Next, you need to create a new page or post, and you’ll get to the Gutenberg editor. Press the Add Block (+) icon, search for the Shortcode block, and click on it to add the block.
Paste the shortcode you previously copied. Finally, if you like how your form looks, you can hit the Publish button at the top.
And that’s it; your contact form with SMS notification is ready.
Wrapping it Up!
That’s a wrap for our tutorial on how to send SMS notification from a WordPress contact form using Everest Forms.
Now, you should be able to send SMS notifications for any submissions made through your form. You can send create and send notifications to both admin and the users.
Besides, Everest Forms can also integrate WordPress forms with third-party apps using Zapier, enabling you to extend the forms’ features.
So, hurry up and get started with the most potent plugin today.
If you’re interested in more WordPress-related content, visit our blog. Similarly, for an easy video tutorial, subscribe to our YouTube channel.
You can also reach out to us on our socials. We’re available on Facebook and Twitter.


![Zakra 3.0 | Zakra Pro 2.0 Release [Major Updates!]](https://i.ytimg.com/vi/g3rifl7kWvg/maxresdefault.jpg)