Learning how to create order form in WordPress is essential if you’re planning to take orders through your website. And this article will teach you exactly that!
With WordPress, you can either create an order form without any payments or accept payments with the order. Still trying to figure out how? Don’t worry! We’ll walk you through both of these processes in a step-by-step tutorial below.
Before that, let’s learn a bit about why you need an order form for your business and the best way to create one. Let’s start!
Table of Contents
Why Do You Need an Online Order Form for Your Business?
You might have heard suggestions to include an online order form on your business website. Do you ever wonder why it’s so crucial?
The obvious answer is to collect orders online through a front-end form. But what does that entail for your business growth? Let’s find out:
- A front-end order form eliminates the need for customers to contact you through email or calls to place orders. It’s like removing a barrier that makes users hesitate to purchase.
- It makes the ordering process more streamlined for both you and your customers. You can also reduce manual tasks and switch to automated record-keeping and reporting.
- If you integrate the order form with payment gateways, you can easily accept online payments as well.
These are only some reasons as to why your business needs an order form on the website. Thus, it wouldn’t hurt to include such a useful form on your WordPress site.
WordPress, by default, doesn’t let you design order forms without coding. What method do you follow in that case? What’s the best way to add an order form to your website?
We’ll discuss it in the next section, so go on ahead!
Best Way to Build an Order Form in WordPress
Plugins are always the best way to go when it comes to extending the tools in WordPress. Likewise, to build your WordPress online order form, you can search for an order form builder plugin.
And the best option you’ll find is Everest Forms, a drag-and-drop custom form builder for WordPress. Using this powerful plugin, you can easily create any form you need for your site. Contact forms, survey forms, appointment forms, and most importantly, the order form.

Additionally, Everest Forms comes with several payment fields that you can use to create an online order form. So, you can let your users place an order on your products and services from a frontend form.
Moreover, the plugin supports smooth integration with payment gateways like PayPal, Stripe, etc. Hence, you can quickly accept payments through the order form.
Besides, Everest Forms offers plenty of rich features you don’t want to miss out on.
- Integrate your WordPress forms with thousands of apps through Zapier.
- Convert form submissions to PDF.
- Prevent contact form spam.
- Analyze form submissions from the Entries dashboard.
- Style the forms without coding.
Given all of these features and more, Everest Forms is definitely the best way to create an order form in WordPress.
With that said, let’s finally dive into the process of building an online order form using Everest Forms.
How to Create Order Form in WordPress?
Designing an order form is simpler than you think, especially with a plugin like Everest Forms. Just follow the steps we’ve detailed below, and your order form will be ready for publishing in no time!
1. Install and Activate Everest Forms and Everest Forms Pro
Naturally, you’ll need to set up the Everest Forms plugin on your website to create an order form.
So, go ahead and log into your site’s WordPress admin dashboard. Then, install and activate both the free and premium versions of Everest Forms. That’s because the payment fields and payment gateway integration are only available in the premium version.
So, you must first install the free plugin and then install the pro plugin on top of it. For a complete guide, refer to this article on how to properly set up Everest Forms Pro.
2. Install and Activate the PayPal Standard Add-on
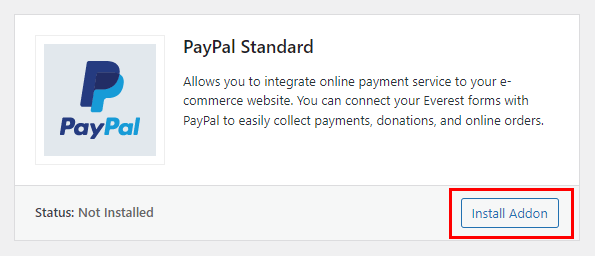
After activating Everest Forms Pro, you’ll get access to the premium add-ons that extend the core plugin’s features. And one of the add-ons is PayPal Standard, which we will need for this tutorial.
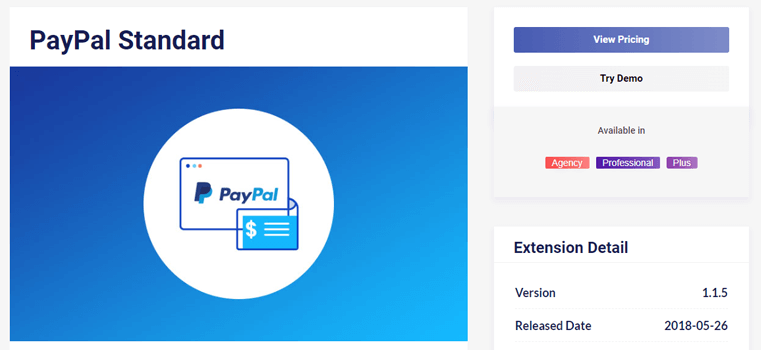
The PayPal Standard add-on gives you access to the key payment fields necessary for a complete order form. Moreover, it also lets you connect your form to PayPal and accept payments.
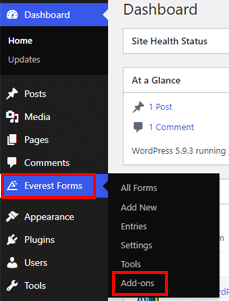
So, let’s install and activate this add-on on your site! For that, open Everest Forms >> Add-ons and search for the add-on.
Click the Install Addon button and then Activate it. The add-on is now successfully set up for you to use.
However, PayPal is just one of the few payment gateways Everest Forms provides. If you’d rather not use PayPal to accept payments, you can use the Stripe or the RazorPay add-on.
For this tutorial, we’ll be using the PayPal Standard add-on. You can choose any other add-on that meets your requirements.
3. Create and Customize Your Online Order Form
Now, it’s time to create and customize a new order form.
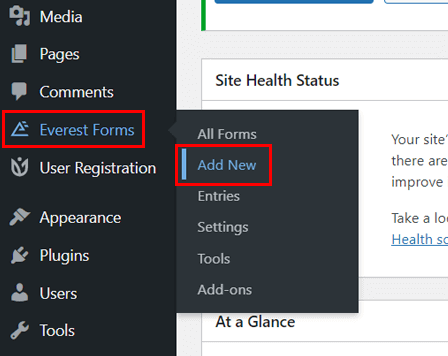
Start by navigating to Everest Forms >> Add New.
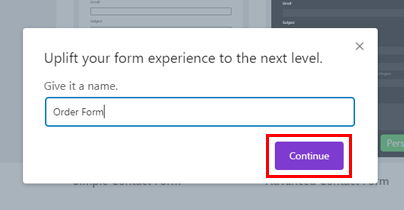
Here, click on Start from Scratch to open the form builder.

Next, give your form a name and click Continue.
The form builder has all the available fields on the left side. You can drag and drop these fields onto the right to build your form.
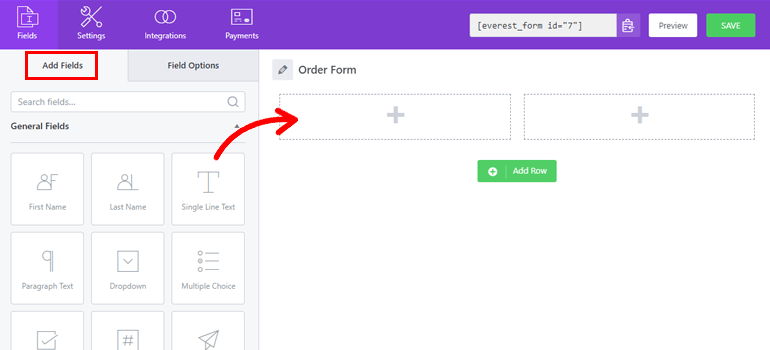
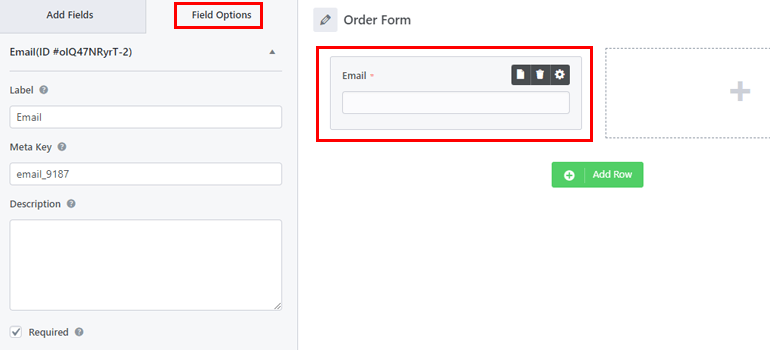
Everest Forms offers plenty of custom fields for you to choose from. So, you can add any field to the form you want. And if you’re going to customize the field, you have to click on it. This opens the Field Options, where you can edit the field’s various options.
But your order form is still incomplete until you include the payment fields. You’ll find them as you scroll down the fields tab.
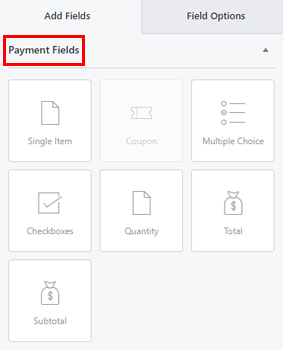
Let’s look at each field in detail to help you understand which of them you should add to the form.
Single Item: The Single Item field adds the singular item you’re selling to the form. You can customize the field and give the item a predefined price. You may also let users enter their own price for the item. Otherwise, you can keep the item completely hidden from the users.
Multiple Choice: This field helps you add various product choices to the form. The user will be able to select a single option among the choices. You can assign a price to each product manually. Moreover, you can even use image choices instead of text choices.
Checkboxes: Similar to the Multiple Choice field, you can provide multiple product options to users with the Checkboxes field. The only difference is that users can tick as many products/services as they want.
Quantity: Users can enter the quantity of the product they’re buying into this field. The value of this field is important to calculate the total amount. You must also set the field using which the final amount is calculated. The field can be Single Item, Multiple Choice, or Checkboxes.
Total: The Total field displays the total amount the user needs to pay based on the quantity and product price.
Coupon: If you’re offering discounts, you can add a coupon code field to the form. The customers will enter the coupon code into the field, and the discount will be applied to the total amount. However, you’ll need the Coupon add-on to access this field.
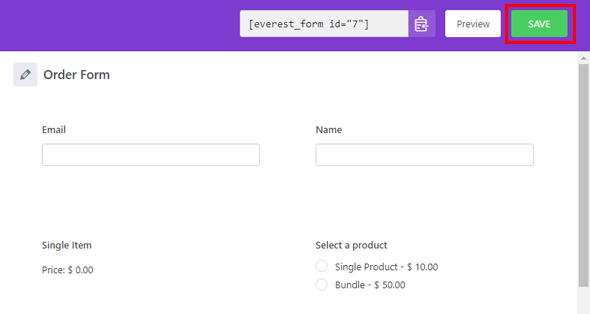
When your order form is ready, hit the Save button at the top to keep all the customization you’ve made.
4. Display the Order Form on WordPress Website
There’s more than building the order form before you’re ready to start taking customer orders. You still need to publish the form on your site. Only then will your users be able to find the form and place their orders.
For this, open the page or post where you want to add the form. You can also create a new page or post. It’s entirely up to you.
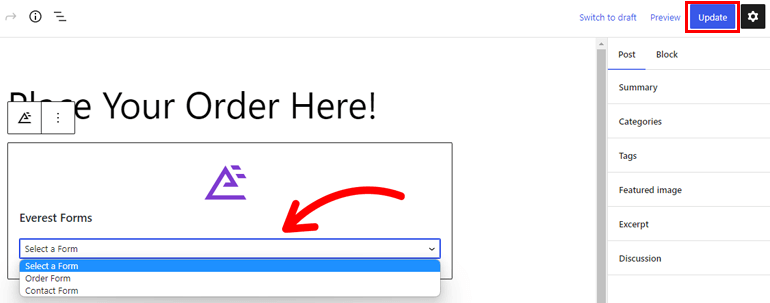
In the Gutenberg editor, press the Block Inserter (+) and search for the Everest Forms block.

Add it to the page and select your custom order form from the dropdown. Hit the Update button, and your form will be live on your site.
If it’s a new page or post, hit the Publish button.
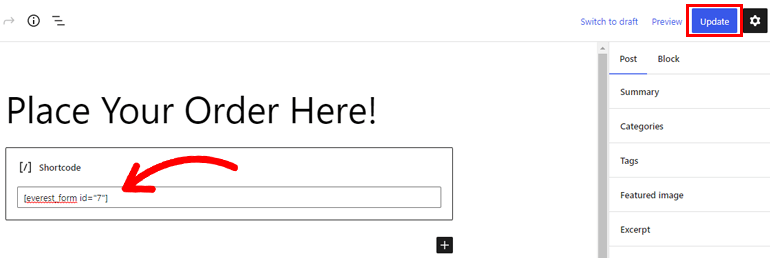
Alternatively, you can go for the shortcode method. Copy the form shortcode of your order form from the top of the builder.
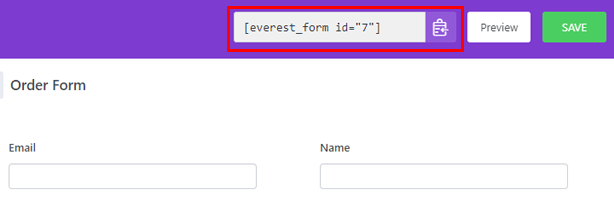
Open the page or post afterward and add a Shortcode block using the Block Inserter.
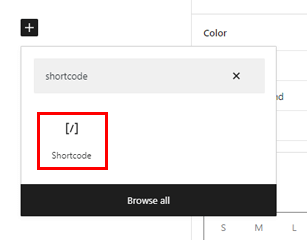
Paste the shortcode you copied previously into the block and click Update.
And you’re done! You’ve successfully created an order form and displayed it on the front end.
How to Create a WordPress Order Form with Payment?
The process above shows you how to create a WordPress order form without any payments actually occurring. But what if you want to accept payments using the form?
In that case, you must implement two more extra steps, as explained below. You can proceed with the following steps after you’ve created the order form.
1. Enable PayPal Standard for the Form
First, you must connect your form to the PayPal payment gateway. This redirects your customers to the PayPal payment system once they hit Submit on your order form.
All you need to do is open the order form and navigate to the Payments tab. Here, you’ll see an option called Enable PayPal Standard. Tick the checkbox for the option and hit Save.
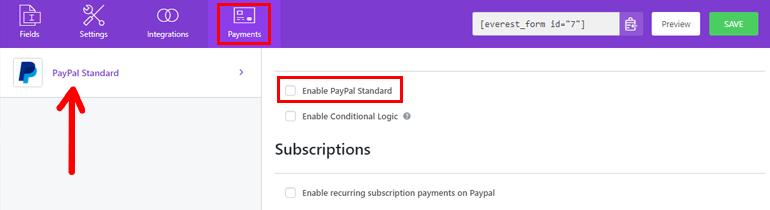
And with that, the initial connection between the order form and PayPal is completed!
2. Configure the PayPal Settings
As soon as you enable the PayPal payment option, a handful of new settings will appear right below. You need to configure these settings for an accurate and error-free payment process.
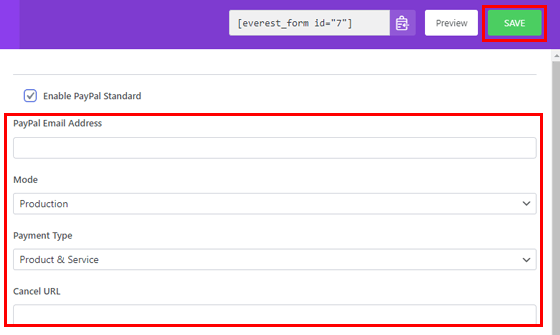
PayPal Email Address: It’s vital that you set a PayPal Email Address for the form. The address you enter is the one where you want to receive all the payments your customers send.
Mode: Everest Forms lets you choose between the Production mode and the Sandbox mode. You can choose the latter mode if the form is for testing purposes only.
Payment Type: Next, select the type of payment a customer is sending. Is it for a Product & Service or a Donation?
Cancel URL: The best part is that you can redirect users to a URL of your choice when they cancel their PayPal payment. Just enter the URL you want to redirect them to in the field.
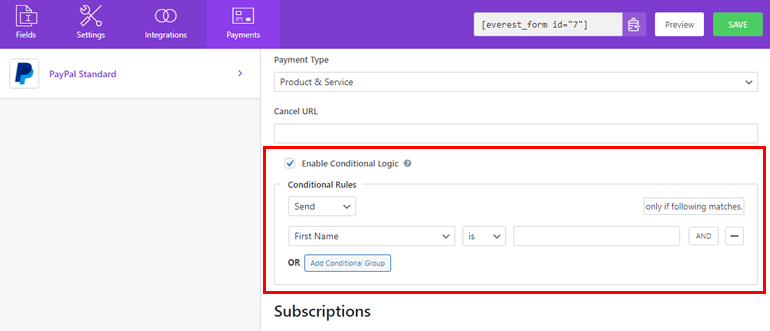
Enable Conditional Logic: You can also enable conditional logic to handle payments for the form. You can set as many rules as you need with Everest Forms’ advanced conditional logic features.
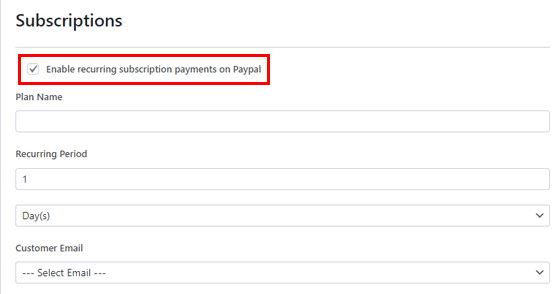
Subscriptions: The plugin lets you set up a subscription-based payment system. This means the customer must pay recurring fees to access your product or service. For that, enable the subscriptions option and configure its settings.
After configuring all the required options, click the Save button at the top.
Congratulations! You’ve successfully created an online order form with payment. As we mentioned before, you can do the same with the Stripe payment gateway or RazorPay. It’s up to your business needs!
Wrapping Up!
That wraps up our article on how to add an order form to a website. As you might have realized by now, it’s super simple with a plugin like Everest Forms at your disposal.
This incredible plugin will help you create just about any form, not just order forms. Plus, you can integrate your forms with various payment gateways like PayPal and Stripe. This way, you can accept customer payments right through the order form.
Besides, Everest Forms has so many more features to offer. For instance, you can add Google Maps to your form, send confirmation emails after form submissions, and more.
Try it for yourself once! We’re sure the plugin will meet all your requirements as a website owner.
You can learn more about Everest Forms and WordPress in general through our blog. If visual learning is more your style, we also have a YouTube channel with detailed tutorials.
Lastly, follow us on Twitter and Facebook to receive news and article updates.


![Zakra 3.0 | Zakra Pro 2.0 Release [Major Updates!]](https://i.ytimg.com/vi/g3rifl7kWvg/maxresdefault.jpg)