If you’re upgrading to the premium version of Everest Forms, you must learn how to install Everest Forms Pro properly.
It’s pretty straightforward; you just need to install the free Everest Forms plugin and set up Everest Forms Pro. However, any beginner is bound to get confused with the exact steps.
Hence, we’ve prepared a step-by-step guide that you can follow to properly install Everest Forms Pro in WordPress. You’ll also learn how to install any of the premium add-ons available with Everest Forms Pro.
So, make sure you read till the end. Let’s start!
Table of Contents
When Do You Need Everest Forms Pro?
As you already know, Everest Forms is a powerful form builder that comes with a simple drag and drop interface. Its free version already comes with more than enough features to help you build simple to advanced WordPress forms. However, there might be cases where you’ll need to add specific features to your form.
For instance, if the form design is too plain for your taste, you might want to customize the form style, fonts, border, etc.
Or you may need to conduct a survey on your audience with the help of survey forms, polls, and quizzes.
For such cases, Everest Forms provides a range of premium add-ons designed to add specific features to your WordPress forms.
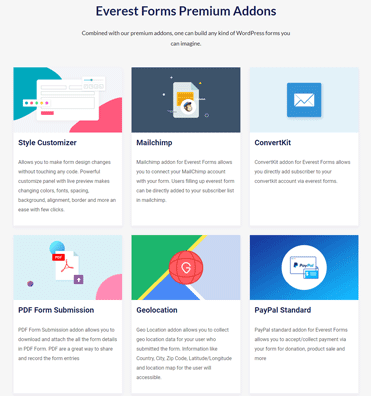
Hence, you can use the Style Customizer add-on to customize the style of your forms. Likewise, you can use the Survey, Polls, and Quiz add-on to quickly create surveys that yield accurate results.
There are a total of 23 premium Everest Forms add-ons as of now, with more in development.
- Style Customizer
- Mailchimp
- ConvertKit
- PDF Form Submission
- Geolocation
- Paypal Standard
- Conditional Logic
- Multi Part Forms
- Survey, Polls, and Quiz
- Stripe
- Zapier
- User Registration
- Post Submissions
- Captcha
- MailerLite
- ActiveCampaign
- Google Sheets
- Email Templates
- Campaign Monitor
- Save and Continue
- Repeater Fields
- Calculations
You’ll be able to access all these add-ons depending on the premium plan you’ve purchased from Everest Forms.
And once activated on your site, you can use them to customize your forms and email templates, connect your forms to email marketing tools, secure forms with CAPTCHA, etc.
Best of all, you get premium, ready-made form templates for your various needs. That way, you won’t have to start building forms from scratch.
Hence, to reap all these benefits, we suggest upgrading to Everest Forms Pro.
We’ll show you how to set up Everest Forms Pro for your WordPress site in a detailed guide below. So, continue reading!
How to Install and Set Up Everest Forms Pro?
Installing and setting up Everest Forms Pro is easier than you can imagine. Just follow the steps we’ve explained below, and you should be able to get Everest Forms Pro running on your site in no time!
1. Install and Activate the Free Everest Forms Plugin
Before we start, it’s important to keep in mind that the Everest Forms Pro acts as an extension to the free Everest Forms plugin.
So, you’ll first need to install and activate the free version of the plugin. Only then will you be able to set up the premium version.
That’s why we’ll go briefly over the steps to install the free Everest Forms plugin.
Start by logging into the admin dashboard of your WordPress website. Here, find the Add New page under Plugins.
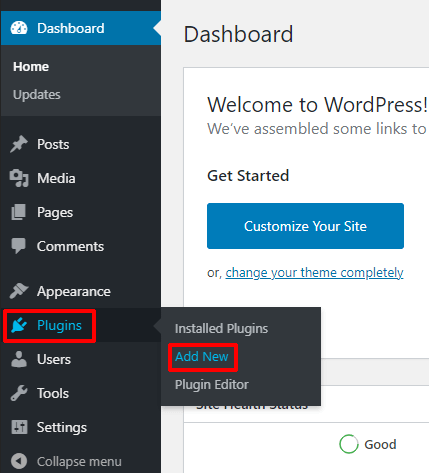
Then, type “Everest Forms” into the search bar and hit enter. When the search results display the plugin, click the Install Now button.
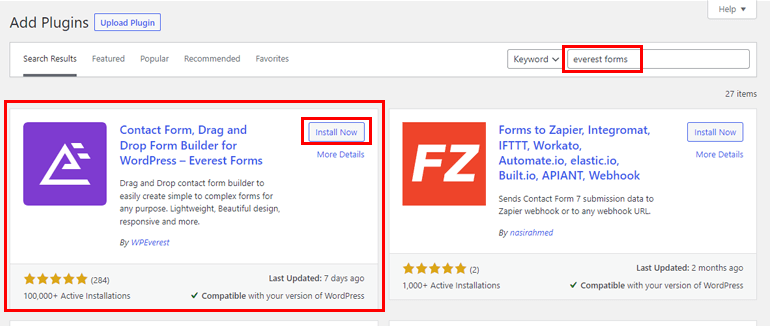
Right after the installation is complete, press the Activate button.
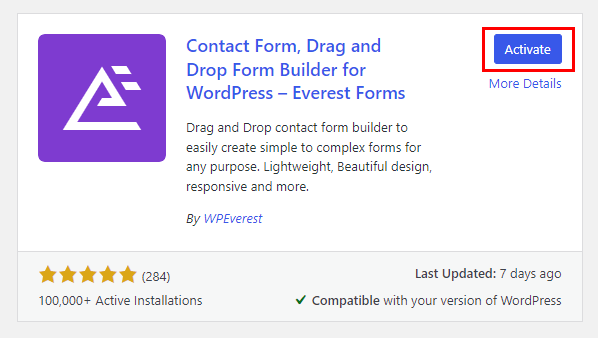
And as quickly as that, you’ve installed and activated the core Everest Forms plugin on your site.
2. Download and Install the Everest Forms Pro File
With the core plugin on your site, you can now install Everest Forms Pro on top of it. But first, make sure you’ve purchased a premium plan for Everest Forms.
For that, head on over to the official pricing page and choose the plan suitable for you. Also, be mindful of the add-ons available under each plan.
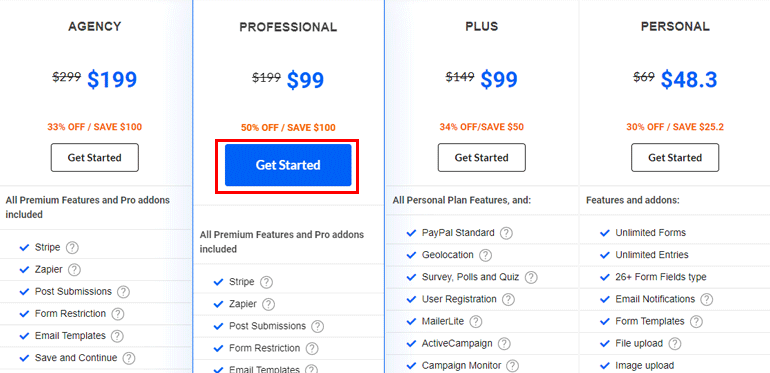
Click the Get Started button once you’ve decided on a plan. Now, complete the steps by entering the necessary details and purchase the plan.

You’ll receive the link to log in to your WPEverest dashboard in the email address you’ve provided during purchase.
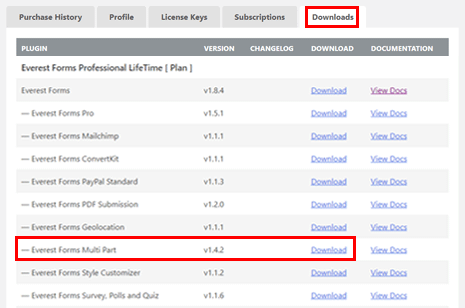
Follow the link and access your WPEverest dashboard. Here, find Everest Forms Pro under the Downloads tab. Then, press the Download button to download the premium Everest Forms plugin file.
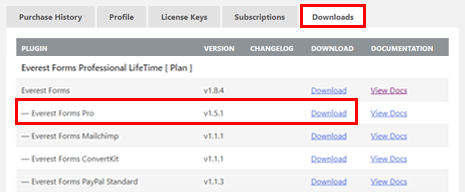
This should download the ZIP file and save it on your local device.
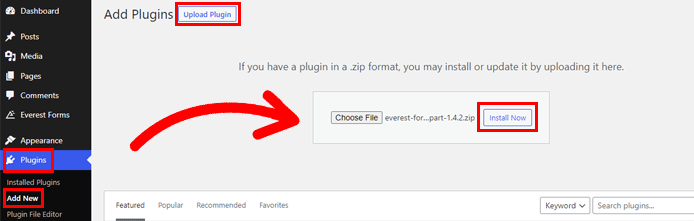
Afterward, go back to your WordPress dashboard and open Plugins >> Add New.
Now, click the Upload Plugin button at the top and upload the file you just downloaded. Next, click the Install Now button.
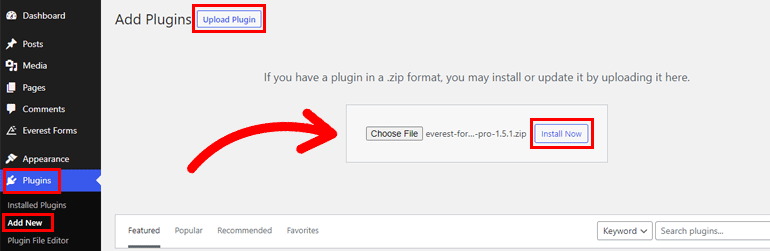
Then, finish the installation by pressing Activate Plugin.
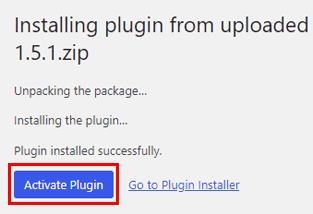
If you’ve completed the above steps correctly, your Plugins page should show Everest Forms and Everest Forms Pro plugins.

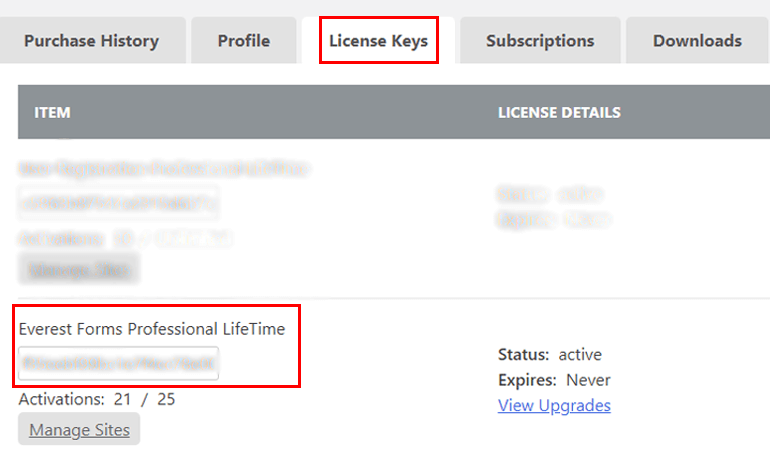
You’ll also see a notice asking you to enter the License Key for Everest Forms Pro. You can find this key in your WPEverest dashboard under the License Keys tab.
Simply copy the key and paste it into the field under Everest Forms Pro, then press the return key.
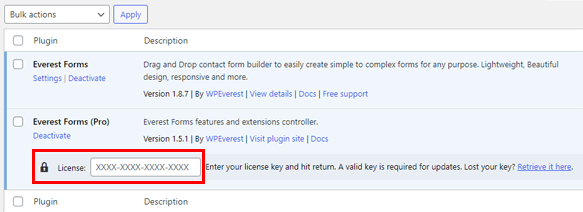
This will activate the license for your premium purchase and enable you to receive automatic updates for all the premium add-ons.
3. Start Building Forms with the Plugin
With both the core and premium plugins installed and activated on your site, you can start building any type of WordPress form you desire.
Contact forms, job application forms, donation forms, medical appointment forms, survey forms, leave request forms; you name it!
Simply follow the comprehensive tutorials available in our blog and implement the proper steps to create the type of form you need quickly.
How to Install a Premium Everest Forms Add-on?
As mentioned before, the premium version of Everest Forms allows access to 23 valuable add-ons depending on the plan you’ve purchased. And if you want to use them, you must learn how to set them up as well.
So, let us give you a brief guide to install a premium add-on on top of Everest Forms Pro.
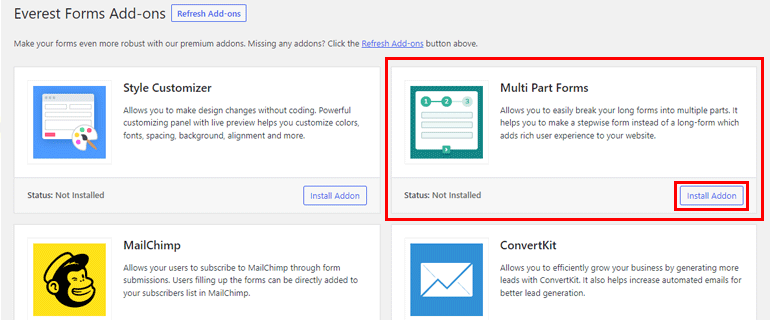
We’ll use the Multi Part Forms add-on in the guide below to demonstrate the process. With the add-on, you can break long forms into multiple pages to create user-friendly WordPress forms.
But don’t get confused! The installation and activation process is the same for any other add-on. So, let’s get started!
1. Download and Install the Everest Forms Multi Part Forms Add-on
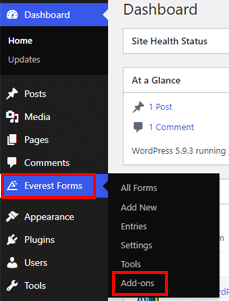
First, navigate to Everest Forms >> Add-ons in your WordPress dashboard. Here, you can see all the premium add-ons available in Everest Forms.
Now, find the add-on you want to install, i.e., Multi Part Forms. Then, click the Install Addon button and Activate the add-on consecutively.
Alternatively, you can download the Multi Part add-on file from the Downloads section of your WPEverest dashboard.
Next, upload the plugin from Plugins >> Add New >> Upload Plugin and hit Install Now.
Regardless of the method you choose, ensure you complete the installation process by activating the add-on.
So, you’re now ready to use Everest Forms Pro and the Multi Part Forms add-on.
2. Create Multi-step Forms with the Add-on
As the name suggests, the Multi Part Forms add-on lets you divide a WordPress form into multiple parts. This prevents your forms from getting too lengthy and congested.
Take an order form for example. You can separate the user’s personal information, payment details, and shipping details into 3 parts. Thus, your order form looks short, clean and organized.
The Multi Part Forms add-on in Everest Forms Pro helps you create such user-friendly forms within a few clicks.
Intrigued? We’ve covered the topic of creating multi-step forms in Everest Forms using the Multi Part Forms add-on in a separate blog. Go through it once if you’re interested in learning more about it!
Wrapping Up!
To sum it up, the free version of Everest Forms is more than enough to help you create simple to advanced WordPress forms. However, Everest Forms Pro takes the form-building experience to the next level.
The premium version comes with extra features and premium add-ons that cater to the specific needs of WordPress users.
It’s the perfect tool for anyone who needs to block WordPress form spam, receive payment through forms, save form submissions as PDF, and so much more.
So, if you want Everest Forms Pro for your website, you can follow the guide we’ve provided above to install Everest Forms Pro and use the tool without any hassle.
Read more on WordPress-related topics on our blog! You can also follow us on Twitter and Facebook to stay updated.


![Zakra 3.0 | Zakra Pro 2.0 Release [Major Updates!]](https://i.ytimg.com/vi/g3rifl7kWvg/maxresdefault.jpg)