Do you want to learn how to auto-populate form fields with a query string in WordPress? We’ll show you how.
Auto-populating form fields can save your customers some time while filling out forms. At the same time, you can identify where the submissions are coming from as a business.
The simplest way you can do this is by using the Query String variable. Thus, in this article, we’ll explain the entire process of auto-populating WordPress form fields using query strings.
First, let’s start with a short introduction about the query string.
Table of Contents
What is Query String?
We all know the basics of a URL. You can either click or type it in the browser’s address bar, which takes you to the corresponding webpage.
The query string is a section of the URL which starts with a question mark sign (?). It has a value assigned to a parameter using an equal sign (parameter=value).
For example, a URL with query string would look something like:
www.example.com/?parameter1=value1
The primary purpose of a query string is to assign a specific value to a parameter. In case of a WordPress form, the information a user fills into the fields are passed as a query string after submission.
Given the way a query string works, you can auto-populate the form fields in a form by passing the field parameter and its values in the URL.
You might be wondering what’s the point of auto-populating fields in such a way. Read ahead to learn why!
How Does Auto-populating Forms Using Query Strings Benefit You?
Let’s say you’ve just launched a campaign through different social media platforms like Facebook and Twitter. Let’s assume, they’re generating a good amount of response and increasing sales, and everything is going great.
But wouldn’t you want to find out where the responses are coming from? Which platform is your campaign more fruitful on?
Tracking this information would help you focus more on your campaign on that particular platform. And, also to improve the campaign on low-performing platforms.
This is just one scenario where query strings come in handy.
Similarly, auto-populating form fields with query strings will help you track the performance of your forms.
We’ve enlisted some more benefits below:
- Auto-populating through query strings help you sort out categories of customers according to the link they clicked.
- It lessens the number of keystrokes required to complete the form.
- This feature increases the possibility of lead conversion.
With that said, now, let’s check how to auto-populate WordPress forms with query strings.
How to Auto-populate Form Fields with a Query String Using Everest Forms?
Auto-populating form fields with a query string doesn’t have to be complex at all! Especially when you have a plugin like Everest Forms at hand.
Everest forms is one of the best WordPress form builder plugins available on the market. This feature-rich plugin helps you create unlimited custom forms for your website without needing coding skills.
Not to mention, it lets you auto-populate specific form fields by using query strings.
Follow the simple steps below and you’ll be able to auto-populate the form fields in your WordPress form in no time!
Step 1: Create a New Form
Before getting started, ensure you’ve installed and activated both Everest Forms and Everest Forms Pro on your WordPress site.
You need the premium version of this plugin to unlock the “Auto-Populate” feature. So, pick a suitable plan from one of the pricing plans and set up the plugin on your site.
After the installation is complete, you can create a new form.
Everest Forms offers a wide range of pre-built templates and plenty of custom fields. So, you can create any form you need, such as contact forms, newsletter signup forms, job applications forms, etc. It’s up to you!
While creating a new form, you can either start from scratch or use a pre-existing template.
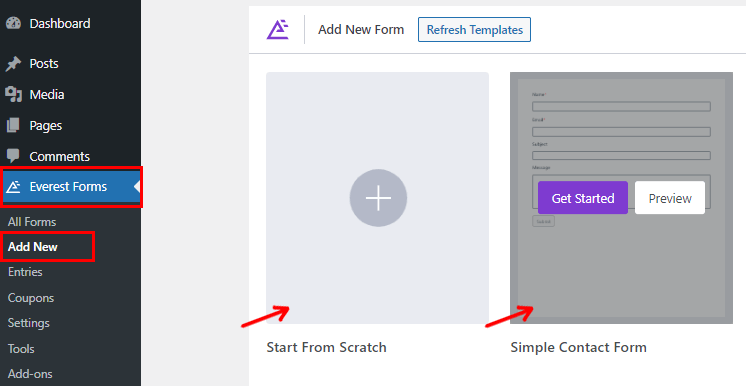
If you wish to create your own form, click Start From Scratch. For the pre-built template, go to Everest Forms >> Add New and choose the template of your choice.
For this tutorial, we’ll be using our Simple Contact Form template. All the required fields are already present in the form. However, you can add more fields and customize them without any restrictions.
For a detailed guide, refer to our article on how to create a WordPress contact form.
When the form building is complete, don’t forget to hit the Save button at the top.
Step 2: Add the Parameter to Auto Populate the Field
Now that your form is ready, you can add a Parameter to the field you want to auto-populate.
For that, select a field that you’d like to be auto-filled. This will show you its Field Options on the left side of the builder.
For example, we selected the Subject field in our form.
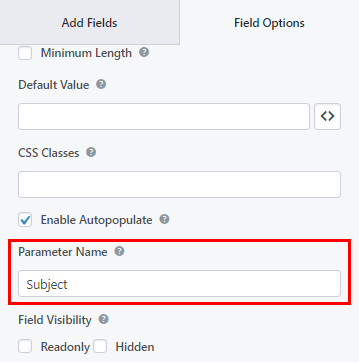
Scroll down to Advanced Options and search for the Enable Auto Populate option. When you find it, simply tick the checkbox next to it to enable the auto-populate feature.

Once you’ve auto-populated the field, you’ll be able to name its Parameter. So, please choose a proper and logical parameter name and add it under the Parameter Name option.
For example, for the Subject field, we’ve given a parameter name “subject”.
Remember to Save all the changes before moving ahead.
Step 3: Add Form to The WordPress Website
The next step in the process is to publish the form on a page on your site.
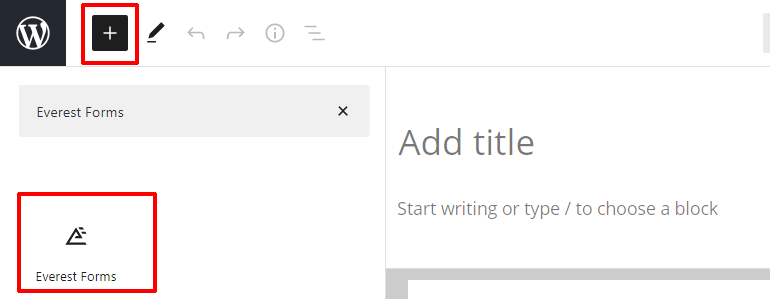
To do so, from your dashboard go to Post/Page >> Add New then click on the plus icon (+) to add a new block.
Next, search for the Everest Forms block and add it to the post/page. After that, you can select your form from the drop-down.
If you want a preview of how your form looks in the front, click the Preview button. Finally, you can hit the Publish button at the top.
For example, your form page link may look like this:
www.example.com/submit-new-form/
Your users can now find and fill the form from the page.
Step 4: Create a Link with a Query String
Here’s the final yet crucial step you don’t want to miss. And that is creating a URL/link with a query string.
To create the link, add the query string behind the URL of your form page. Now to append a query string onto your URL,
- Start with a question mark (?) after the link.
- Then enter the parameter you set before in your form.
- After that, put an equal sign (=). Doing this indicates the value to be assigned to the parameter.
- And add a value to the parameter. This value will autofill in your form.
For instance, let’s take our form’s link;
www.example.com/submit-new-form/
On the same link, we’ve added the query string;
www.example.com/submit-new-form/?subject=AboutPricingDetails

Here “subject” is the parameter name that we set before. And, everything beyond (=) equals to sign is what we want to autofill in our form, i.e., the value.
Further, to add spaces between the value text, you can simply add “%20”.
www.example.com/submit-new-form/?subject=About%20Pricing%20Details
Now that you’ve successfully created a link with a query string. You can attach it to any page you desire. Or share it to your audience via different channels like email or social media.
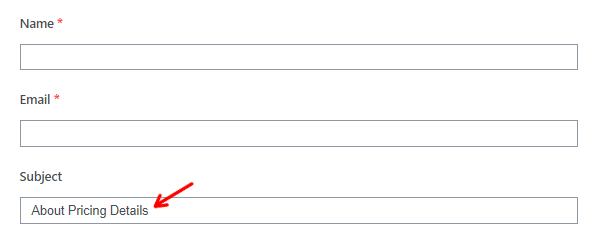
Hence, whenever your users click on the form page link with the query string, the ‘Subject’ field will be auto-populated with ‘About Pricing Details’ text.
And that’s it! You can implement the same steps to auto-fill any form field you desire with an appropriate value.
Wrapping it Up!
That wraps up our article on how to auto-populate form fields with a query string in WordPress. Pretty easy, right?
With Everest Forms, you can easily enable the auto-populate feature for any form field. It lets you use query strings to auto-fill the form data for users.
If you still have any confusion or question, please do comment below. We’ll be happy to answer your queries.
You can do more with this powerful plugin, like accepting iDEAL payments in WordPress, uploading files from WordPress forms to Dropbox, and more. If you’re interested, you can read more about Everest Forms-related content on our blog.
For easy video tutorials, subscribe to our YouTube channel. And if you like our content, share it on your socials. You can also reach out to us on Twitter and Facebook.


![Zakra 3.0 | Zakra Pro 2.0 Release [Major Updates!]](https://i.ytimg.com/vi/g3rifl7kWvg/maxresdefault.jpg)