If you’re looking for the best way to add Google Maps to a WordPress contact form, this article is the perfect guide for you.
Adding Google Maps to the contact form helps you track your user’s location. And you can use this data to increase your conversation rates, carry out effective marketing campaigns, etc.
So, in this guide, you’ll learn to add Google Maps to WordPress contact forms in the most effective way.
But before that, let’s understand why you should add Google Maps in a contact form.
Table of Contents
Why Add Google Maps in a Contact Form?
Adding Google Maps to the contact form helps your website to grow in multiple ways.
First of all, it allows you to collect data regarding your user’s location. So, in the future, you can target specific customers and users while marketing your brand.
Moreover, knowing your user’s location improves your geolocation targeting and you can show them personalized content. This, in turn, drastically enhances your leads, conversion rates, and increases your website revenue.
So, these are some of the primary benefits of adding Google Maps to the contact form. Now, let’s know the best way to do it.
Best Way to Add Google Maps to WordPress Contact Form
You can add Google Maps to your contact form using a Google Maps WordPress plugin. Or, you can use a form plugin that supports Google Maps integration. There are numerous such plugins available in the WordPress market.
But, the one that stands out from the rest is Everest Forms, a powerful WordPress form builder plugin.
Why Everest Forms? Well, it’s a versatile plugin that has extensive features and functionality. And it’s a complete solution for building any form. Donation forms, job application forms, hotel booking forms; you name it!
Also, it has a user-friendly interface. Hence, you can build any type of form with the simple drag-and-drop method.
Most importantly, it offers the Geolocation add-on that allows you to collect the location data of your users through forms. You can get data of your users like Country, City, Zip Code, and Latitude/Longitude based on their IP address.
Using the same add-on, you’ll be able to add a map to your contact form in the front-end.
And so far, it has successfully accumulated 100000+ users’ trust. So definitely, it’s one of the best plugin options to add Google Maps to a WordPress contact form.
Adding Google Maps to WordPress Contact Forms with Everest Forms
It’s quite easy to add Google Maps to your contact forms. Just follow the steps we’ve explained below and you’ll have a WordPress contact form with Google Maps in no time.
1. Install and Activate Everest Forms Pro and Geolocation Add-on
First of all, let us clarify that you need to buy a premium plugin, no matter which plugin you use to add Google Maps to your contact form.
Similarly, you also need to buy the Everest Forms’ premium plan to access this feature. But worry not; this plugin’s premium plans come at an affordable price.
So, you can buy its premium plan by visiting its official website WPEverest.
Then, check out this article to install and activate Everest Forms Pro.
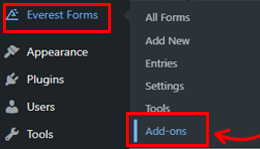
Now, we believe that you’ve successfully activated Everest Forms Pro. So to activate the Geolocation add-on, go to the Everest Forms >> Add-ons section of your WordPress dashboard.
By scrolling down, you’ll see the Geolocation add-on, then click on the Install Add-on option.
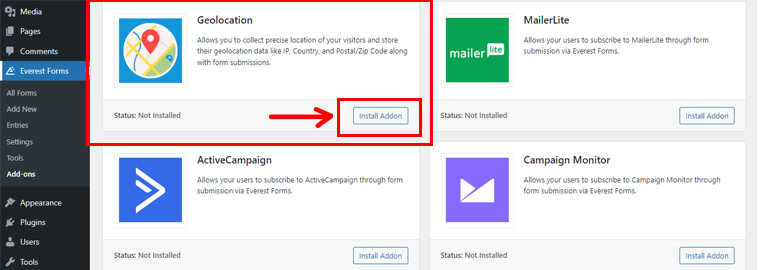
Then, press the Activate button.

2. Set Up the Geolocation Add-on
Now that you’ve successfully activated the Geolocation add-on, it’s time to generate an API (Application Programming Interface) key.
In a general sense, an API connects one program to another and it controls requests made between these programs. Whereas, API keys connect these programs with each other to share data and to connect to the system.
I. Generate API Key from Google Console
Remember that, you need a billing account to generate API keys from the Google Console to add Google Maps to your contact form. So visit their official billing page to get one.
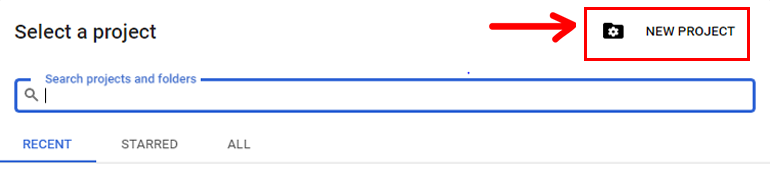
Now, after purchasing a billing account, go to your Google Console dashboard. Then, click on My First Project.

After that select New Project.
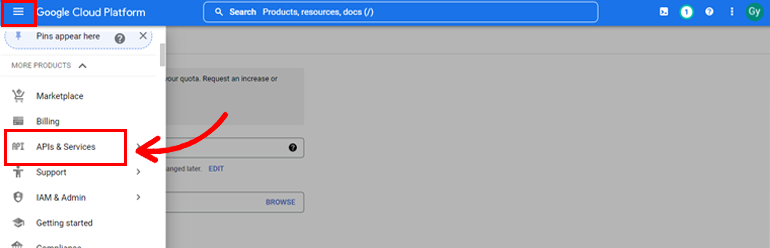
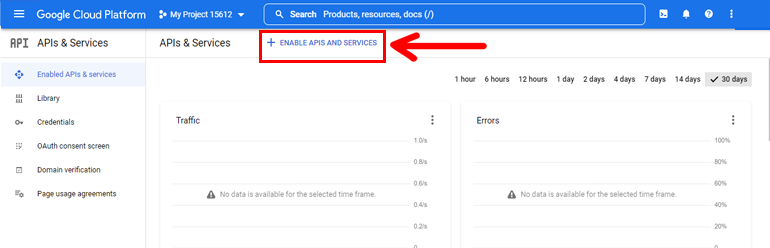
Then, press the hamburger menu on the left side of your dashboard and click on APIs & Services.
After that, it will open the API Library, and from here, press the + ENABLE APIS AND SERVICES button.
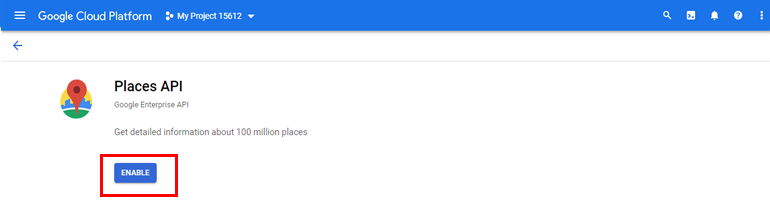
After enabling it, you’ll be directed to a new page where you need to search for the Places API option.
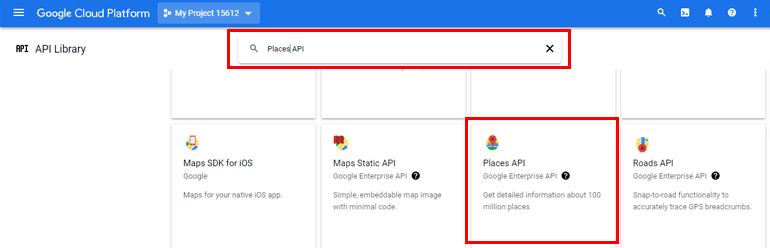
Once you find it, click on it and then, press ENABLE button.
As you enable it, click on the hamburger menu that will appear on the top of your left side. Then, navigate to APIs & Services >> Credentials.
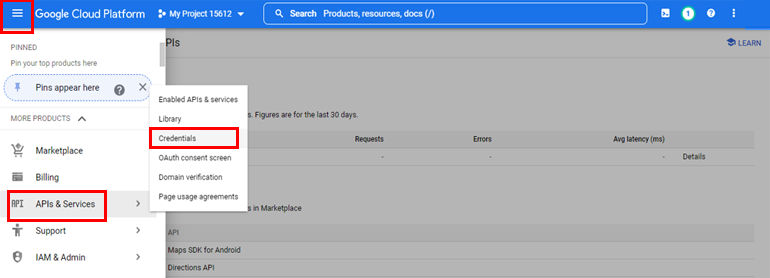
Then, click on the + CREATE CREDENTIALS section. And from here, select the API key option to generate an API key.
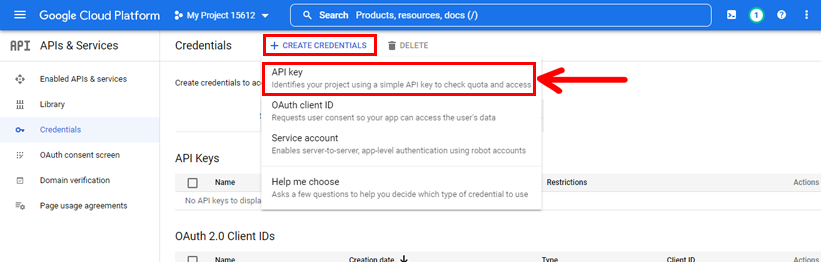
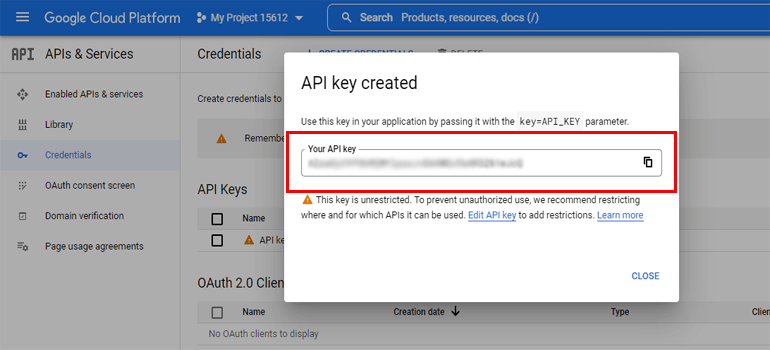
Now, the API key will appear in a pop-up window. All you need to do is copy it.
II. Add the API Key to Geolocation Settings in Everest Forms
Now, go back to your WordPress dashboard and add the API Key to Geolocation Settings in Everest Forms.
After copying the key, go back to your WordPress dashboard. Navigate to Everest Forms >> Settings, and click on the Geolocation option from the top.
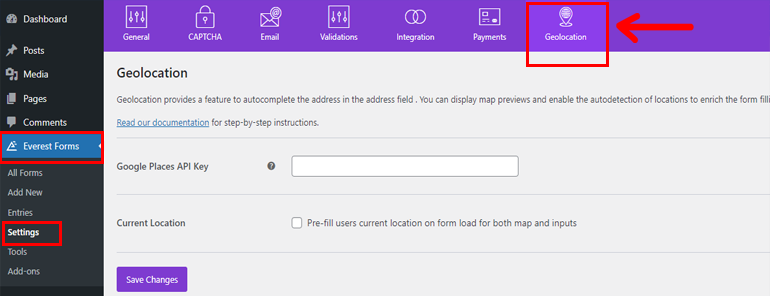
Here, you’ll see the Google Places API Key option where you need to paste your API key, which you copied earlier. After that, press the Save Changes button below.

3. Create a New Contact Form
Now that you’ve generated an API and added it to your website, it’s time to create a contact form.
Creating a contact form with Everest Forms is a piece of cake. First, go to your WordPress dashboard, and click on Everest Forms >> Add New.
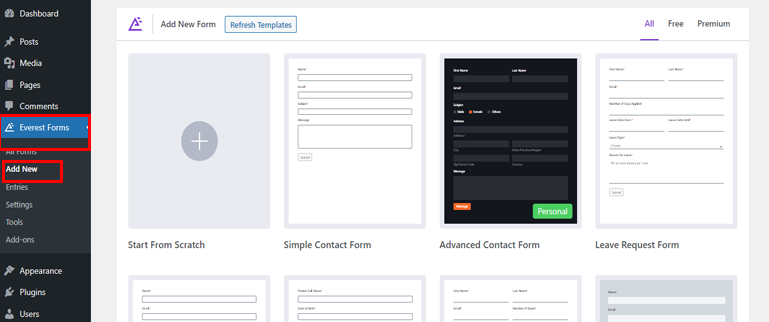
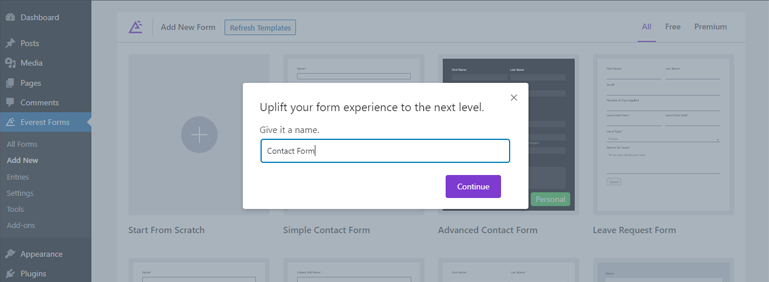
Everest Forms offers a series of templates that you can use with a single click of a button or build your form from scratch.
Here, we’ll build the form from scratch, and we’ve named it Contact Form.
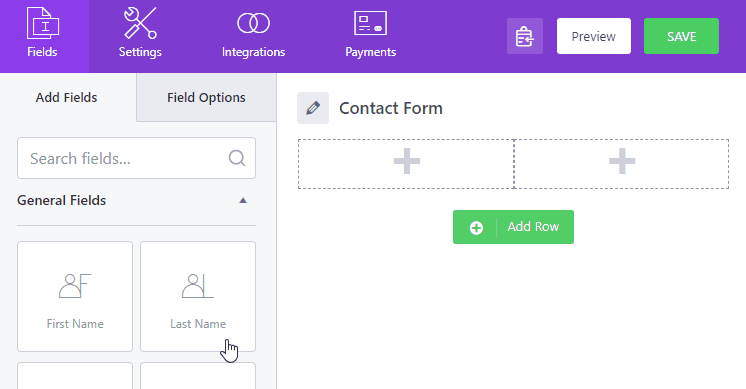
Then, you can drag and drop a field in your contact form from the Add Fields section.
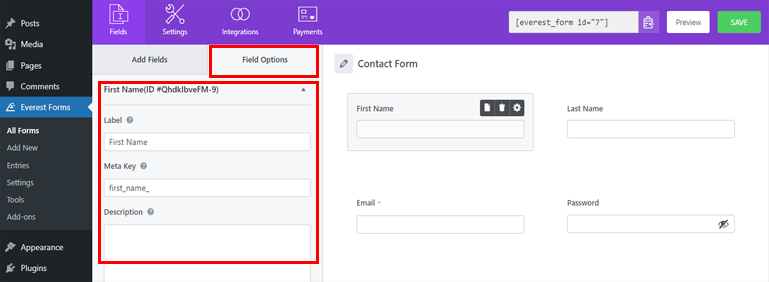
Moreover, with Everest Forms, you can change your form’s Field Label, Meta Key, Description, etc. And to do that, click any form field and go to Field Options and make changes.
If you need further help on the form-building process, go through our article on how to create a contact form using Everest Forms.
After all the necessary customizations, make sure you save them by clicking on the Save button at the top. You can also Preview what your form looks like in the front end.
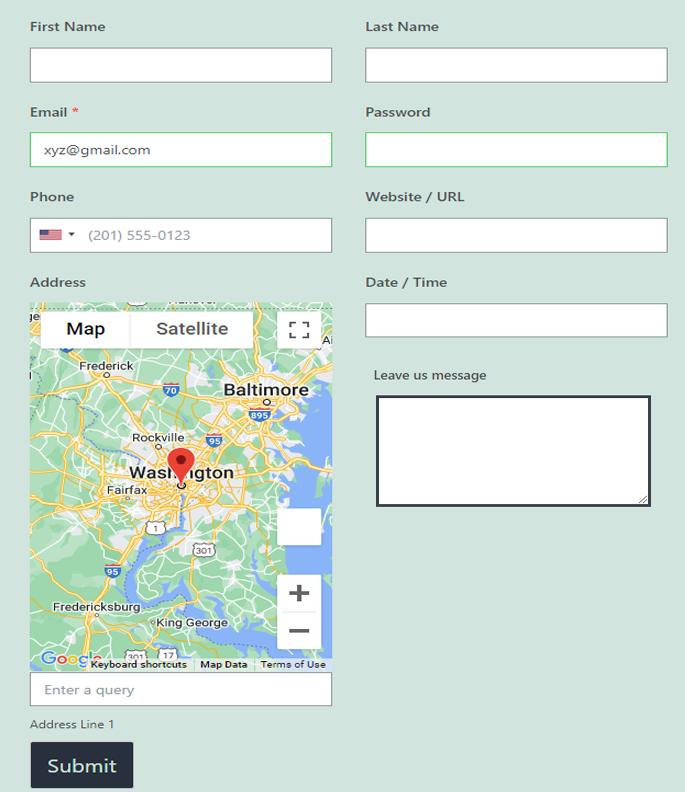
4. Add the Google Maps Address Field to Your Form
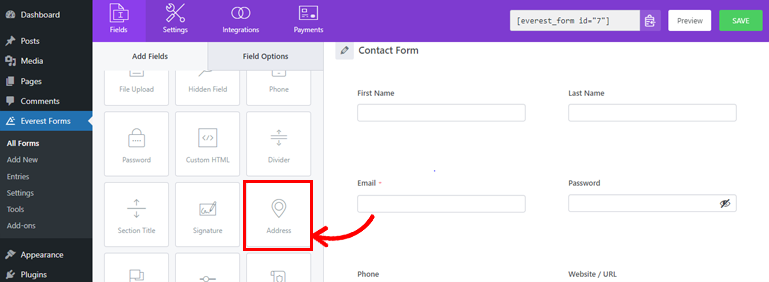
First, you need to add the Address field in your contact form to add the Google Maps address feature in your contact form.
So, go to the Add Fields section, and scroll down to Advanced Fields.
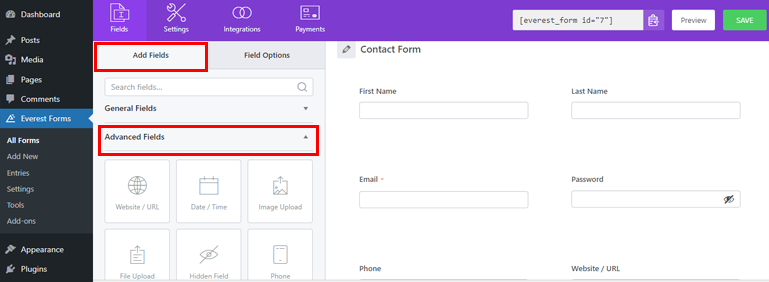
And then, add the Address field to your contact form.
After that, click on the Address field on the right to open its Advanced Options on the left panel.
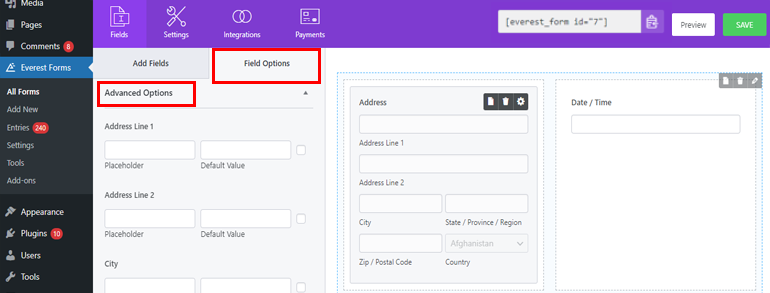
By default, the form displays a text address. Since we need to add a map to the form instead of a text address, change the Style option to Map from the dropdown.
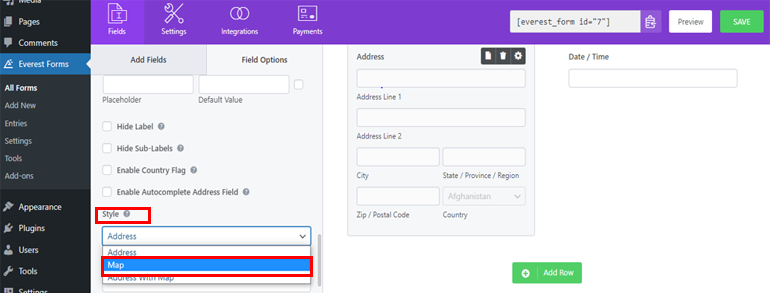
This adds the map and Address Line 1 to the contact form. When a user selects a place on the map, the address field below is auto-filled with the location selected.
That’s it! You’ve successfully added Google Maps to a WordPress contact form using Everest Forms!
5. Publish the WordPress Form
After you’ve completed all the steps above, it’s time to publish your contact form.
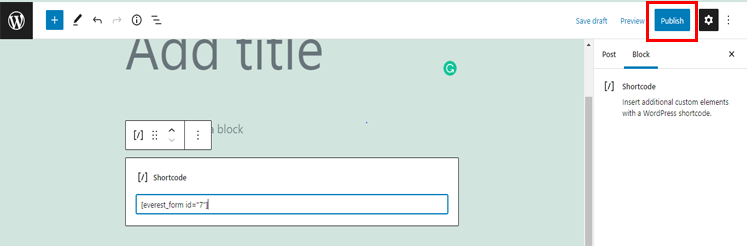
Simply copy your contact form shortcode from the top of the form builder.
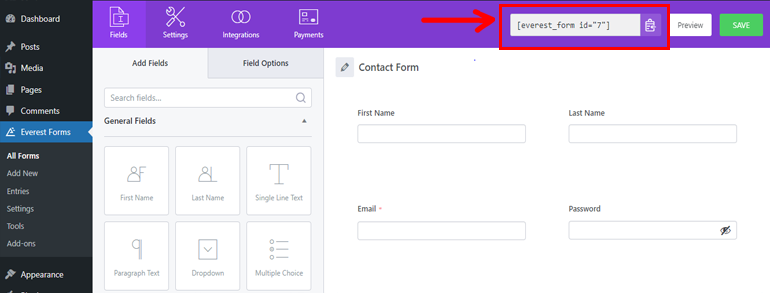
Then, open the post or page where you want to showcase your form. Here, add a Shortcode block using the block inserter (+).
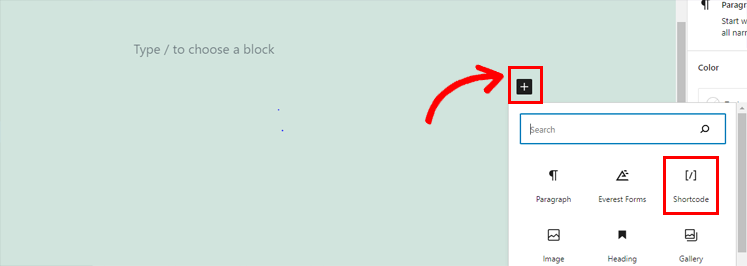
Then, paste the shortcode into the block.

Finally, hit the Publish button from the top of the left side corner.
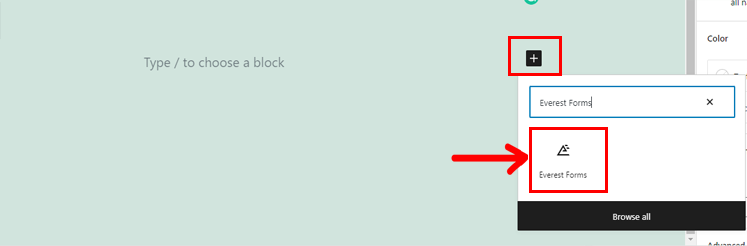
Alternatively, to publish your contact form, click on the block inserter (+) button as shown in the image. Type Everest Forms into the search bar and click on the block when it appears in the results.
After that, select the contact form you just created from the drop-down menu and Publish it.
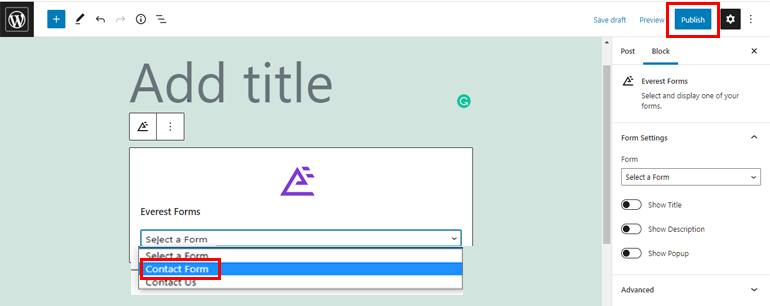
With that, your contact form with Google Maps will be live on your website.
Conclusion
So, that’s all for our article on how to add Google Maps to WordPress contact forms. As you can see, it’s super easy with a plugin like Everest Forms. However, that’s not all.
With Everest Forms, you can also add repeater fields to a form and change color of submit button. You can even send confirmation email after form submission.
But that’s just the tip of the iceberg. If you’re interested in learning more about this plugin, you can visit our blog and the official documentation page.
Also, don’t forget to follow us on Twitter and Facebook to receive updates on more helpful articles.


![Zakra 3.0 | Zakra Pro 2.0 Release [Major Updates!]](https://i.ytimg.com/vi/g3rifl7kWvg/maxresdefault.jpg)