Wondering how to limit form submission in WordPress forms? Then, this article is just the thing for you.
If your form entries are cluttering your WordPress dashboard, you might want to limit the number of submissions you receive for the form. What if we told you that it’s super easy with a WordPress plugin like Everest Forms?
Everest Forms lets you restrict unnecessary form entries in 6 different ways. Thus, you’ll learn how to use this plugin to limit WordPress form submission in this article.
So, make sure you read till the end.
Table of Contents
Why Restrict Form Entries in WordPress?
A website can receive a considerable number of form entries through its front-end forms. Oftentimes, you don’t need all the entries. They only end up cluttering your WordPress dashboard.
So, the primary reason for restricting form entries is to avoid unnecessary entries taking up your website space.
Hence, by limiting form submissions in WordPress, you can:
- Limit the number of job applicants applying through a job application form on your site.
- Schedule when an event registration form goes online to limit the number of total attendees.
- Target the preferred demographic in your WordPress forms by restricting submissions from users of a specific country.
- Set a certain date or time period for your users to place orders through an order form on your site.
The possibilities are endless when it comes to limiting form entries. With that said, it’s time to learn how to limit the number of form submissions in WordPress.
How to Limit Number of Submissions on WordPress Forms?
Well, you’ll find quite a few plugins to help you restrict form submissions. However, our pick is the incredible Everest Forms plugin.
This popular form builder plugin has it all. A drag and drop interface, ready-made templates, and beginner-friendly settings.
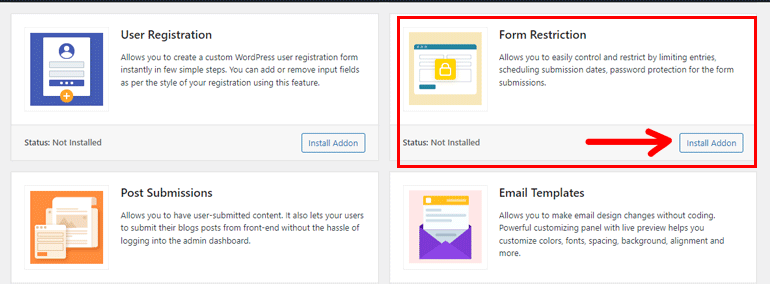
Most importantly, it offers a large selection of premium extensions, one of which is the Form Restriction add-on. Using this add-on, you can limit form responses based on the number of entries, user login status, country, specific time periods, etc.
That’s why we’ll be using Everest Forms to demonstrate the step-by-step process of limiting WordPress form submissions. Let’s get started!
1. Install Everest Forms Pro and Form Restriction Add-on
First of all, you must install Everest Forms Pro on your website. That’s because the Form Restriction add-on is only accessible through the premium version of Everest Forms.
Check out our article on installing Everest Forms Pro properly and quickly set up the plugin on your site.
Once that’s done, navigate to Everest Forms >> Add-ons in your WordPress dashboard.
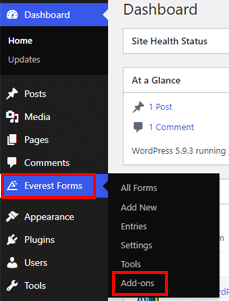
Scroll down to find the Form Restriction add-on and click its Install Addon button. Don’t forget to Activate it right after.
Now, your website has the core Everest Forms plugin, Everest Forms Pro, and the Form Restriction add-on. With that, you’re ready for the next step.
2. Create a New Form with Everest Forms
Next, you’ll need a form where you can restrict form submissions. So, let’s create a simple contact form for now.
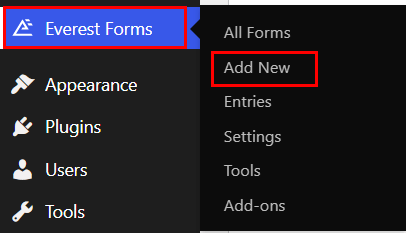
Navigate to Everest Forms >> Add New in your WordPress dashboard.
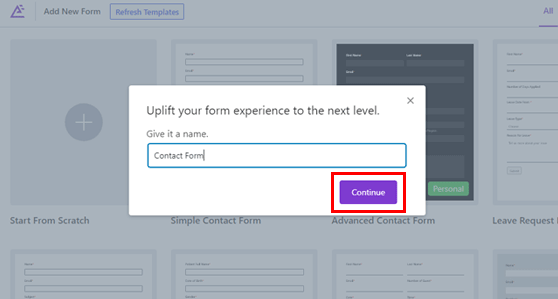
You can either use one of the pre-designed templates available or build a form from scratch. Here, let’s Start From Scratch.

Give your form a name and click Continue.
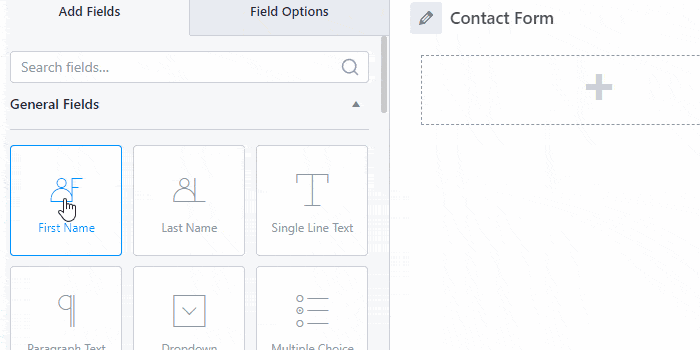
This opens up the form builder with all the available fields and their settings on the left.
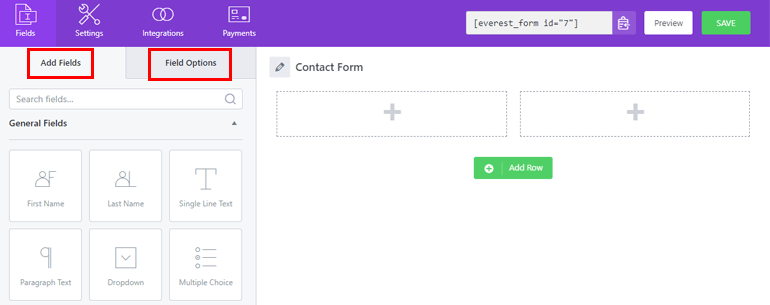
Simply drag the fields and drop them into the form on the right.
You can add as many rows and fields as you need for your form. You can also customize each form field from its Field Options.

You just have to click on the field, and it’ll open the Field Options in the left panel. From here, you can customize the Label, Description, CSS Classes, and more for the field.
Once you’re done, don’t forget to save the changes.
If you need a more detailed guide, check out our blog on how to create a contact form in WordPress.
If not, you can proceed to the next step, i.e., limiting form entries in the form.
3. Limit the Number of Form Entries
Here’s the most crucial part. With the addition of the Form Restriction add-on to your website, you get 6 options to limit form submissions in Everest Forms.
Thus, you can actually restrict form responses in 6 distinct ways. We’ll go through each of them in detail below.
6 Easy Ways to Limit Form Submissions
After you complete creating a custom form, check the top of the form builder. You’ll see the Settings tab that lets you edit individual form settings.
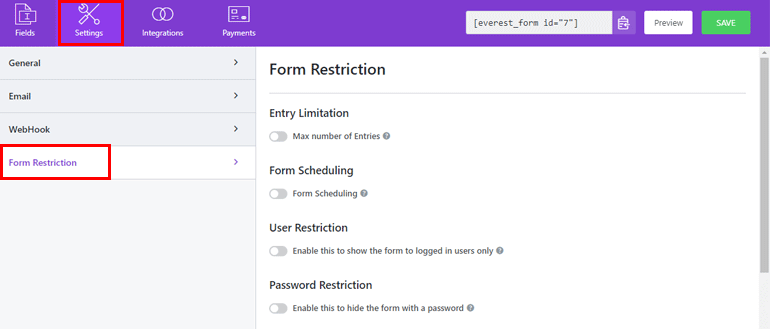
Here, open the Form Restriction settings. It consists of 6 distinct form restriction options for your form.
I. Set the Maximum Number of Entries Allowed
The first way to limit form responses in WordPress is to set the maximum number of entries allowed for a form.
It’s as simple as enabling the Entry Limitation option and defining the maximum number of entries. Besides, you can choose whether the max entry limit is for a day, week, month, year, or total entries.
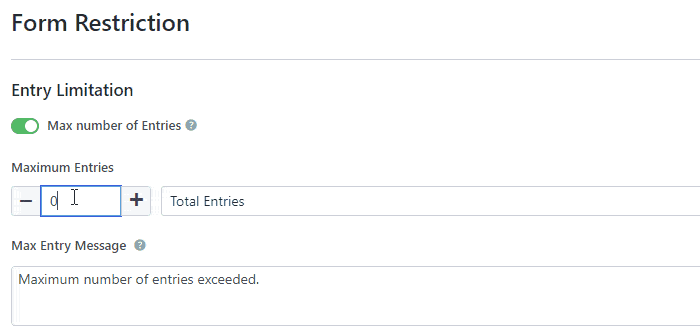
Moreover, you can edit the Max Entry Message. A form that has reached its limit displays this message when a user tries to fill the form.
II. Set a Deadline for Your Form
Next is Form Scheduling. You can schedule the form based on days of the week, specific dates, and times when you enable this option.
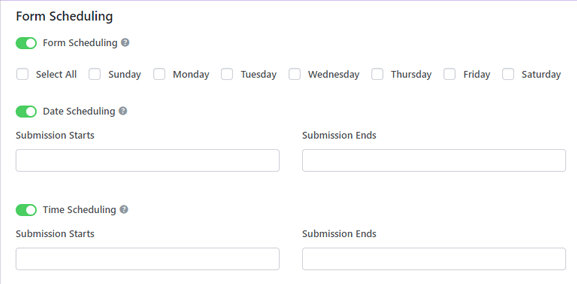
Hence, you can choose the days when you want the form to be live on your site.
Or, you can set the start date and end date for a form. This will ensure that the form is accessible to users only during that period.
Likewise, Time Scheduling lets you make the form fillable only during your set hours.
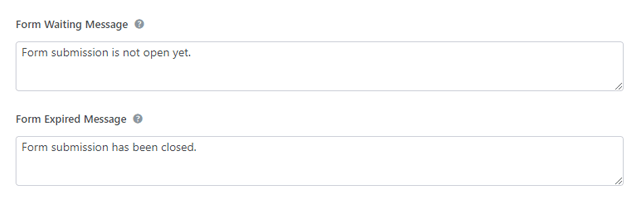
After configuring the schedules, you can edit the Form Waiting Message and Form Expired Message. They’re displayed when the form is yet to open and when it reaches its deadline, respectively.
III. Restrict the Users Based on User Login Status
Everest Forms lets you restrict a form to users based on their login status. So, when you enable the User Restriction option, only logged-in users will be able to fill and submit the form.
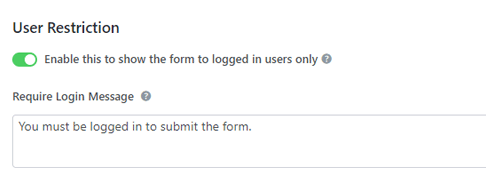
Also, you can add a Require Login Message for users who aren’t logged in.
IV. Restrict the Form with a Password
Another way you can limit entries on WordPress forms is to enforce the form with a password. Thus, only users who have the password can fill and submit the form.
To do this, toggle on the Password Restriction option for the form. Then, enter your desired password into the Password field. Users with this password are able to fill out the form.
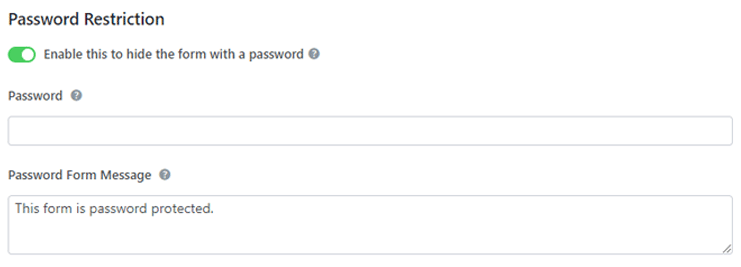
Next, you can edit the Password Form Message that appears when a user without the password tries to access the form.
V. Deny Empty Submissions
With the Form Submission option, you can avoid empty submissions cluttering your form entries. This means the users who’ve left all the form fields blank won’t be able to submit the form.
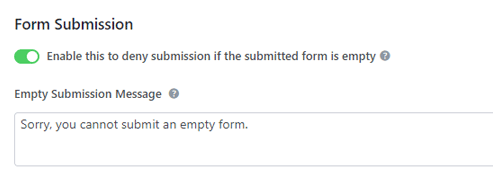
All you have to do is enable it and set the Empty Submission Message.
VI. Restrict Form Entries by Country
Finally, the Form Restriction add-on enables you to deny form responses from users of a particular country.
For that, toggle on the Form Restriction by Country option and choose a country you want to restrict.
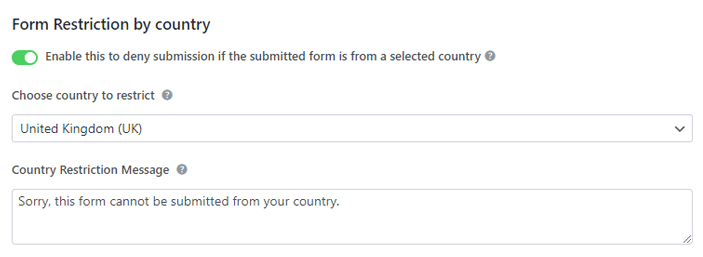
Furthermore, you can set the Country Restriction Message that pops up when users try to fill out the form from the restricted country.
4. Configure Individual Form Settings
After limiting form submission, there are a few more settings you must configure.
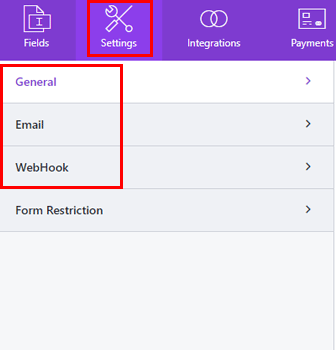
You’ll find these settings in the same Settings tab at the top of the form builder. Hence, besides restricting form responses, you can also customize General, Email, and WebHook options for individual forms from this section.
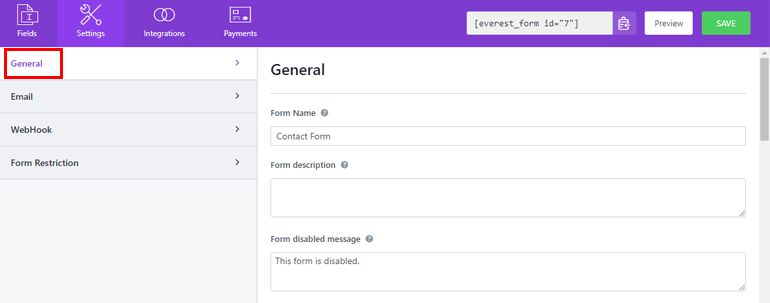
General: In this section, you can edit the form name, set the redirection path after submission, choose the form layout design, change the submit button text, etc. You can also enable anti-spam honeypot, disable saving entries, enable AJAX form submission, etc.
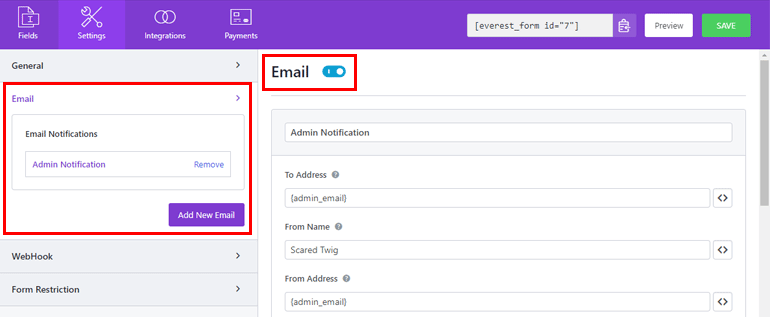
Email: This section lets you create and customize email templates for admin and user notifications. You can also apply conditional logic to decide when a user or admin receives the emails.
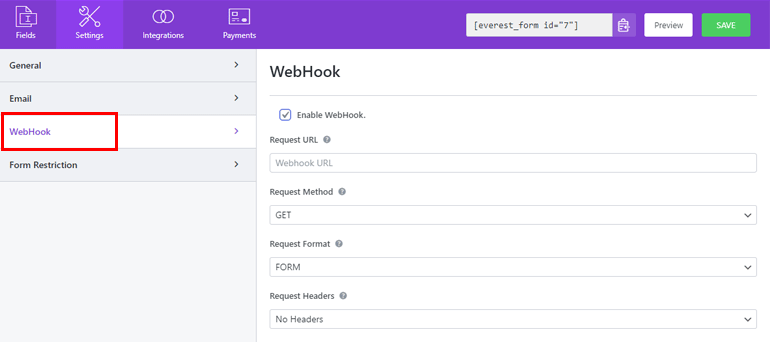
WebHook: You can enable webhooks for the form and set Request URL, Request Method, Request Format, etc.
Don’t forget to hit the Save button when you complete the customization.
5. Publish the Form on Your Website
Finally, it’s time to publish the form and make it live on your website.
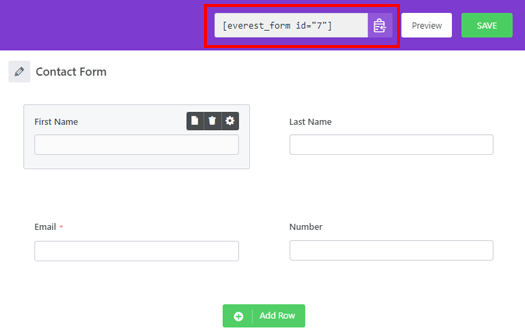
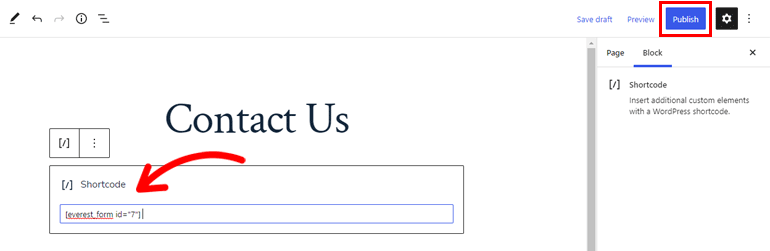
For that, copy the form shortcode of the form where you limited form responses. You’ll find the shortcode at the top of the form builder.
After that, create a new page or post where you can display the form. Then, add a Shortcode block using the block inserter (+).
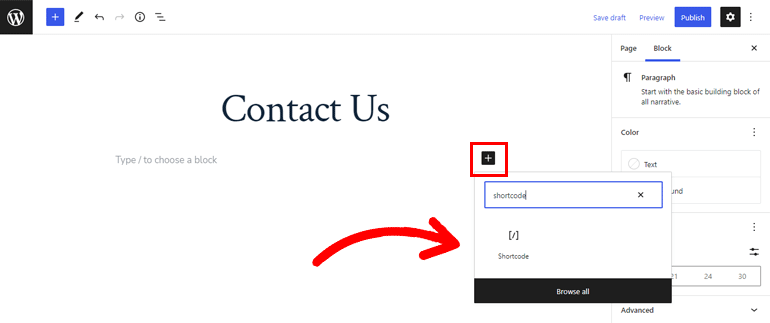
All you have to do now is paste the shortcode into the block and hit Publish.
Alternatively, you can add an Everest Forms block using the block inserter (+).
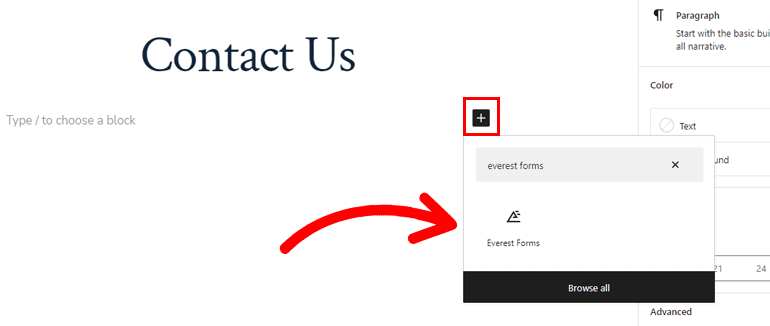
Choose the correct form from the dropdown and click on the Publish button.

However, you don’t always need to create a new page. You can also add the form to an existing page or post and simply update the changes.
And that’s it! You’ve created a form, restricted form submissions, and displayed the form on your website as quickly as that.
Conclusion
To summarize, it’s best to limit the number of form submissions to avoid redundant form entries taking space on your website. And the perfect tool to help you do that is Everest Forms.
You can set the maximum number of entries allowed, schedule form start and end dates, and restrict entries from a country. You can also password-protect the form, allow only logged-in users to submit the form, and deny empty form submissions.
However, that’s not all you can do with Everest Forms. This feature-rich plugin lets you add repeater fields to forms, enable spam protection, convert form data to PDF, etc.
So, get Everest Forms and take your WordPress forms to the next level.
For more WordPress-related articles, visit our blog. Also, follow us on Twitter and Facebook to stay updated on new posts.


![Zakra 3.0 | Zakra Pro 2.0 Release [Major Updates!]](https://i.ytimg.com/vi/g3rifl7kWvg/maxresdefault.jpg)