Wondering how to create a job application form in WordPress? But don’t have any idea how to make an application form online on your site?
No need to worry! We’ve got you covered.
Creating a job application form on a WordPress site is super easy. All you need to do is install a suitable WordPress job application form plugin and follow a few simple steps. And you can add an employment application to a WordPress website in no time.
In this article, we’ll provide a step by step guide on how to create a job application form in WordPress. After reading this full article, you’ll know about how to create an application form for your WordPress site with ease.
Before getting started, let’s take a brief overview of what exactly a job application form is and why you need one.
Table of Contents
What is a Job Application Form and Why You May Need One on Your Site?
A job application form is a type of online form asking a series of questions that the applicants require filling up while they apply for a vacancy. It allows you to collect all the necessary information about the candidates.
A standard job application form is a great way to attract candidates to your site so you can choose the fit candidate for your business or company. It also allows you to collect additional information you want to know other than what they’ve on their resumes.
Besides, it makes the task of choosing the candidate easier since it allows easy comparison of applications as the information is assembled similarly.
Choosing a WordPress Plugin to Build a Job Application Form
If you’re wondering how to create an online job application form, then the foremost thing you need to do is to choose the best WordPress job application form plugin. There’re many such plugins available that allow creating a job application form.
Among different options, Everest Forms is the best choice as it provides an all-in-one solution to all types of forms you need on your site. It’s a WordPress contact form plugin with tons of powerful features to build any type of online form including a job application form.
Everest Forms is an intuitive drag and drop form builder plugin that permits creating any type of online form including a contact form, survey, quiz, job application. It lets you create unlimited forms as well.
Not to mention, it has pre-built form templates for popular types of forms like contact form, job application, etc. So, it permits creating an application form in no time just with a few clicks.
In this article, we’ll be showing two methods on how to create an application form. They are:
- Creating a WordPress Job Application Form with a Pre-built Template
- Creating a WordPress Job Application Form from Scratch
Without further delay, let’s head on to the steps on how to make an application form.
Steps to Create a Job Application Form in WordPress
The following are the simple steps that you need to follow to add employment application to WordPress website.
Step 1. Install and Activate Everest Forms Plugin
As stated above, you can build an employment application form with Everest Forms via 2 methods. If you are creating a job application form starting from scratch, then you can download the free version of Everest Forms directly from the WordPress dashboard.
But if you want to get access to pre-built templates of job application forms then you’ve to upgrade to the premium version of the plugin.
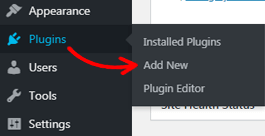
Let’s begin the free installation method. Firstly, you need to login to your WordPress dashboard. And navigate to Plugins >> Add New.
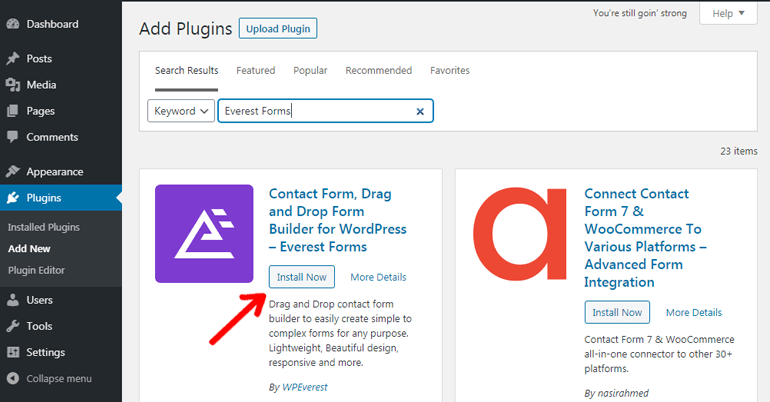
Search for the Everest Forms plugin by typing in the search bar of the plugins page. Once the plugin is displayed, you can press the “Install Now” button and hit the “Activate” button to activate the plugin to your site.
If you want to make an online job form with a pre-made template, then you need the paid version of Everest Forms. You can buy a premium version of Everest Forms from WPEverest. Once purchased, the plugin downloads as a Zip archive.
After that, you can log in to your WordPress admin area and navigate to Plugin >> Add New. After that click the “Upload Plugin” button and choose a zip file that you had downloaded before.
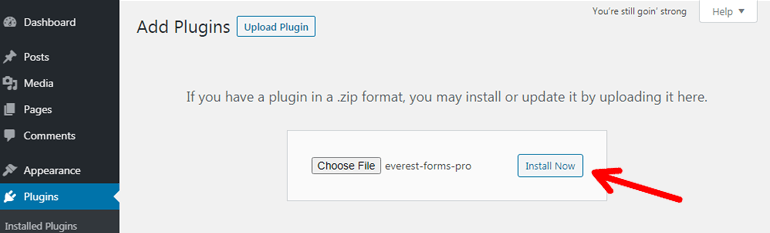
Finally, install and activate it and you can start using it to create a job application form using pre-built templates.
If you want more detailed information. Then you can check our step by step guide on how to install a WordPress plugin.
Step 2. Create a Job Application Form
If you want to know about how to create a job application form in WordPress using Everest Forms then here’s the detailed process. Everest Forms allows you to create an employment application form using two methods which are explained as given below:
I. Creating a WordPress Job Application Form with a Pre-built Template
Pro version of Everest Forms provides you with access to several pre-built form templates. You can use those templates immediately for creating any kind of form.
Pre-built templates not just only save your precious time but also save your energy. Because you don’t have to spend time creating a form from scratch or from the blank form.
Once you install and activate Everest Forms Pro, you can navigate to Everest Forms >> Add New. There you’ll find several pre-built templates for different kinds of forms including the “Job Application Form” template.
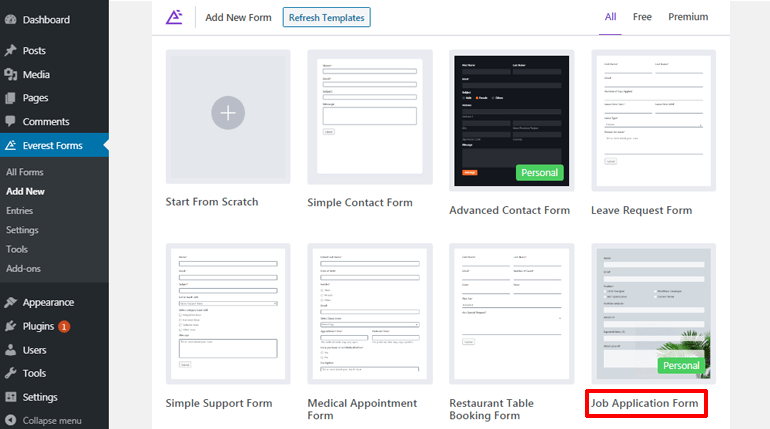
You can simply click on that and get started to create an application form for your site.
But before you begin, you need to give a name to the untitled form. It also shows that you require Everest Form Pro and Everest Form Style Customizer that you’ve already purchased.

But nothing to worry! The Everest Forms Style Customizer automatically activates once you buy Everest Forms Pro. Style Customizer permits you to customize all the components of your form. Then hit the Continue button.
II. Creating a WordPress Job Application Form from Scratch
Creating a WordPress job application form from scratch is a little bit different from creating a form from the pre-built template. It needs a little bit of extra effort from your side since you need to add fields on your own.
You need to create an outline on your own for your application form. However, you can add any questions of your choice for collecting information from candidates that you want to know. And get the best fit for your company or business.
For this, after finishing the installation and activation of your free Everest Forms plugin. Navigate to the Everest Forms tab on your sidebar of the WordPress website. Click on the “Add New” button and it’ll direct you to the “Add New Form” page with several templates including “Start from Scratch”.
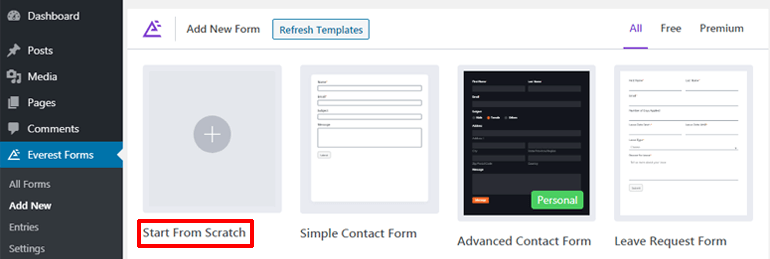
Simply click on it and start your job application making journey by giving a title to your form in the title field and hitting the continue button.
Step 3. Add Required Fields and Customize the Form
Customizing every component of the form is easy with the drag and drop interface of Everest Forms. You can simply drag the field that you need and drop it to the required area of your form. Clicking on the field will show you more form field setting options. And you can customize your field as per your convenience.
With Everest Forms, you can add various fields to create a completely customized job application form. There’re two major form fields:
- General Fields
- Advanced Fields
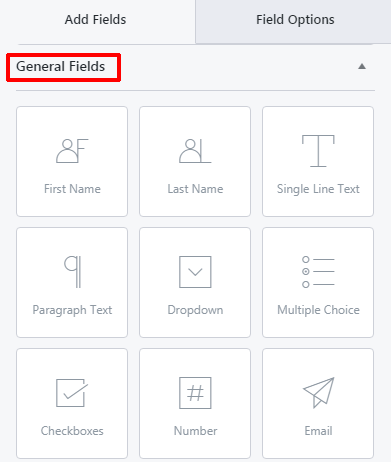
I. General Fields
Besides common general fields like First Name, Last Name, Number to add contact details, and Email for adding an email address. There’re many other fields that you might consider adding to your application.
- Single Line Text Field lets you acquire one-line text information from the applicants as per your need.
- Paragraph Text Field lets you obtain information from the applicants in a paragraph form. Usually, this field is useful if you want to get some long-form information from the applicants.
- Dropdown lets you add multiple options from which applicants can select any one of the options.
- Multiple choice lets you add multiple choices from which applicants can choose any one of the options.
- Checkboxes let you add multiple choices displayed using checkboxes. Applicants can select more than one option in this case.
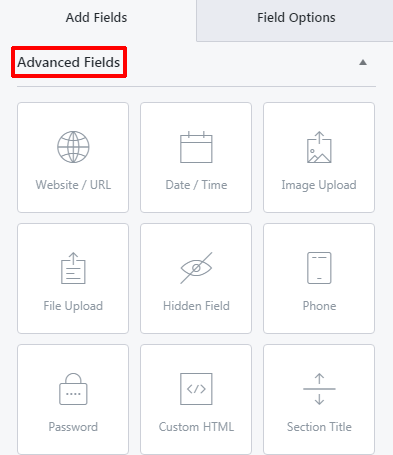
II. Advanced Fields
- Website/URL lets your applicants add their personal or company’s site URL.
- Date/ Time lets your applicants add the requested date and time on the form.
Apart from these two, with Everest Forms Pro you get access to the following additional fields:
- Image Upload Field lets your applicant upload images in the form of multiple formats like jpg, png, gif, BMP, etc. Besides, you can also configure additional settings like the maximum file size of the image uploads; maximum number limit of file uploads, and so on.
- File Upload Field allows applicants to upload the files. You can easily change the label so that the applicants aren’t confused about where to upload their resumes and other files. Besides, you can also make additional changes to it.
For instance, you can configure settings for allowed file extensions (pdf, docs), maximum file size, and the maximum number of limits on uploads as for the images. Further, Everest Forms Pro version 1.3.7 or higher permits saving the uploaded files to Google Drive and Dropbox. Isn’t that great?
Moreover, there’re Hidden Field, Phone, Password, Custom HTML, and many other fields that you can utilize for your application form.
With these numerous field options, you can easily make a completely customized job application form for your site. For instance each job application requires a Name field, Email, Phone, and so on. You can simply drag a First Name field from the left panel and drop it to the right panel.
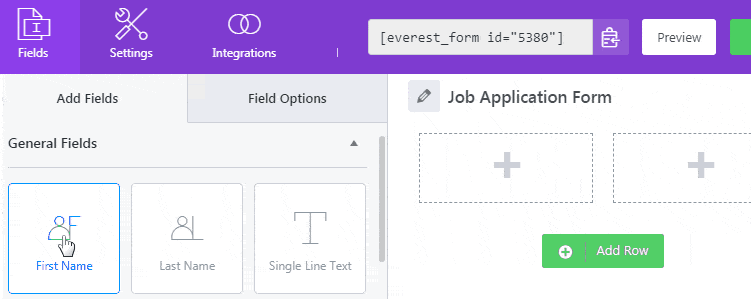
Similarly, drag and drop the Last Name field beside the First Name Field. Next, you can continue with the Email field. Below the Email, you can ask to enter the phone number using the Number field.
Likewise, you can ask for other desired questionnaires using Single Line Text, Multiple Choice, and other available options. You can make use of the Image or File Upload field if you want to fetch your applicants’ images, resumes, and other files.
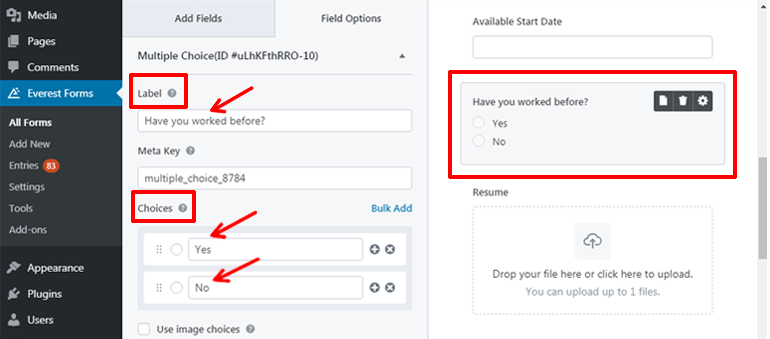
Enabling Conditional Logic
Everest Forms offers a feature of conditional logic. So you can create a form that isn’t too lengthy or complex to be filled up by the applicants without missing any essential information. This allows you to proceed with additional related questionnaires only if the applicants have a positive response to the particular field.
For instance, let’s just say that you want to know if the applicant has worked before. If the answer is yes then you might further want to ask the reason for leaving the previous job.
To enable conditional logic add a Multiple Choice field to the desired area of your form. Click on it to make edits. Label it (“Have you worked before?”) and add the required choices (Yes and No).
Then add a Single Line Text field just below it. Click on it to make edits. Label it (“Reason for leaving the job”). After that scroll down and enable conditional logic.
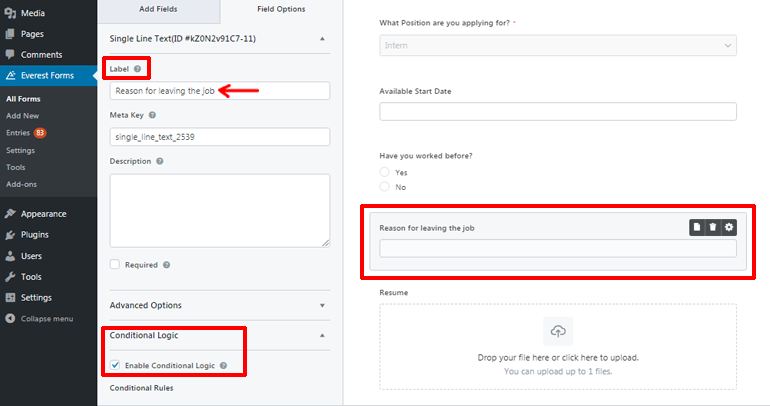
Finally, click on Show this field if “Have you worked before?” is “Yes” and save it. Now, whenever the applicants select the “Yes” option for the question. It’ll display the additional field “Reason for leaving the job”. It won’t be displayed if the answer is “No”.

Step 4. Configure Form Settings
You can navigate to Settings >> General to configure the general settings for your application form. Under the general setting, you can make changes as mentioned below.
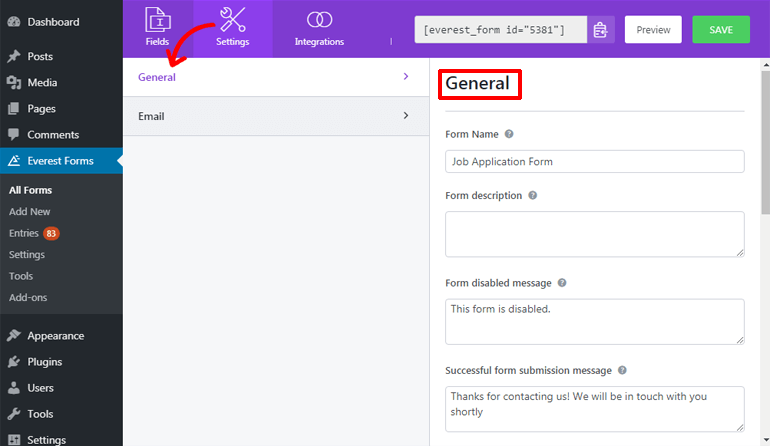
- Form Name lets you give a suitable name to your form.
- With Form Description, you can further add a brief description of the motive of your form.
- Form Disable Message lets you display the message once you disable the form.
- Successful Form Submission Message displays text to the applicants once you receive the form successfully.
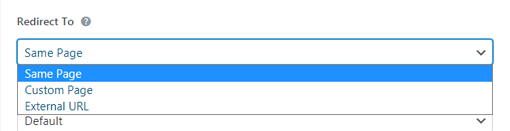
- Redirect To option allows applicants to land to the URL of your choice after they submit their form. There are 3 Redirect To options available:
- Same Page – This page is selected by default. Here, the applicants remain on the same page once they submit the form.
- Custom Page – If you select a Custom Page, then all your pages will be listed. You can choose any one of the pages from the dropdown you wish your applicants to land on.
- External URL – In case if you select External URL, then you need to add an external URL where you wish your applicants to be redirected.
- Layout Design lets you choose from pre-made form designs. You can either select from Default Layout or Classic Layout.
- Form Class lets you add a class for your form.
- Submit Button Text allows setting the text for submit buttons such as “Send” or “Submit” or “Apply”. You can set the text as your wish to suit your form.
- Submit Button Processing Text lets you display text in the button while the form is being processed.
- Submit Button Class allows adding CSS class names for the submit button.
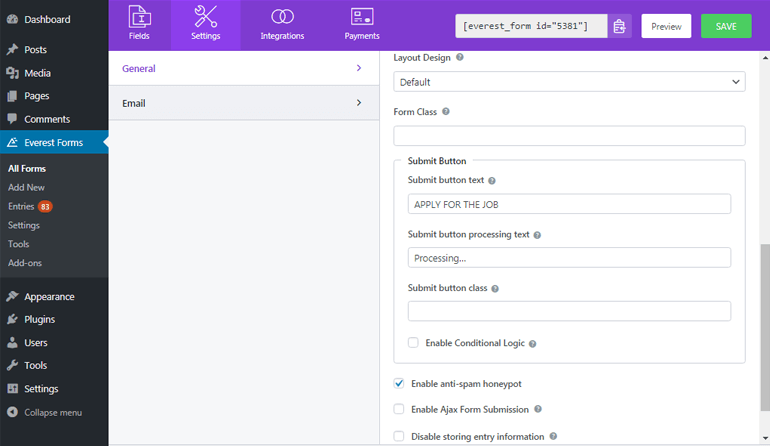
Further with pro-version, you can enable conditional logic for the submit button. Enabling anti-spam honeypot prevents spam on your forms. You can also enable Google reCAPTCHA Version (V2 OR V3) to avoid spam on your form and for user validation.
To disable saving entries to your database, you can enable Disable Storing Entry Information. After configuring settings to suit your form you can hit the “SAVE” button at the top.
Step 5. Configure Form Notification
Customizing your form notification allows getting a notification whenever applicants submit the form. Plus you can also notify your applicants. That way your applicants will be confirmed that their form has been successfully received by the concerned authority.
For configuring form notification, navigate to Setting >> Email and get started once you turn on the Email settings. You can set up unlimited email notifications with Everest Forms. Few examples are as follows:
- Admin Email Notification Setup
- User Email Notification Setup
I. Admin Email Notification Setup
Admin Email Notification is used to set up a notification for the admin. With Everest Forms whenever you create a form, your admin email notification sets up by default. But still, it’s a good idea to check the settings to ensure that no mistake is made during email delivery.
You can navigate to Settings>> Email>> Admin Notification and make changes to the following:
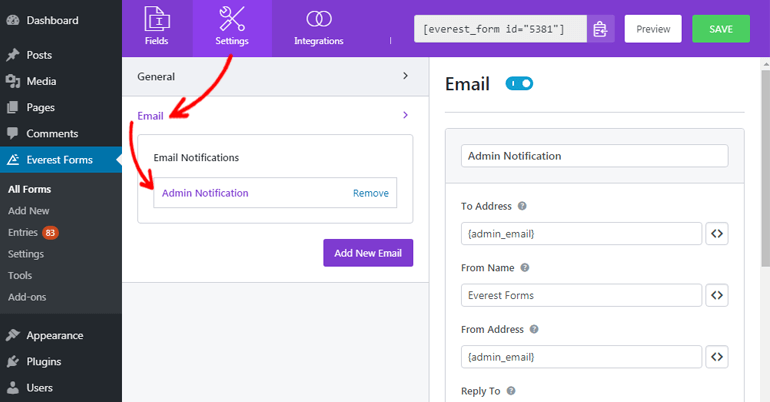
- To Address lets you add an email address where you wish the email notification to be conveyed after the applicants fill their form. Here you can add the admin email address.
- From Name lets you add the name that you wish to be displayed when sending the form. Here, since the admin is getting the email notification so you can get the name of the applicants who submit the form using smart tags.
Also, it’s important to ensure that the name field is marked as required in the form. Because if this field is empty then it might create a problem during mail delivery.
- From Address lets you add the email address form where the forms are sent. So you can use your admin email address here.
- Reply To lets you add the email address where you want the email to be replied to whenever the email receiver wants to reply. Here you can set the email address of applicants who submitted the form. You can use smart tags to automatically get the applicant’s address.
- Email Subject allows adding the subject of the email.
- Email Message allows adding a message that you want to send along with your form.
Additionally, with {all_fields} smart tag you can exhibit the form fields filled up by the applicants.
II. User Email Notification Setup
User Email Notification allows you to set the notification for the user (applicants) who submits the form. Sending a confirmation email is a great way to let them know that you’ve received their form.
For this go to Settings >> Email and click on the “Add New Email” button and give it a name to get started. Here, we’ll name it “User Notification”. Finally, configure the following details:
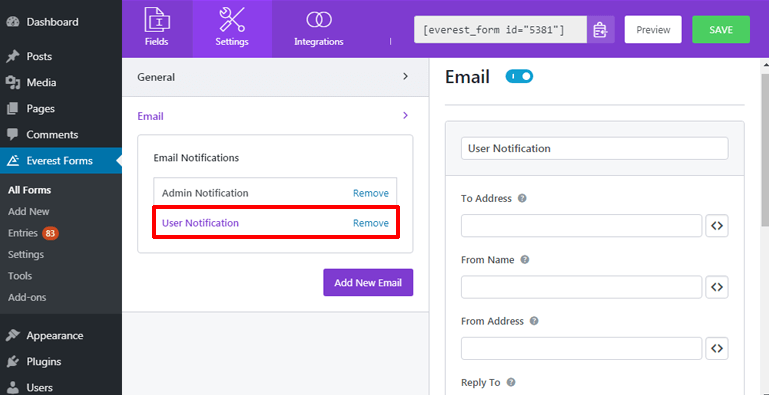
- For the To Address, you can use the smart tag to get the email address of the applicant who submitted the form.
- In the From Name add your business or company’s site name.
- For the From Address add your admin email address.
- In the Reply To add your admin email.
You can also add the Email Subject and Email Message as before.
Step 6. Add a Job Application Form in WordPress Website
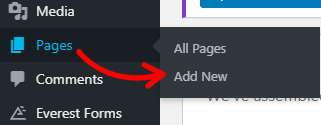
Once you complete creating a form and configuring the settings and notifications. You need to add an employment application to the WordPress website. To share your form, you can add it to posts or pages or even at the sidebar widgets wherever you find it suitable.
Here we’ll be adding the form to the “Pages”. For this you need to go to the Pages>> Add New.
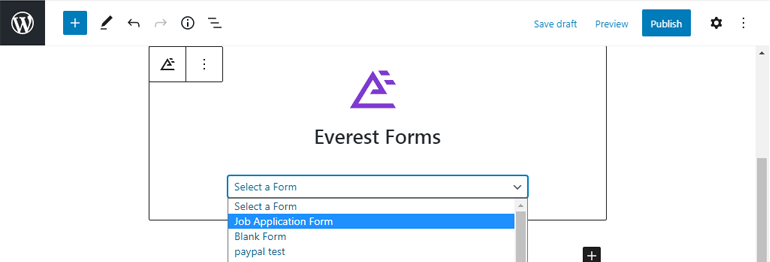
Then click on the “Add block” button at the top. It’ll display with several widgets including Everest Forms, select it. Then select the form you created in the “Select a Form” bar after clicking the Everest Forms dropdown.
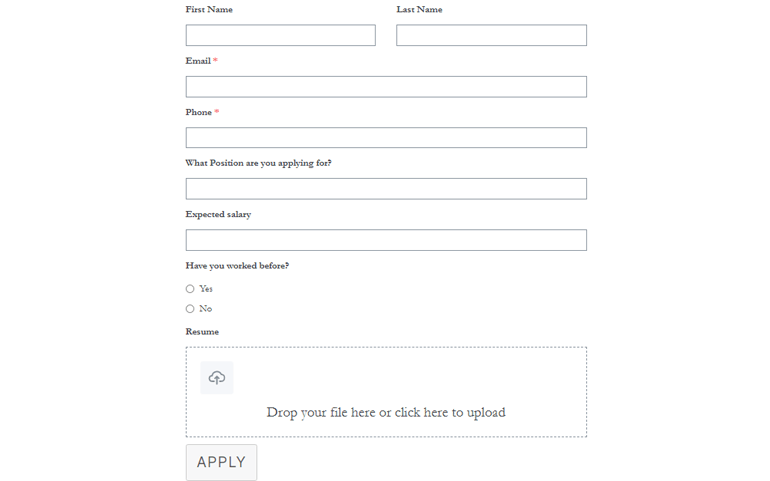
Finally, press the “Publish” button to share your application form on your webpage. You can also Preview your form before you hit the Publish button. Your form looks something like this from the frontend.
If you want to view and try how online job application form works, then please see this job application form demo by Everest Forms.
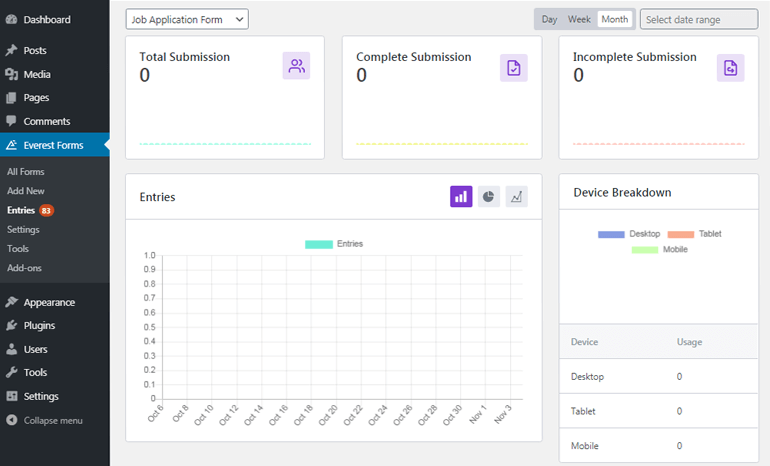
View Your Job Application Form Entries
You can view the entries to your forms on your webpage by navigating to Everest Forms>>Entries. You can also download the form, print it, or delete it as per your requirement making the selection process easier and less time-consuming.
Wrapping Up
With the spectacular WordPress forms plugin like Everest Forms, creating an application form online becomes super-duper easy. Either you start creating form from scratch or pre-built template, you can create an engaging and interactive job application form for your website without any difficulty.
We hope after reading this article, now you know how to create a job application form in WordPress easily.
Similar to this tutorial of ours, we also have an easy tutorial for creating the contact form for your WordPress website. You might also want to check out our article on how to make a WordPress contact form with 2 columns without any difficulty.
Please do share our article if you liked it. You can also leave us your valuable comments and suggestions in the comment section below.


![Zakra 3.0 | Zakra Pro 2.0 Release [Major Updates!]](https://i.ytimg.com/vi/g3rifl7kWvg/maxresdefault.jpg)