Wondering how to change color of submit button in your WordPress forms without touching any code? If yes, this article is all you need.
The catchy appearance of the submit button plays a vital role in grabbing your user’s attention and encouraging them to submit the form. By default, the submit buttons in the WordPress forms tend to appear dull.
So, if you wish to style it with beautiful colors that match your brand and lift your overall form’s look, make sure you read this article till the end.
Table of Contents
Choose the Best WordPress Forms Plugin with Submit Button Styling Option
WordPress offers thousands of plugins to achieve almost every function you need, and the forms plugin with a button styling isn’t an exception.
However, you’ll rarely find a WordPress forms plugin that allows you to style and change the color of your submit button without having to deal with CSS code.
Though this might not be a big issue to developers, it’s not the same for non-tech-savvy. And that’s why we recommend using Everest Forms. It’s probably the best WordPress forms plugin that lets you style your form and submit button or change the button’s color in WordPress without messing around with any code.

Everest Forms got it all from changing your form’s layout design to your form’s button style in a few clicks. On top of everything, you can easily design the WordPress forms to match your site with the live preview option of the plugin.
Now that you know which plugin to use, let’s talk about how to change the submit button color in WordPress.
How to Change the Color of Submit Button in WordPress Form?
Adding the color of your choice to the submit button has never been so easy. All thanks to the wonderful plugin called Everest Forms. Now, you can change the color of the submit button in WordPress form following the simple steps as given below:
Step 1: Install Everest Forms Plugin
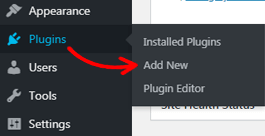
Before anything else, you need to install the plugin on your site. For this, log into your WordPress dashboard and go to Plugins>>Add New.
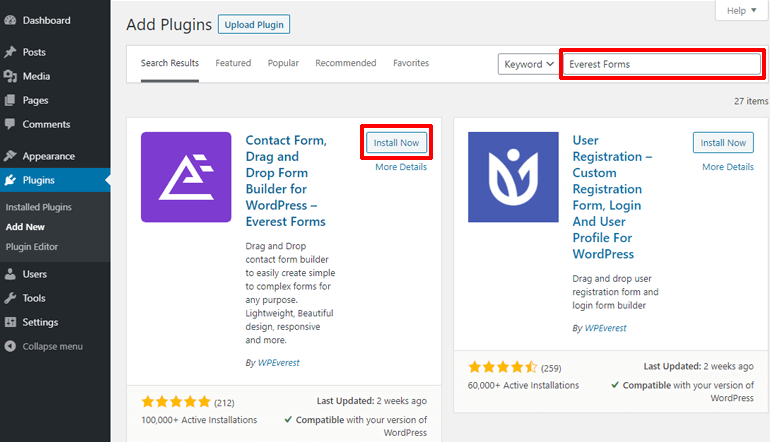
Now, search for the plugin by typing Everest Forms on the search box at the top right. Once the plugin shows up, click on the Install Now button.
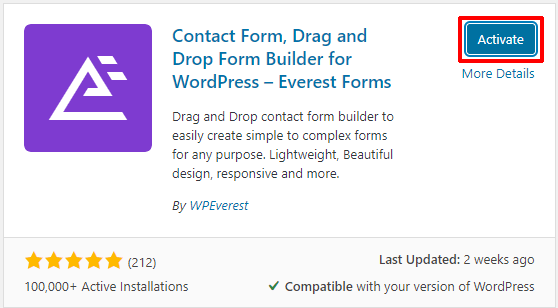
Soon after the installation, hit the Activate button to activate it on your site.
Step 2: Install Everest Forms Pro and Style Customizer Add-on
No doubt that the free version of Everest Forms is more than enough to create simple forms like contact forms, leave request forms, call-back forms, and so on. However, to style the WordPress form to your liking, you’ll need the Style Customizer add-on, only available in the premium plan.
Therefore, visit the plugin’s official pricing page and select the suitable premium plan at first.

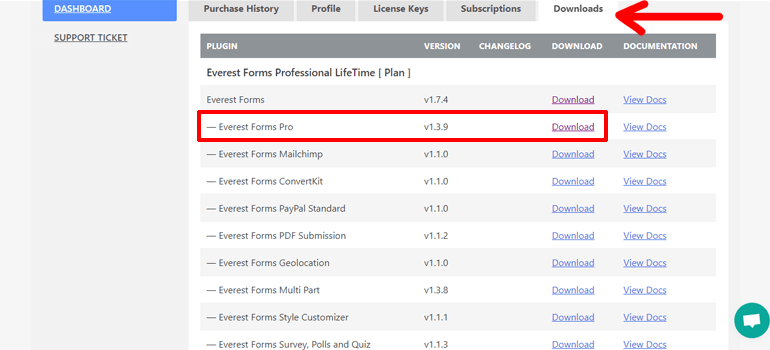
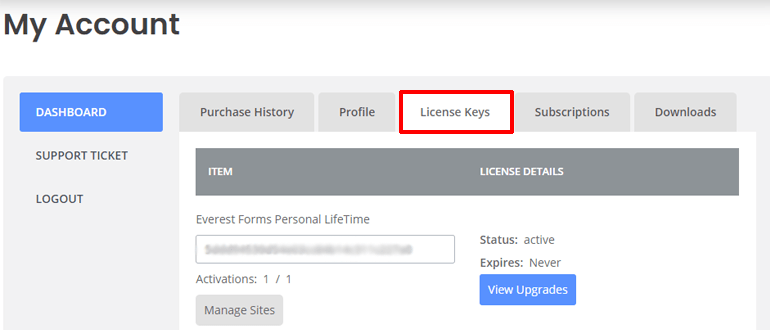
Now, you can create a user account and log into it. After that, find the Downloads tab in your accounts dashboard and click it. Now, download the Everest Forms pro-add-on on your computer. The plugin downloads as a ZIP file.
Also, don’t forget to copy the license key from the License keys tab, for you need to enter it in the later steps.
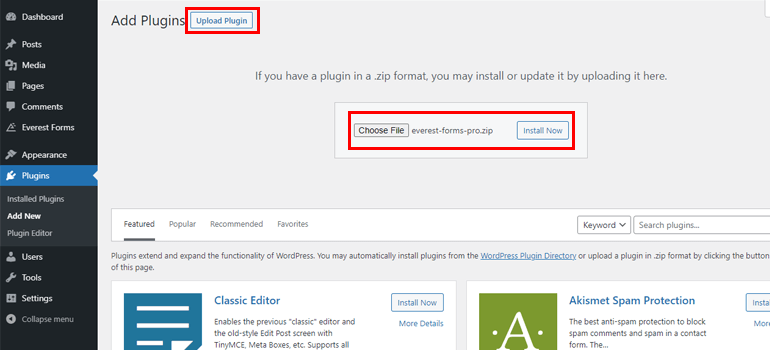
Once again, navigate to Plugins>>Add New and hit the Upload Plugin button. Now, select the Everest Forms pro ZIP file and press the Install Now button.
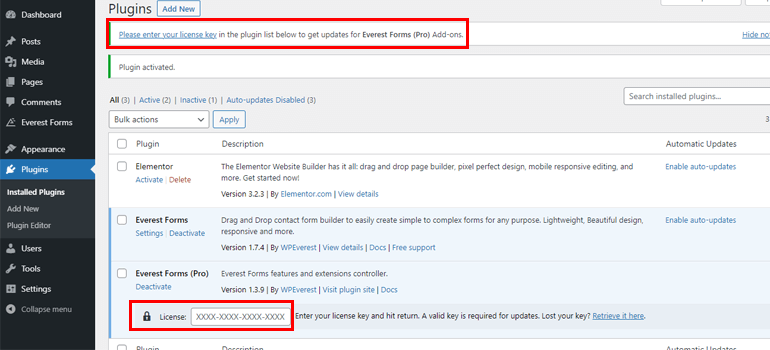
After the successful installation, activate it on your site. Then, enter the license key you’ve copied earlier.
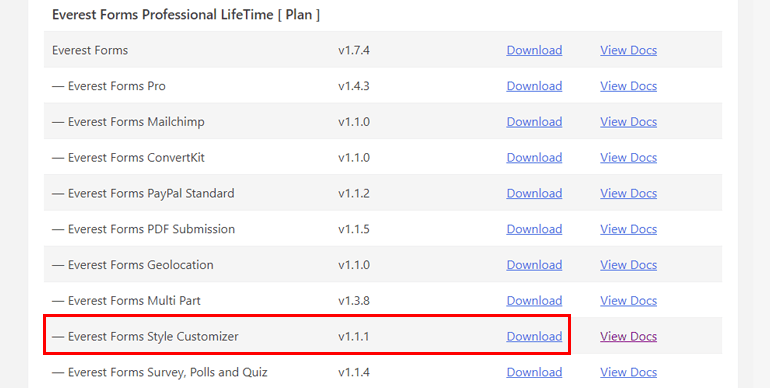
You can follow a similar procedure to install the Style Customizer add-on as well. From the Downloads tab, download the Style Customizer ZIP file first.
Next, upload the ZIP file and finally install and activate it on your WordPress site.

Step 3: Create a New Form
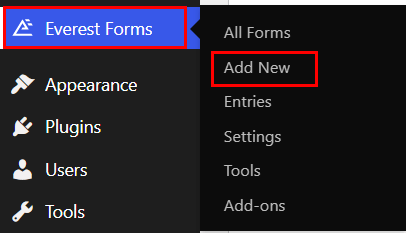
Once you complete the plugin installation, you can create a new form from your WordPress dashboard. To begin with, find the Everest Forms tab and hover your mouse over it. Different options will pop up. Now, click on the Add New option.
It opens an Add New Form page with beautifully designed pre-built form templates and a Start from scratch option.
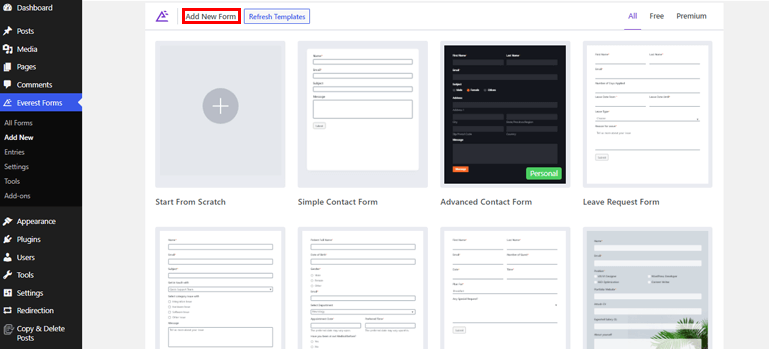
You can either edit the pre-existing templates to design your forms instantly or start from the ground to craft them to your liking. The choice is all yours. Both methods will let you create great-looking forms effortlessly without any doubt.
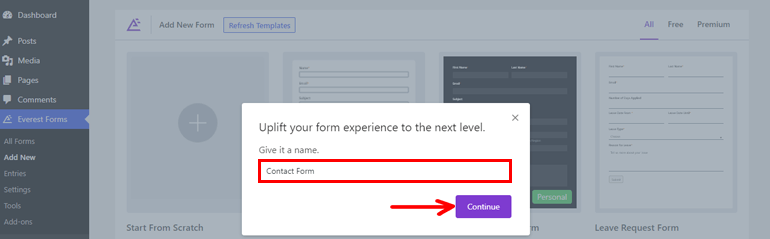
In this tutorial, we’ll start from scratch so, click on the Start From Scratch option. Provide a name to your form and press the Continue button.
Now, a form editor window will open up.

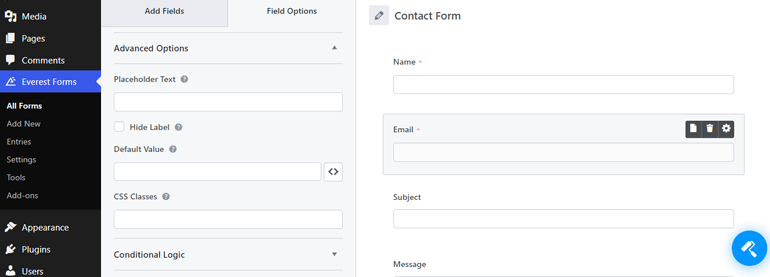
As you can see, there are different field options on the left. You can easily drag the required fields from there and drop them on the right to add to your form.
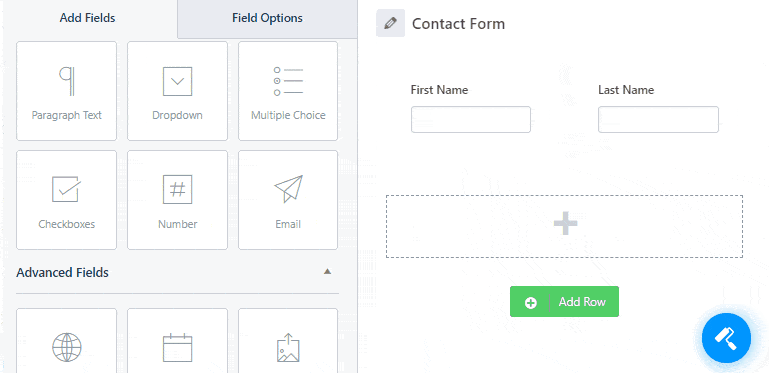
Again, you can edit the properties of the individual field you add to your form from the Field Options. From here, you can provide a proper label and add a short description if you want. Likewise, you can make the field mandatory by checking the Required box.
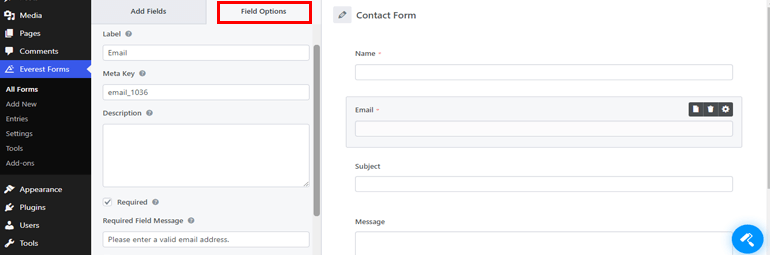
Besides, there are advanced options, conditional logic, and more features that you can apply to your WordPress forms.
For a detailed guide, make sure you go through the article on creating a contact form in WordPress.
Step 4: Customize Your WordPress Form
Since you have the Style Customizer add-on installed on your site, you can take its full advantage to style the overall look of the WordPress form. So, click on the form designer icon at the bottom right and start customizing it to your heart’s content.
Using the customizer, you can modify various sections of your form as given below:
- Active Template: You can select between two different form layouts, i.e., either Classic or Default template.
- Form Wrapper: This option lets you edit your form’s margin, border, background color, and more.
- Field Labels: You can change the font size, font color, font style, text alignment, etc., of your field labels from here.
- Field Sublabels: It enables you to edit the font’s size, color, and style plus text alignment, margin, and more of your field sub-labels.
- Field Description: You can also customize the description you provide to the form fields. You can modify the text alignment, margin, padding, font size, color, etc., of the field description.
- Field Styles: It permits you to customize the form field data that users fill. You can change font size, style, placeholder font color, border type, width, radius, etc.
- Radio/Checkbox Style: It lets you edit the inline style, radio/checkbox color, style variation, etc. of the texts, numbers, or symbols used for checkboxes or radio buttons.
- Section Title: Font style, color, text alignment, line height, etc., of section title, can be easily managed from here.
- Button Styles: We’ll talk about this section in the next step.
- Form Messages: It provides different options to customize your form’s success, error, or validation message.
- Additional CSS: You also get an option to add custom CSS to customize the form exactly the way you want.
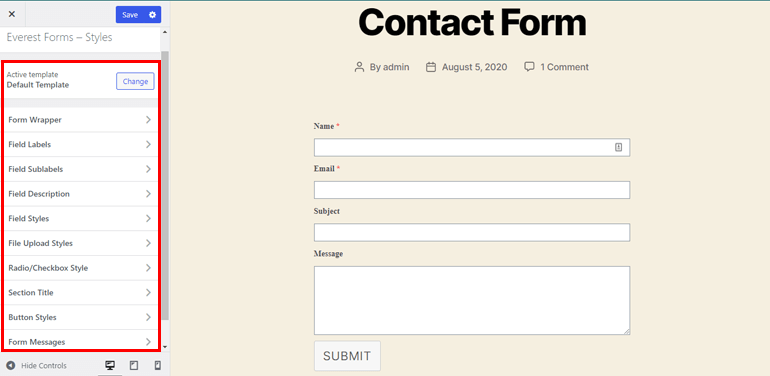
The best part is that you get the live preview of all the changes you make to the sections mentioned above.
Step 5: Change the Color of Submit Button in WordPress Form
Remember the Button Styles option we encountered earlier? That’s exactly where you can change the submit button color in WordPress. So, let’s explore more about this section here.
As you click on the Button Styles, it displays several button customization options. From here, you can select the color of the submit button in WordPress form with ease. You don’t need to have any coding knowledge. Amazing, right?
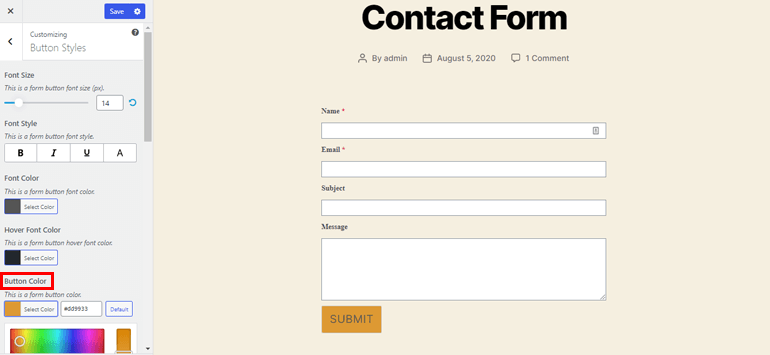
Not to mention, it also allows styling your submit button the way you like. You can adjust the font size of your button and change the form button’s font style. Likewise, it’s possible to set the font color, hover font color, and button hovers color.
Besides, many options like border type, border width, border color, line height, button margin, button padding, etc., are also available.
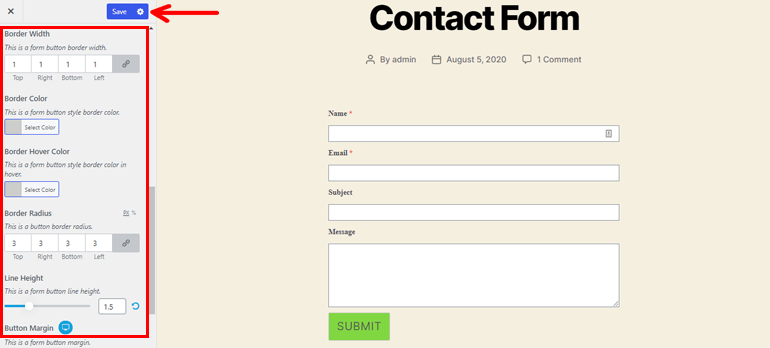
Lastly, don’t forget to save all the settings by hitting the Save button at the top.
Step 6: Configure the Form Settings
Now, you know how to change the color of submit button in WordPress; let’s briefly talk about the WordPress form configurations.
You need to configure the General and Email settings before you publish your form. The General form setting enables you to edit the form’s name, add a description, edit the successful submission message, customize submit button, and so on.
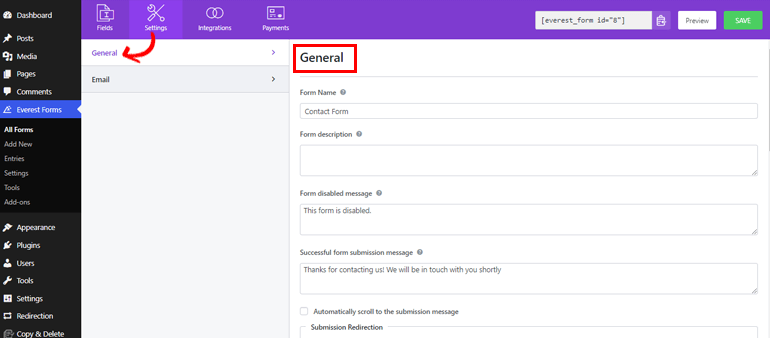
Furthermore, it allows you to either enable or disable options like anti-spam honeypot, ajax form submission, storing entry information, etc.
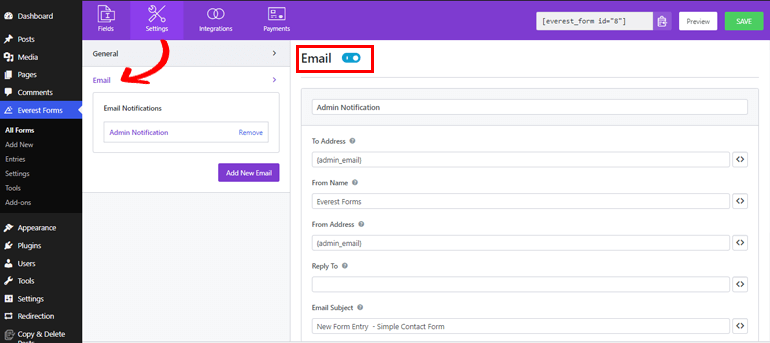
Likewise, the Email setting enables you to manage the email notifications. It lets you configure the To and From addresses for receiving emails. Email subject and message can also be added. Hence, whenever users submit the form, you can instantly get the notification.
Step 7: Publish Your WordPress Form
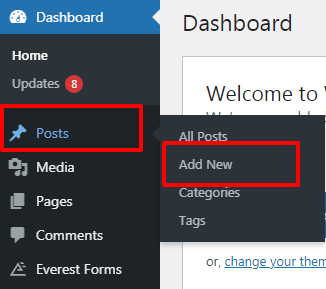
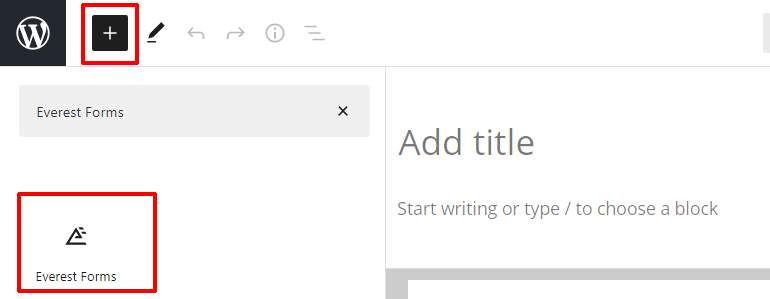
Since the form is all set, you can now add it to your site. To make your WordPress form with a beautiful submit button color visible to your users, go to Posts>>Add New.
Then, click on the add block (+) button, search for the Everest Form block and add it to the editor.
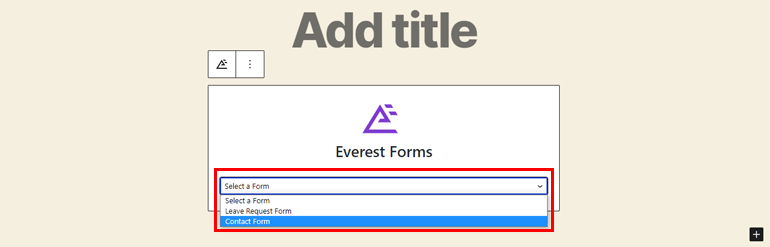
Now, from the dropdown menus, select the required form.
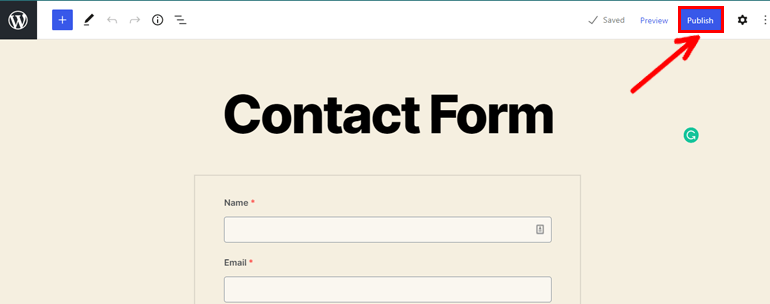
Once you provide an appropriate title to your form, you can click on the Publish button at the top.
Summing it Up
And that’s a wrap-up of our tutorial on how to change the color of submit button in WordPress. As you can see, changing button color in WordPress is a walk in a park with a great plugin like Everest Forms.
So, what are you waiting for? Get Everest Forms for your site today and make great-looking forms with the beautiful button color to enhance the click-through and conversion rate.
We expect this article was helpful enough to make you understand how to change the color of submit button.
Also, for more useful WordPress articles like creating job application forms and online hotel booking forms, please visit our blog website.
Lastly, do follow us on Twitter and Facebook for the latest blog article updates.


![Zakra 3.0 | Zakra Pro 2.0 Release [Major Updates!]](https://i.ytimg.com/vi/g3rifl7kWvg/maxresdefault.jpg)