Although E signatures have been used for quite some time in the business world, there are still many individuals and businesses that are unsure of how they work or even if they are legally binding. In this blog post, we will discuss the basics of E signatures and explore how you can easily accept them on your WordPress forms. Let’s get started!
Table of Contents
What is E Signature?
An E signature, also known as an electronic signature, is a digital version of your handwritten signature that can be used to sign documents electronically. E signatures are legal and binding in most countries, including the United States, Canada, and the European Union.
Why Sign Documents with E Signatures?
Signatures have been and still is the most crucial factor in identifying a party when making transactions. Signatures can be legally binding so, it ensures security when making a deal. But, getting clients to sign documents in time is such a hassle. The whole process of sending documents forward and back via email is very time-consuming. Instead of pen and paper, one can just sign documents on their computer screens with the help of a digital pen or mouse. It is an easier and faster way to get your client’s signature.
The use of E Signatures is essential for every business owner in this day and age. For WordPress users, the integration of e-signatures is made simpler with WordPress plugins. Just create a WP E Signature form with the help of a form builder plugin.
Don’t know how to create one? No need to worry! In this WPEverest Article, you’ll learn how to create a WordPress E Signature form with the help of a WordPress plugin so that your clients can effortlessly sign documents online.
We are using Everest Forms for this tutorial because it allows you to add a Signature field to any form without any trouble. You can not only increase your productivity at work but also make it convenient for the customers by creating E Signature forms.
Follow the steps listed below to create a WordPress Form that allows you to accept e signatures on our site with no trouble.
How to Create an E Signature in WordPress Forms?
Step 1: Install Everest Forms

First of all, you need to get the Everest Forms pro version from the official website. Everest Forms is undoubtedly one of the best contact form builder plugins that are available right now. This plugin allows you to create any type of form in a matter of minutes. Because of its drag-and-drop feature, you can easily add any form fields to your form.
There are four pro plans which allow you to install addons so you can add more functionalities to your forms such as post submission, user registration, survey, polls, quizzes and more. You can go to our plans and pricing page to get more details on pricing.
Most importantly, the pro version of the plugin allows you to add 15 advanced form fields that are not available in the free version. This includes a WP E Signature field which lets you accept electronic signatures from your clients in the form.
Step 2: Create a WordPress Form
After you finish installing the plugin, you can start creating a form. For this, go to Everest Forms -> Add New. You can choose a template or start from scratch. Then, you can easily insert the fields that you require from the left-hand side of the form builder. The easy to use drag and drop feature of Everest Forms allow you to insert and position form fields smoothly.

Step 3: Add E Signature Field
Secondly, you need to add the Signature field to the form. You can find it in the Advanced Fields section of the form builder. Just drag and drop the field to your form.

To edit the field label or add a description, you can go to the Field Options by simply clicking on the field. Also, you can enable the Required option to prevent form submission if the Signature field is left empty.
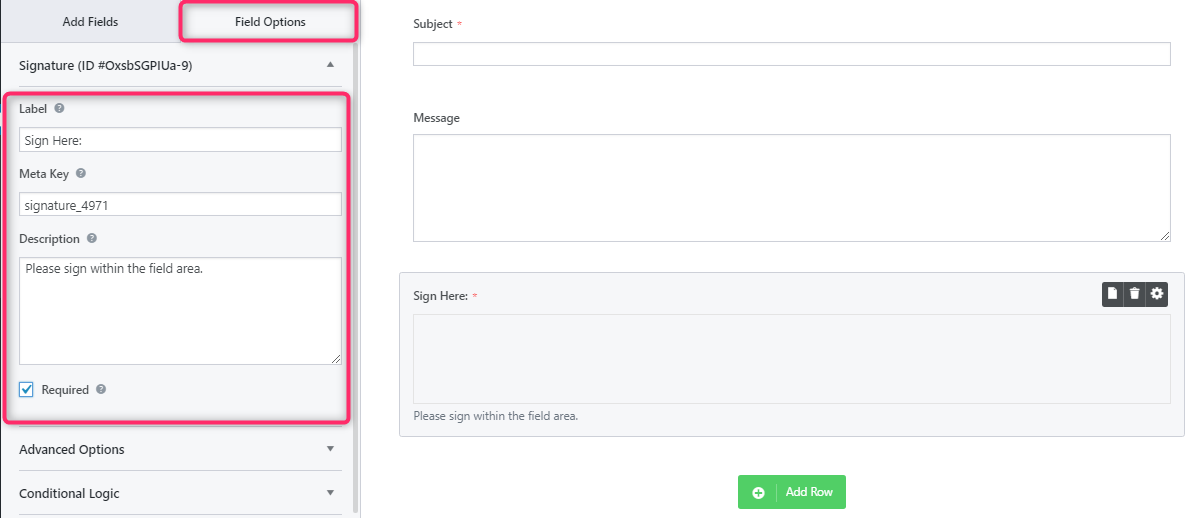
Furthermore, you can even use Conditional Logic to make the Signature field to show if the client agrees to sign and hide if the client disagrees.
For this, you can insert a Multiple choice field or Checkbox field to add a condition to show or hide the Signature field. After you’re done with the settings, click on SAVE.

Step 4: Test E Signature Form
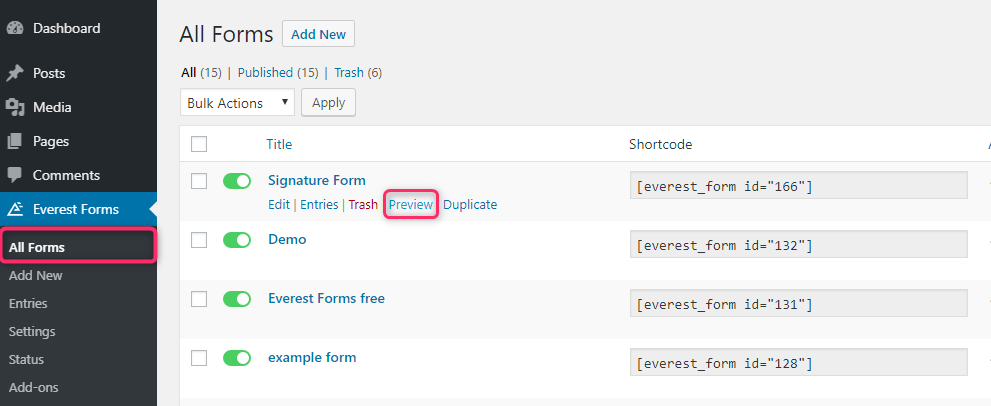
Once you finish creating your form with e signature field, you can check if it works correctly.
Go to Everest Form -> All Forms, and hover over the form you just created. Then, click on the Preview.
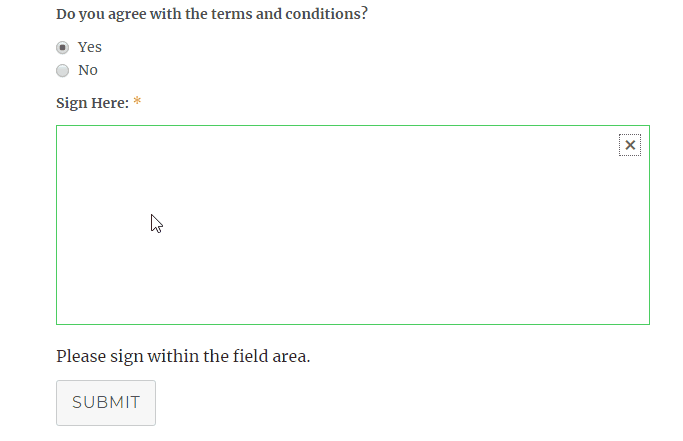
Now, you can fill the sample data in the form. In the signature field, you can sign with digital pens or just your mouse. There is a clear button on the top-right corner in case there are any mistakes.
Step 5: Add Signature Form to your Site
After you check if your WP E Signature Form is working correctly, you can add it to any page or posts for service agreements on your website.
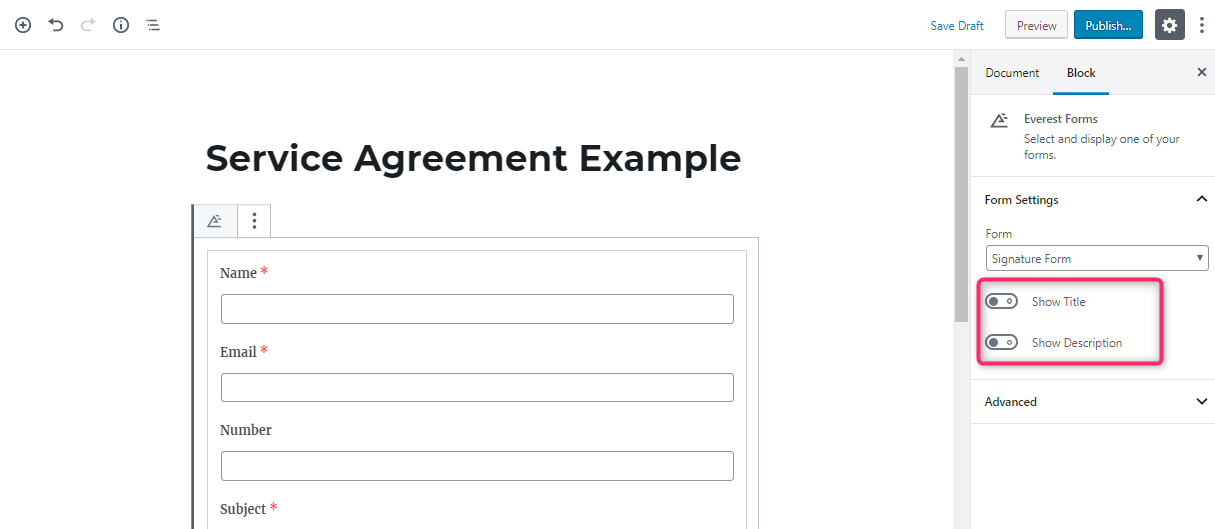
For this, go to your text editor and search for the Everest Forms block.
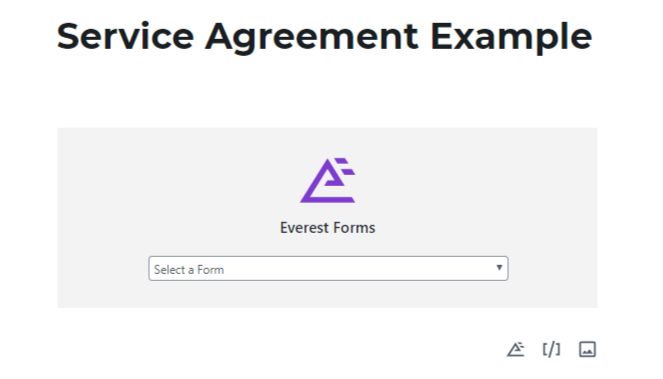
Then, select the e signature form that you created. On the right side of the block editor, you can see the options to display form Description and title.
To Conclude:
Therefore, Everest Forms makes it extremely easy for anyone to accept E Signature from their clients. As a business owner, you need the quickest and efficient way to get your client’s signatures when necessary.
e Signature is a quick and easy way to sign documents without having to print, sign, scan and email back. Hopefully you can now easily integrate e signature into WordPress forms with Everest Forms. If you are looking for an easy way to get signatures quickly, Everest Form’s e Signature is the solution for you. Have you tried using e Signature? What has been your experience?
Next, Print the WordPress Forms in PDF
Now, once the form has been signed. You might want to convert form submissions into PDFs. You can easily convert the form submission to PDF, print the form and keep it as a record and even share it to your clients or businesses in no time. To learn more check our guide on How to convert WordPress Form Submissions to PDF.


![Zakra 3.0 | Zakra Pro 2.0 Release [Major Updates!]](https://i.ytimg.com/vi/g3rifl7kWvg/maxresdefault.jpg)