Do you want to learn how to upload files from your WordPress forms to Dropbox? If yes, this article is for you.
When accepting uploaded documents from forms on your site, especially audio and video files, your storage space can run out fast. As a result, you might be sick and tired of manually transferring files and arranging a custom integration.
The perfect solution for this is to upload files from WordPress forms to Dropbox directly, the popular file hosting service. Luckily connecting Dropbox to your WordPress forms is much easier than you think. All you need is our complete and simple guide.
But before we begin, let’s find out why you should upload files from WordPress forms to Dropbox.
Table of Contents
Why Upload Files from WordPress Forms to Dropbox?
Dropbox is a great app that automatically syncs your file across all your devices. It’s a safe, free, cloud-based storage service that enables users to store and access files online.
There are more reasons to upload files from WordPress forms to Dropbox; some of them are:
- Dropbox provides you with 2GB of free storing space and gives you terabytes of storage for a relatively low price.
- Dropbox works as an excellent backup for all your files.
- You can have access to your files from any computer or device worldwide.
- You can use it as a secondary source of storage.
Thus, it increases the convenience factor of your professional or daily life by ten folds.
Now that you’re aware of the reasons for using Dropbox, we’re sure you want to incorporate it in your form. For this, you require the best form builder tool, like Everest Forms.
With Everest Forms’ prebuilt templates, you can create any form in minutes. Survey forms, job application forms, leave request forms, and more!
Best of all, Everest Forms allows seamless integration with Dropbox. So, you can upload your form files to your Dropbox account without any hassle.
With that said, let’s move on to our stepwise guide on how to upload files from WordPress forms to Dropbox directly.
How to Upload Files from WordPress Forms to Dropbox Using Everest Forms?
To upload files from WordPress forms to Dropbox using Everest Forms, follow the simple steps below:
Step 1: Install Everest Forms and Everest Forms Pro
The first thing you need to do is install and activate Everest Forms Pro on your WordPress website. If you need help with the installation process, refer to our guide on how to install Everest Forms and Everest Forms Pro.
You must also install the pro version of the plugin since the Dropbox feature is only available with a premium plan.
Once you’ve set up the plugin correctly, you can move on to the following step.
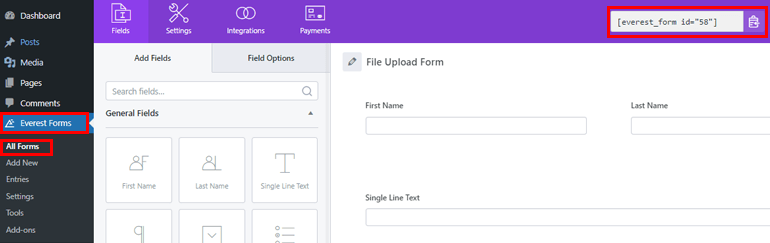
Step 2: Create a New Form with File Upload Field
After the installation is complete, you must create a new form with a file upload field so that users can submit the required files.
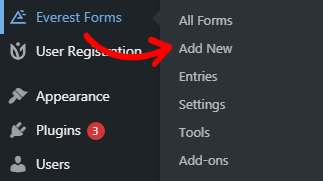
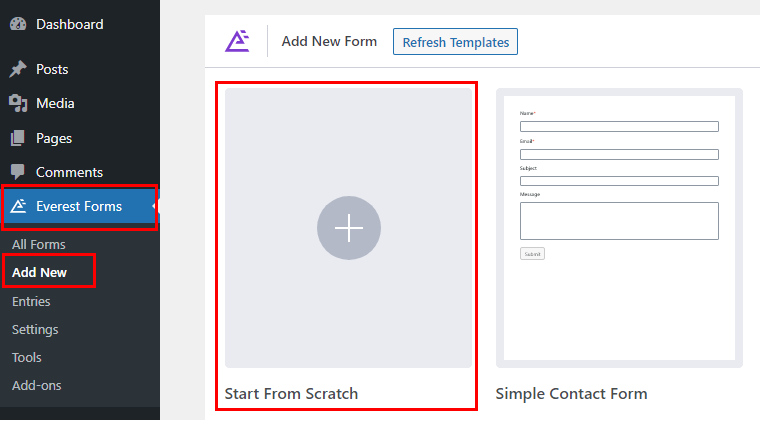
So, navigate to Everest Forms >> Add new. You’ll find a collection of prebuilt form templates on the Add New Form page. However, you can also start from scratch.
In this tutorial, we’ll be creating a form from scratch. So, click on Start From Scratch.
Now, a form builder window will open up. On the left side of your screen, you’ll see form fields that you can add to your form.
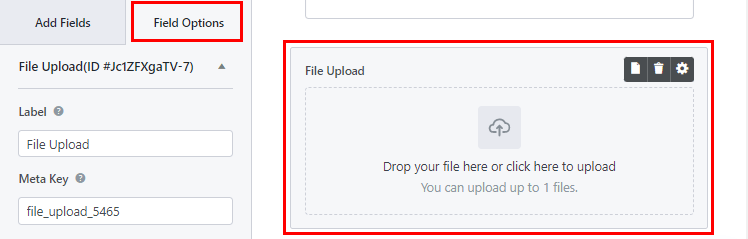
You can drag and drop the fields on your right to the desired area to create your form. Make sure to add the File Upload field to the form as well. Using this field, users can upload and submit files through the form.

Moreover, you can customize each form field from the Field Options. Just click on the field you want to edit, and its Field Options will appear on the left.
After the form is complete, make sure to save the changes by pressing the Save button.
So, once you’ve created the file upload form, you can finally connect Dropbox with it to send a copy of all your documents.
Step 3: Authenticate Dropbox
The third step is to authenticate your Dropbox account for your WordPress site. Only then you will be able to upload files from WordPress forms to Dropbox successfully.
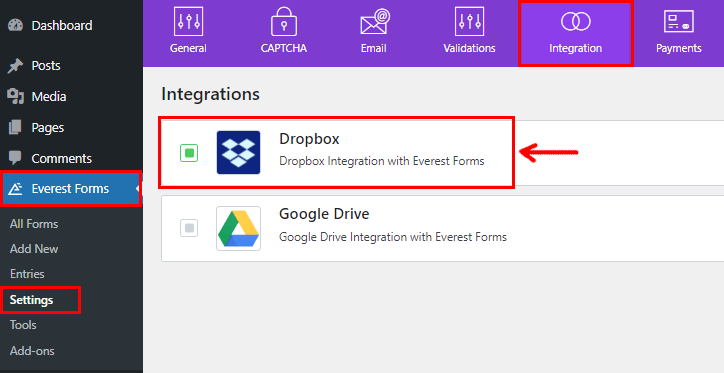
For that, go to Everest Forms >> Settings. Next, open the Integration tab and click on Dropbox.
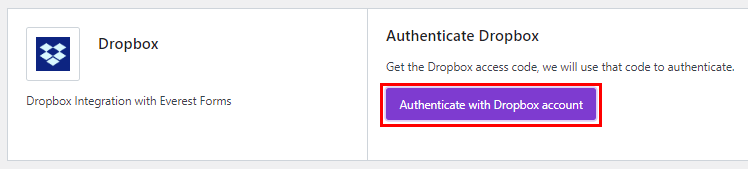
Now, click on the settings icon to see the Authenticate with Dropbox account button. Simply press it.
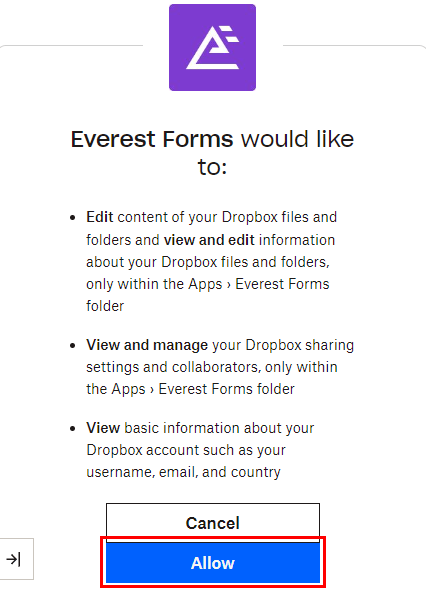
A new window will open where Everest Forms will ask for your permission to access your basic information like username, email, and country. You can grant permission by clicking on the Allow button.
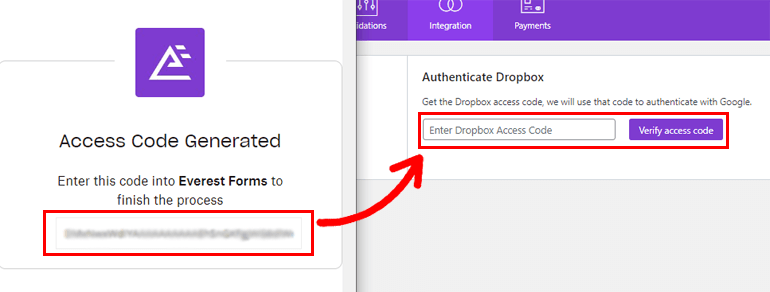
After that, you’ll get the access code. Please copy the code and paste it into the Enter Dropbox Access Code field. Finally, click the Verify Access Code, and your authentication is complete.
Step 4: Enable Dropbox File Upload
After you’ve successfully integrated Everest Forms with Dropbox, it’s time to enable the Dropbox file path.
To do this, open the form you created in the second step. In the form builder, open Settings >> General. Scroll down and search for the External Upload Path option. All you have to do is tick the checkbox for the Dropbox File path.
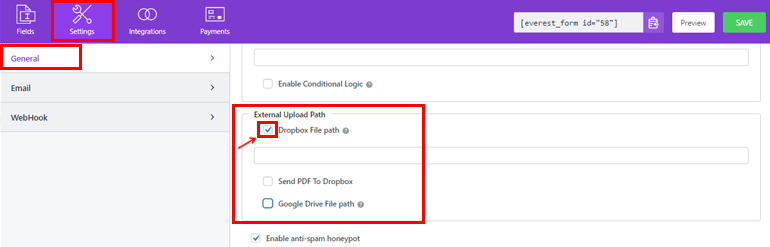
You can now either define the folder path in the input box or leave the box empty. If you decide to leave the input box blank, your file will be directly saved in your default path and not inside any folder.
Finally, hit the Save button to save the changes.
Step 5: Add Your Form to the Website
The final step is embedding your Dropbox upload form on your website. This way, your users can upload and submit files to your form.
There are two most common page/post embed options: using the Shortcode block and using the Everest Forms block. You can use either of these two methods.
To use the shortcode method, go back to the form builder where you’ll see the form shortcode at the top.
Now, copy your form’s shortcode. Then, create a new page or post and you’ll be taken to the Gutenberg editor.
Here, press the Add block (+) icon, search for the Shortcode block, and click on it to add it to the page.
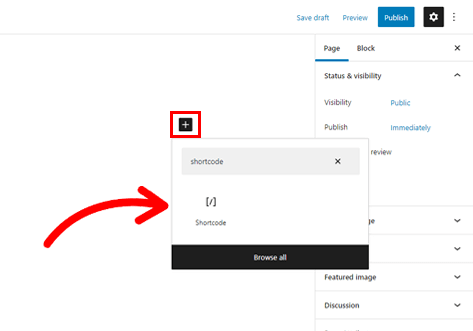
Next, paste the short code you just copied into the block and click on the Publish button.

That’s it! Your form will now be displayed on your site.
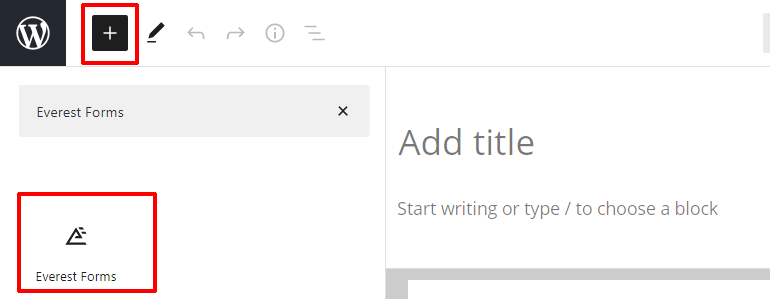
Alternatively, click on the Add Block (+) button and search for the Everest Forms block. Add it to the page and select the file upload form from the drop-down.
Finally, you can hit the Publish button at the top if you like how your form looks.
Wrapping it Up!
Voila! You’ve successfully created a file upload form using Everest Forms and integrated it with Dropbox.
Thanks to the premium version of Everest Forms, you can enable file uploads directly from your forms to your Dropbox account.
But don’t stop at Dropbox integration. You can do so much more with this plugin like convert WordPress form submissions to pdf, create a customer support form in WordPress, etc.
You can read more about WordPress-related topics on our blog. For easy video tutorials, visit our YouTube channel and subscribe for future updates.
If you like our content, you can share it on your socials. We’re also available on Facebook and Twitter, so, follow us for more.


![Zakra 3.0 | Zakra Pro 2.0 Release [Major Updates!]](https://i.ytimg.com/vi/g3rifl7kWvg/maxresdefault.jpg)