If you want to send contacts from a WordPress form to your HubSpot account, you must integrate the form with HubSpot.
By doing this, your HubSpot list receives all the contacts you’ve collected through a form on the website. You can then use this data for efficient customer relationship management.
Don’t know how to integrate a form with HubSpot? We’ll show you two easy methods to do this below. So, read till the end.
Table of Contents
Best Way to Send Contacts From Your WordPress HubSpot Form
Integrating a WordPress form with HubSpot doesn’t have to be super complicated. With the right tool, you can easily send contacts from a form to a list in your HubSpot account.
One such tool is Everest Forms, a drag-and-drop contact form builder WordPress plugin. With minimal effort, this beginner-friendly plugin lets you create beautiful front-end forms for contact, job applications, hotel booking, etc.
Best of all, it supports seamless integration with the HubSpot CRM platform. So, all you have to do is create a contact form with Everest Forms and connect it with HubSpot.
We’ll talk about the ways you can use Everest Forms to send contacts from a WordPress form to HubSpot in the following section.
How to Integrate WordPress Form with HubSpot?
Everest Forms offers two different methods to integrate a WordPress form with HubSpot.
You can implement any of these two methods as per your requirements.
Method 1: Using the Everest Forms HubSpot Add-on
The first way to integrate a WordPress form with HubSpot is the Everest Forms HubSpot add-on. It’s a premium add-on that helps you connect your forms to HubSpot in the simplest way possible.

So, here’s a step-by-step look into how you can use this add-on to send contacts from a WordPress form to HubSpot.
Step 1: Install and Activate the HubSpot Add-on
For this method, you’ll need to install the HubSpot add-on available in the premium version (Professional and Agency Plans) of Everest Forms.
So, you must buy a premium plan and install and activate Everest Forms Pro on your site. Go through our complete guide on properly installing Everest Forms Pro if you need help.
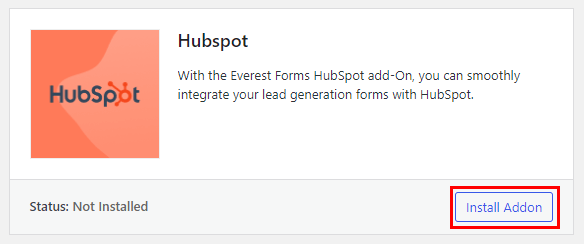
After that, go to Everest Forms >> Add-ons.

Scroll down and find the HubSpot add-on. Here, click on the Install Addon button and Activate it.
Now, you’re fully equipped to create a WordPress form with Everest Forms and send its data to HubSpot.
Step 2: Create a New Form with Everest Forms
Before sending contacts to your HubSpot account, you must have said contacts. And the perfect way of collecting WordPress contacts is through a front-end form on your website.
With Everest Forms, you can create contact, survey, newsletter, leave request forms, and more; you name it!
In this guide, we’ll build a simple contact form. All you have to do is drag and drop the necessary fields into your form and customize them.
Refer to our tutorial on how to create a contact form with Everest Forms to get started. After you have a contact form ready, you can proceed ahead.
Step 3: Integrate your HubSpot Account with Everest Forms
The next step is integrating your HubSpot account with Everest Forms using an Access Token.
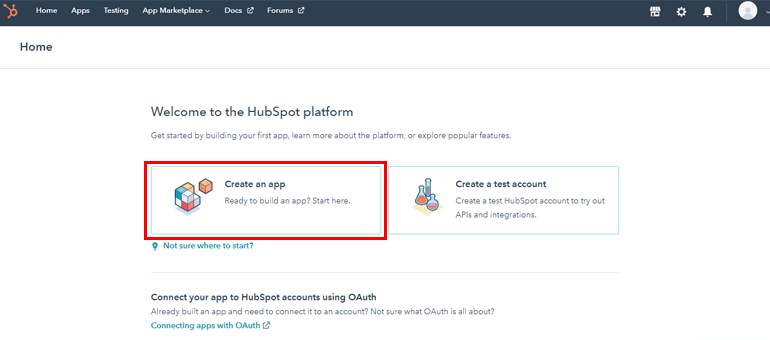
To get the token, log into your HubSpot Developers account. You can sign up for a new account here if you don’t have one.
Once you’re in your HubSpot dashboard, click on Create an App. The purpose of an app is to create a means of connection between a third-party app and HubSpot.
This takes you to the Basic Info page.
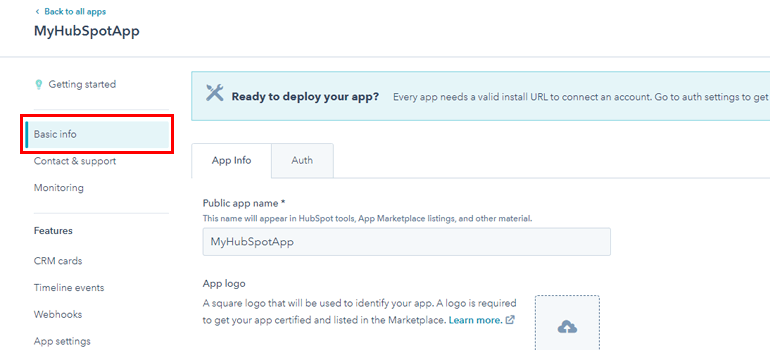
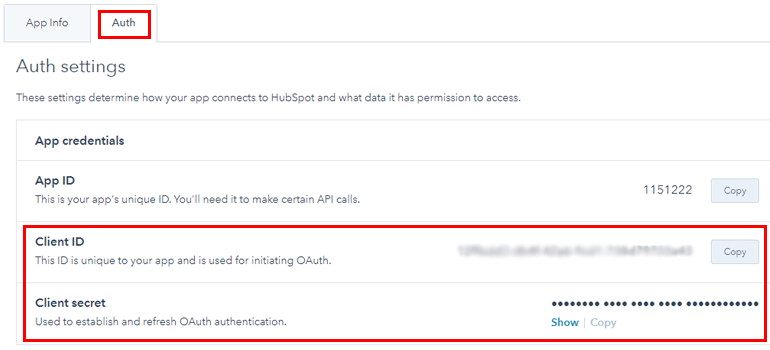
Switch to the Auth tab, where you’ll find the Client ID and Client Secret key. Copy them for later use.
Although HubSpot allowed the use of API keys before, they’re now shifting to the App approach. That’s why we recommend you use an app instead of API Keys.
After that, scroll down to add a redirect URL in the format shown in the image and Save the settings.
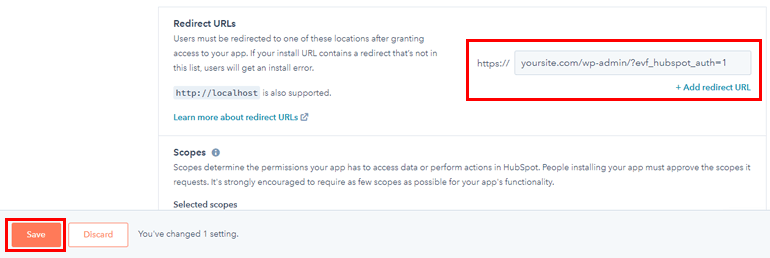
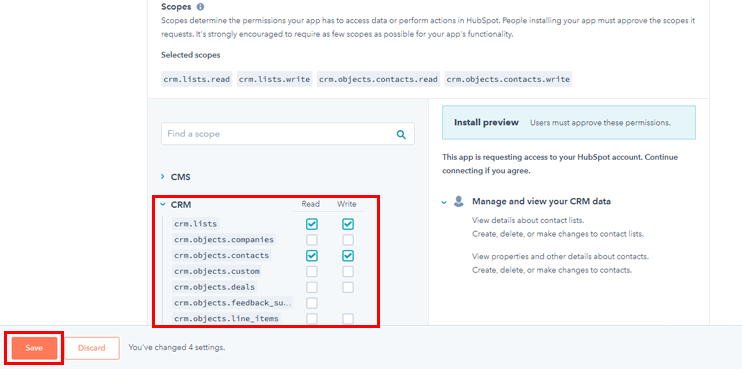
Next, scroll down to the Scopes section, select the required scopes, and hit Save. These scopes determine what HubSpot data the app gets access to and what actions it can perform.
Back in your WordPress dashboard, open Everest Forms >> Settings >> Integration. Here, click on the Settings icon for HubSpot.
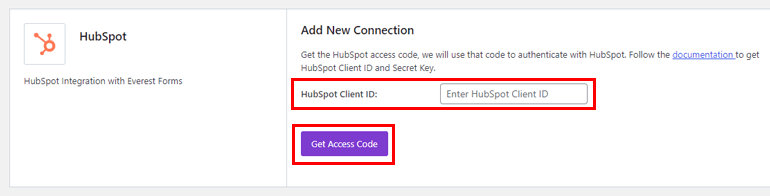
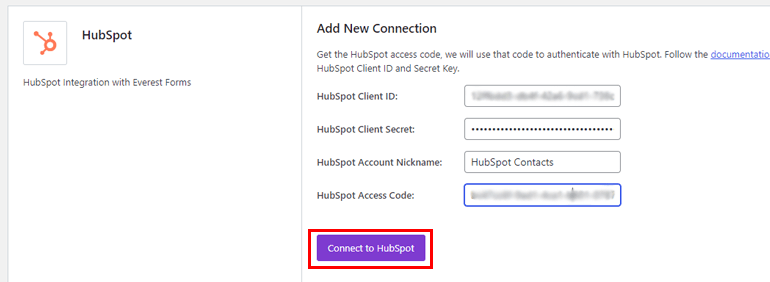
Now, paste the Client ID you previously copied into HubSpot Client ID and click Get Access Code.
This opens a new window asking you to choose an account. So, pick the proper account and hit Choose Account.

Then, click Connect app, and you’ll get a HubSpot Access Code. Simply copy it and paste it into the HubSpot Access Code field.
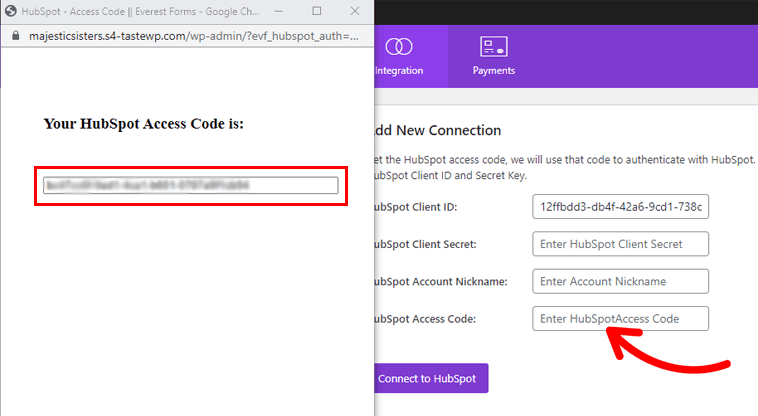
Also, paste the Client Secret you previously copied and give an Account Nickname. Finally, click the Connect to HubSpot button and complete the integration.
Step 4: Add a HubSpot Connection to the Form
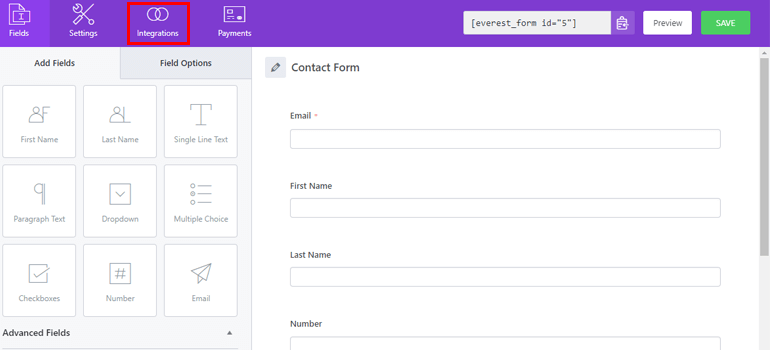
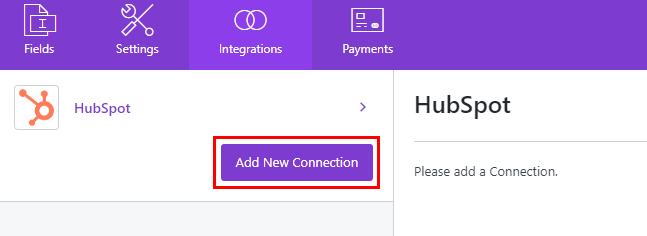
The last step of this process is to connect the individual contact form to HubSpot. So, open the contact form you created earlier, and go to its Integrations.
Then, click the Add New Connection button.
Give the connection a name like HubSpot Contacts Connection, and press OK.

After that, you’ll need to provide the following information:
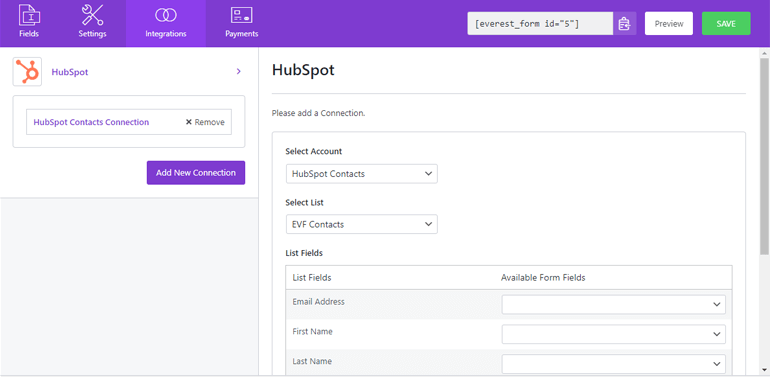
Select Account: Select your HubSpot account from the dropdown.
Select List: Select the HubSpot list where you want to send the contacts from this form.
List Fields: Map the list fields to the corresponding form fields.
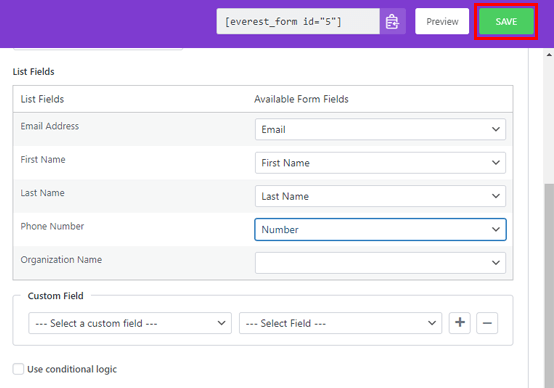
Custom Fields: You can also map custom form fields to custom list fields.
If you don’t have a suitable list, open your HubSpot dashboard and create one. You can then select the list from the dropdown.
You may also enable conditional logic for the connection to determine when the data is sent to the list. After you’re done, save all of the changes.
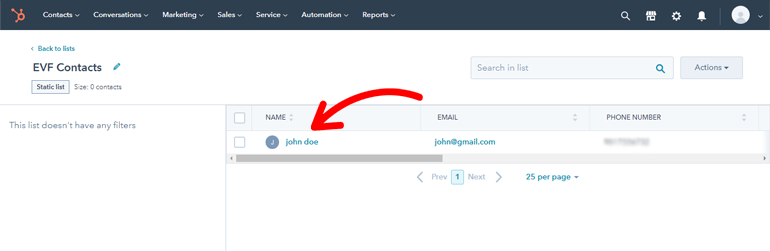
Now, every form submission received through the contact form will be sent to the HubSpot list as a new contact.
Method 2: Using the Everest Forms Zapier Add-on
The second method of sending contacts to HubSpot from a WordPress form is using the Zapier add-on. It’s a premium add-on that lets you connect your WordPress forms with thousands of third-party apps, including HubSpot.
You can try this method if you’re already using the Zapier add-on in Everest Forms and don’t want to install an additional extension.
Let’s look at how you can use this add-on to integrate a WordPress form with HubSpot and send contacts.
Step 1: Install and Activate the Zapier Add-on
Similar to the HubSpot add-on, you must install the Zapier add-on to integrate it with your forms.
After you’ve set up Everest Forms Pro on your site, navigate to Everest Forms >> Add-ons. Here, find the Zapier add-on and click Install Addon.
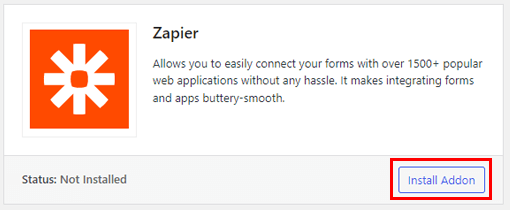
Then, Activate it as well.
Step 2: Integrate Zapier with Everest Forms
It’s time to integrate Zapier with Everest Forms using the Zapier add-on. Note that you’ll need a Zapier account to complete the following steps. So, create an account here if you don’t already have one.
Depending on your requirements, you can either set up a free account or buy a premium plan.
Create a New Zap & Set Up Trigger
Log into your Zapier account to access your dashboard. Here, click on the Create Zap button.
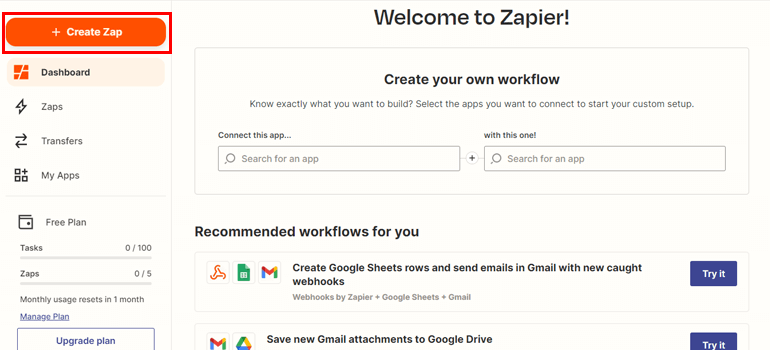
This takes you to the Zap editor. Start by giving your Zap an appropriate name.
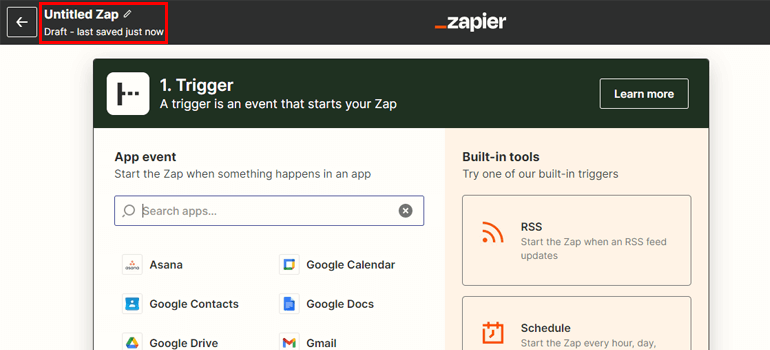
The first step to creating a zap is choosing a Trigger app. In this case, the trigger app is Everest Forms, and the trigger is form submission.
So, search for Webhooks by Zapier and choose it as the App event. This builds a connection from Everest Forms to Zapier using webhooks.
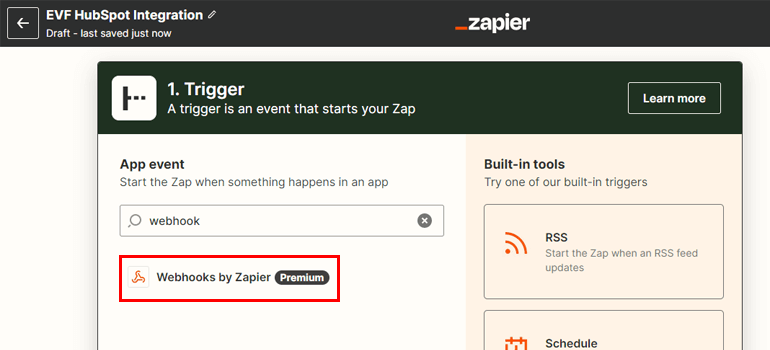
Next, select Catch Hook from the dropdown as the event. This event starts the automated process between Everest Forms and Zapier.
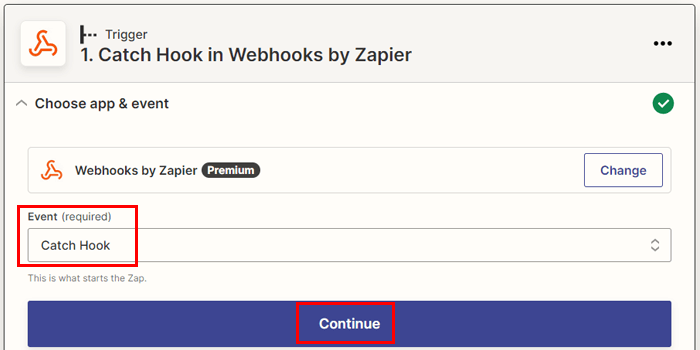
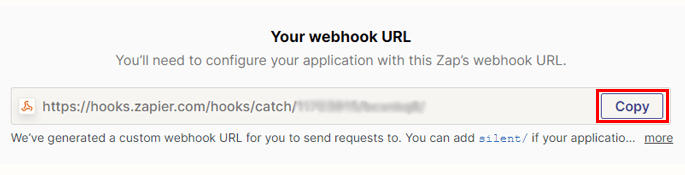
As soon as you press Continue, you’re provided with a webhook URL. Copy this URL and go back to your WordPress site dashboard.
Navigate to Everest Forms >> All Forms, and open the contact form where you want to integrate Zapier. If you don’t have a contact form, we suggest you make one with Everest Forms before proceeding.
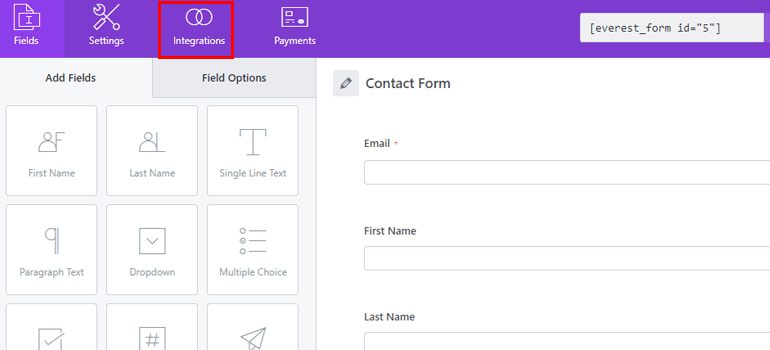
You’ll see the Integrations tab at the top of the form builder. All you have to do is Enable Zapier and paste the URL into the field.
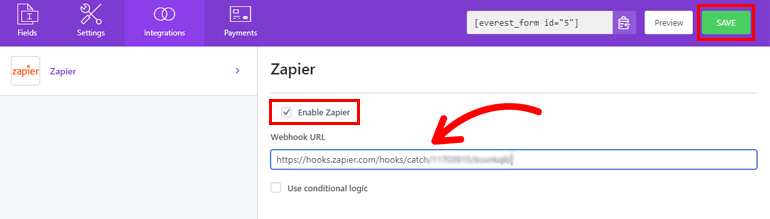
Hit Save, and your contact form is now connected with Zapier.
Test the Trigger
With the integration complete, you might want to test whether the connection is working successfully. This ensures that the webhook is catching information from your contact form correctly.
You’ll need a form entry submitted through the contact form. You can simply fill the form out by yourself for testing purposes. After that, click on the Test Trigger button in your Zap.
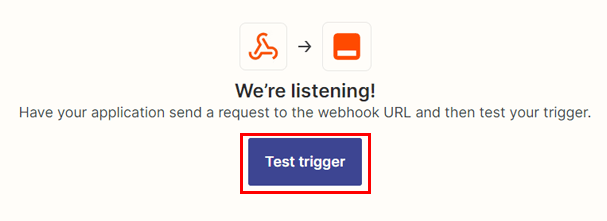
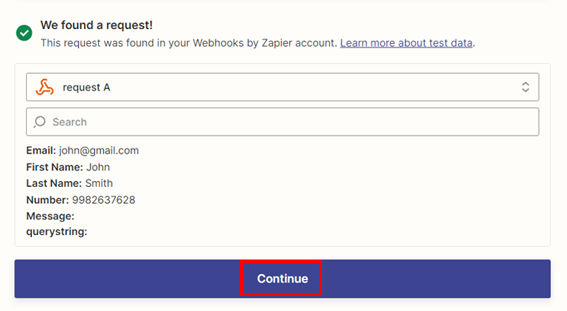
If you see the “We found a request!” notice with the form entry listed, the integration is complete. You can now click Continue and proceed ahead.
Step 3: Connect Everest Forms to HubSpot
The entire point of the Zapier add-on is to connect Everest Forms to HubSpot through Zapier. We’ve already integrated Everest Forms with Zapier. All that’s left to do now is integrate Everest Forms with HubSpot.
Hence, the next step in your Zap is to set up an action. In our case, the action is sending Everest Forms contacts to HubSpot. This action is automatically triggered by form submissions in Everest Forms.
Let’s look at the step-by-step process of setting up this action below.
Choose App and Event
The second step in Zap creation is choosing an action app and event.
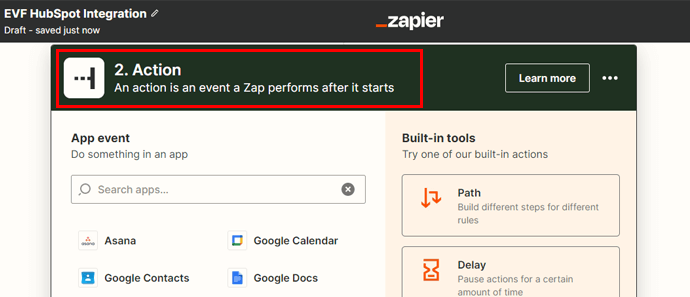
An action app is simply the app where the action takes place after a Zap starts. Likewise, you can choose a suitable event to occur in the selected app.
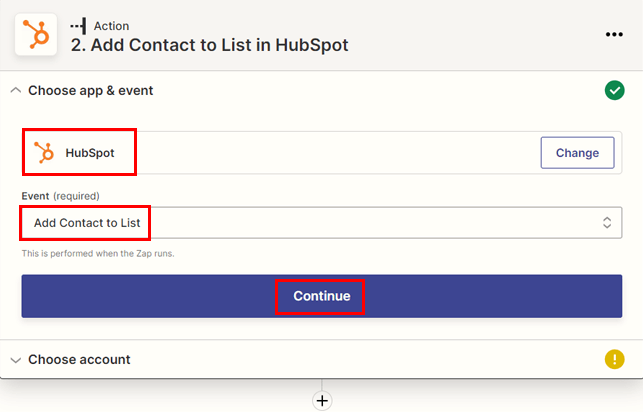
So, add HubSpot as the App Event using the search bar. A new Event field will appear below. You can search for the required event from the dropdown. To send contacts to HubSpot, choose Add Contact to List. Hit Continue after that.
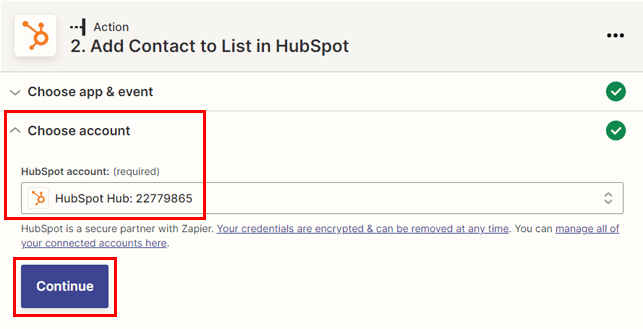
Next, you must choose your HubSpot account from the Choose an account dropdown and press the Continue button.
Set Up an Action
Besides choosing the app and event, you must also specify what data you want Zapier to pass from the form to the HubSpot list.
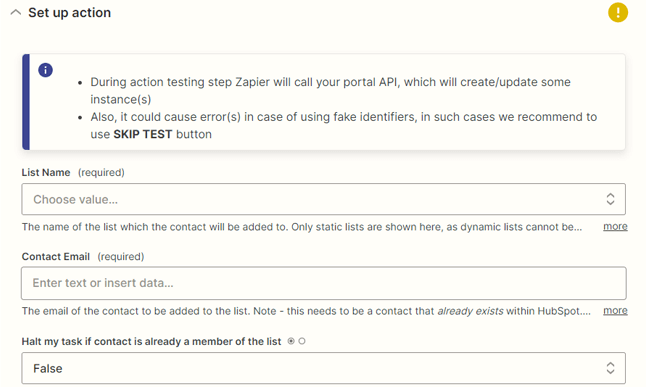
First, select the list where you want to send the contacts from the dropdown. Then, you can select the respective form field from the dropdown for each list field. This maps the form fields to the list fields, ensuring correct data transfer and storage.
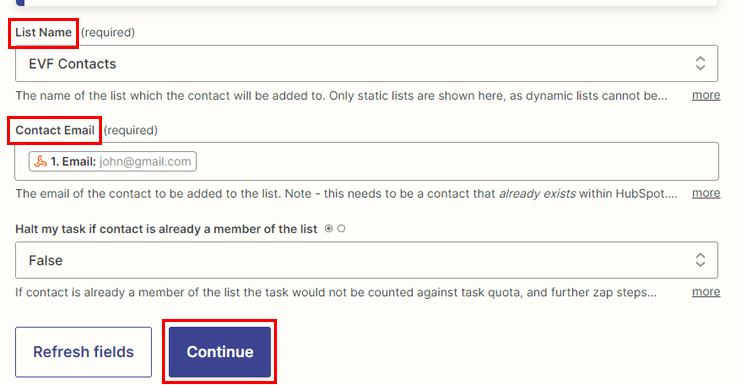
Press Continue after you’ve fetched all the required data.
Test the Action
Similar to how we tested the trigger, it’s important we also test the action.
This step displays all the data Zapier will send from Everest Forms to HubSpot. After confirming they’re all correct, click the Test & Continue button.
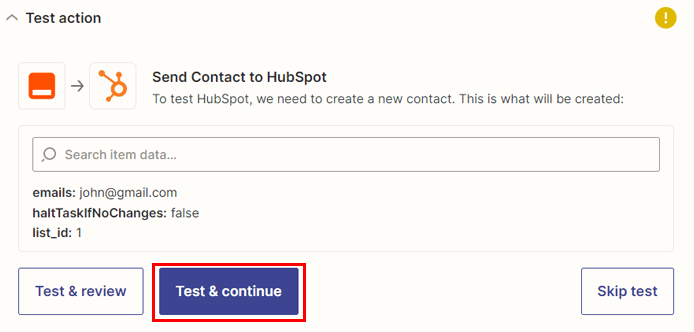
If the connection is successful, you’ll see a success message.
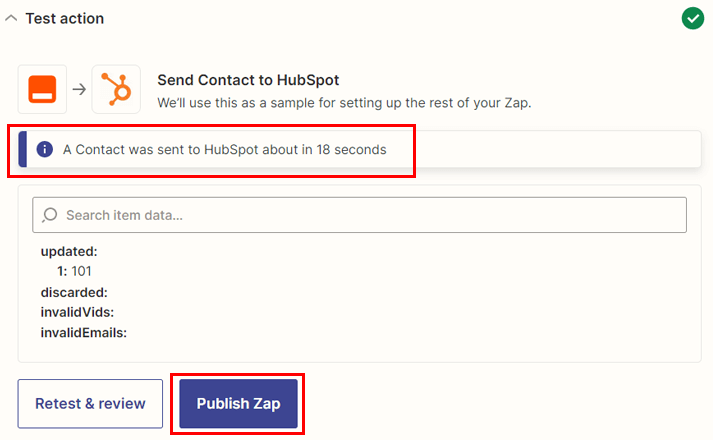
Finally, press the Publish Zap button to complete the zap creation process. Therefore, with a new form submission, your HubSpot list will receive a new contact automatically.
Congratulations! You’ve successfully integrated Everest Forms with HubSpot with Zapier.
Wrapping Up
Everest Forms is the best solution if you want to send contacts from your WordPress form to HubSpot. This form plugin lets you create a custom contact form and integrate it with a HubSpot list. So, each form submission sends a new contact to the list.
With Everest Forms, you can integrate the form with HubSpot in two ways. You can either use its HubSpot add-on or Zapier add-on.
Just follow the steps in the tutorial above, and you should be able to connect your form to HubSpot in no time!
Besides, you can also use Everest Forms to integrate your form with Google Sheets, and other third-party apps.
Read more about this fantastic plugin on our blog and watch its video tutorials on our YouTube channel. Also, follow us on Twitter and Facebook for new updates.


![Zakra 3.0 | Zakra Pro 2.0 Release [Major Updates!]](https://i.ytimg.com/vi/g3rifl7kWvg/maxresdefault.jpg)