Are you planning to build an online store with WordPress but don’t know where to start? Wondering how to build a WordPress eCommerce website? Then, this WordPress WooCommerce tutorial is just the thing for you.
As per the data provided by Statista, the eCommerce market revenue is rapidly growing and is predicted to reach 4.15 trillion US Dollars in 2022.
No doubt that the growing popularity of eCommerce stores is due to the ease of selling variable products without setting a physical location. Moreover, you also get the complete freedom to design your online store to your heart’s content.
Hence in this tutorial, we’ll show you how to build your online store as successful as Amazon or eBay with WooCommerce and WordPress. So, make sure you read our article till the end.
Table of Contents
A. Why Build an Online Store with WordPress and WooCommerce?

WordPress is a popular website-building platform that enables the creation of any type of website without any cost. The best part? This platform is suitable for everyone. Yes, even to beginners with zero coding skills. And that’s why this platform is used by about 42.9% of all websites today.
Further, WordPress comes with several eCommerce themes and plugins exclusively designed for your online store. Therefore, you get tons of customization options and functionalities that support the effortless creation of an eCommerce site in WordPress that stands out from the crowd.
WooCommerce, on the other hand, is a popular WordPress plugin that lets you set up an online store freely. It’s super-easy to use and comes with all the necessary features you’ll ever need to start your online store. It’s a highly customizable eCommerce platform that allows customizing your store as per your need.
The plugin lets you sell physical products like shoes, clothes, jewelry, etc., or digital products like eBooks, software, and more without any hassle. On top of that, it’s compatible with other WooCommerce extensions and themes to extend the functionality of your eCommerce store.
Hence, there’s no better option than free and open-source platforms like WordPress and WooCommerce to set up a successful eCommerce website.
B. How to Build an Online Store with WordPress and WooCommerce? (Step-by-Step)
Now, it’s time to walk you through the step-by-step guide to build an online store with WordPress and WooCommerce. Are you ready? Let’s start!
Step 1. Buy a Domain Name & Web Hosting
The first and the most important thing you need to do before starting your WooCommerce store is to buy a domain name and web hosting.
A domain name is a unique name for your website with which the users will recognize you online. For instance, the domain name of our website is wpeverest.com. Similarly, yahoo.com, amazon.com, google.com are some other examples of domain names.
Now, you must be wondering what’s web hosting then? Web hosting is the space you rent on the web to accommodate all your website files. Your website will be accessible to your users only when you purchase and sign up for web hosting.

Additionally, you need to make sure that your website is SSL certified. It works as proof to your users that your website is secured. Thus, an SSL certification is a must for eCommerce websites as customers need to put the credit card and other sensitive information while checking out.
All these times, we talked about the need to purchase a domain name and web hosting. So, here’re some helpful tips and tricks that you can implement to choose a good domain and hosting.
Choose a Perfect Domain Name
A perfect domain name is something that reflects the purpose of your website. Besides, it must be catchy enough to be remembered by your potential customers.
Other things to consider while choosing a unique domain name for your website are as follows:
- Short, Simple, and Easy to Remember: Your domain name doesn’t need to be complicated to be catchy. Instead, it should be short and simple to make your potential customers easily remember it.
- Avoid Domains with Copyright Infringement Issues: You need to ensure that your domain name is unique and doesn’t resemble any other existing brand to avoid the hassle of copyright issues.
- Appropriate Domain Name Extension Usage: You can find several domain extensions like .com for commercial, .biz for business, .edu for education, etc. Hence, you should choose the one ideal for your website’s purpose.
- Take Help of Blog Name Generator Tools: If you’re confused about where to start, blog name generator tools (Domain Wheel, Panabee, etc.) can help. These tools provide unique ideas for the keyword you enter to come up with great domains for your website.
Choose a Right Web Hosting
Apart from choosing a perfect domain name, you also need to choose the right web hosting to build a WordPress eCommerce website. You should carefully research the following factors while choosing the hosting service for your eCommerce site.
- Speed: A good site speed is key to deliver a good user experience. Moreover, it has a direct impact on your website’s SEO (Search Engine Optimization). So, you need to make sure that you choose a hosting with fast server speed.
- Uptime: Uptime means the time expressed in the percentage for which your site remains up or working without any server disturbances. Choosing a web hosting with good uptime guarantees that your site is available to your users 24*7.
- Features: Since you’re setting up a WordPress WooCommerce site here, you need to choose the WooCommerce hosting plan packed with robust eCommerce features to set your online store with ease.
- Security: A web hosting service with strong security is highly recommended to protect your website from hackers, malicious networks, and other security attacks.
- Customer Service: It’s possible to face issues with your website now and then. At those times, friendly and reliable support is what you need from your hosting providers to solve the issues quickly. So, make sure that the hosting you choose has good customer service.
Some of the best WooCommerce web hosting services that you can choose from are:
- Bluehost: Starts from $15.95/mo. for Standard WooCommerce Hosting Plan
- SiteGround: Starts from $3.99/mo. for StartUp WooCommerce Hosting Plan
- DreamHost: Starts from $16.95/mo. for DreamPress WooCommerce Hosting Plan
Purchase Web Hosting Service for Your eCommerce Website
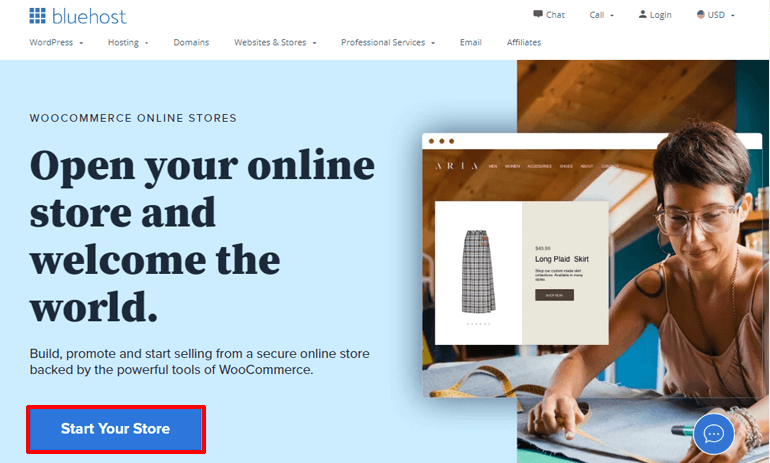
In this WooCommerce tutorial, we’ll use Bluehost to show you how to purchase web hosting for your eCommerce website.

Bluehost is a popular hosting service provider which WordPress.org officially recommends. Furthermore, it comes with a hosting service exclusively built for your WooCommerce site. Thus, you can fully utilize the advantages of its WooCommerce features to set up a successful online store.
Above all, it provides a free domain name and an SSL certificate with its hosting service. Hence, you don’t need to purchase a domain name and SSL certificate separately.
Firstly, visit the Bluehost WooCommerce hosting page and click on the Start Your Store button.
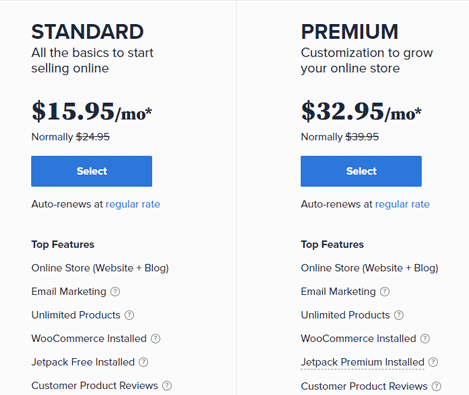
You’ll see two different WooCommerce hosting pricing tables. The Standard plan is the right choice for beginners who are just starting their online store. On the contrary, the Premium plan is suitable for those looking to extend their online store. Now, select your plan to proceed further.
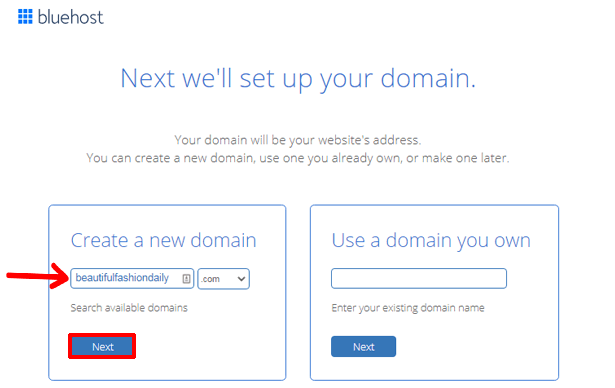
Since you haven’t set your domain name yet, the next step will allow you to set a domain for your eCommerce website. Remember, you get to register your domain name from other domain registrars as well. But you don’t need to do that as Bluehost offers you a free Bluehost domain name.
Hence, type the domain name in the rectangular bar within the Create a new domain box and click Next to check its availability.
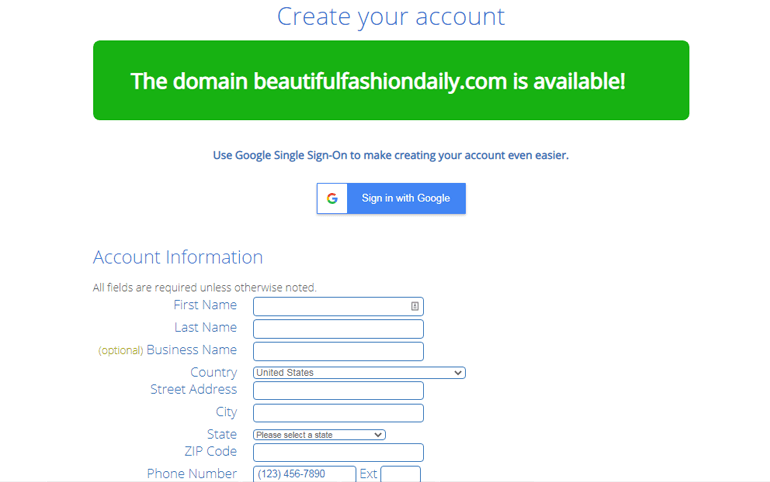
After that, you can create an account in Bluehost. Here, you need to enter your personal details and payment information like credit card details, etc.
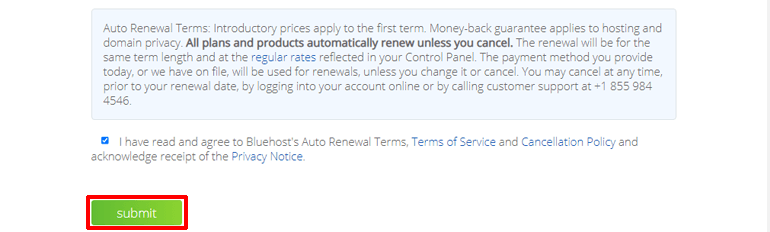
Once you fill in the necessary details, you need to accept the Bluehost terms and conditions. Finally, click on the submit button to complete your purchase process.
After that, you’ll receive an email that includes all the details you need to log in to your hosting control panel (cPanel).
The first time you log into your cPanel, you’ll get a pop-up message saying both WordPress and WooCommerce are already installed on your site. Now, click on the log into your site button on the bottom of the same pop-up page, and you’ll be able to log in to your WordPress dashboard.
Step 2. Set Up WooCommerce
Since Bluehost has already installed WooCommerce on your site, you don’t need to install it manually. Therefore, as soon as you log in to your dashboard, you’ll see the setup wizard for WooCommerce.
If you missed that out by any chance, you can still click on the WooCommerce tab on the left of your WordPress dashboard.

Now, you can quickly set up the following:
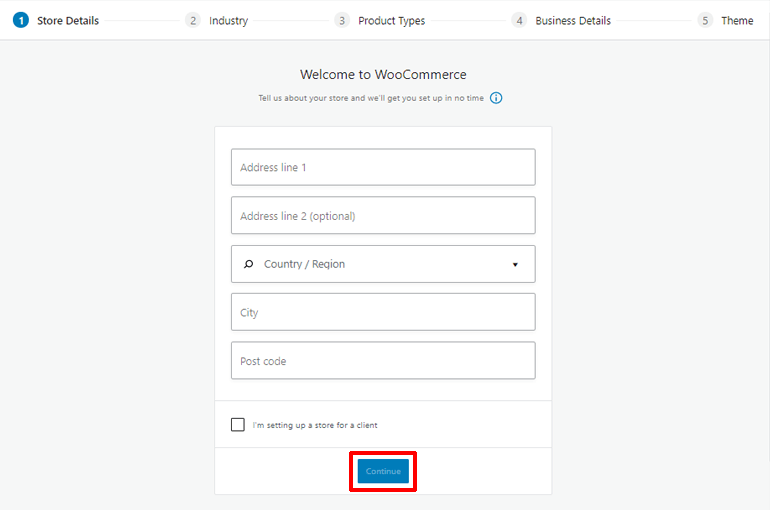
Provide Store Details
Here, all you need to do is add details about your store like address, optional address (if you have any), country/region, city, and the postal code. After that, hit on the Continue button to proceed further.
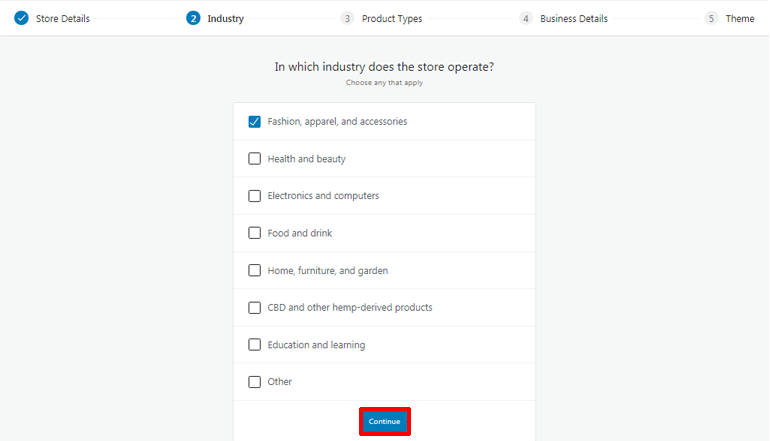
Choose the Industry
Under Industry, you should choose the industry type that applies to your WooCommerce store. You get various options like Fashion, apparel, and accessories, Health and beauty, Food and drink, etc. Checkmark the one that suits your store type the most and Continue to the next step.
Define the Product Types
Next, you need to define the type of products you’ll sell in your online store. You can sell physical products, downloadable products, and more. However, if you wish to sell subscriptions, memberships, bookings, and so on, WooCommerce requires you to pay some extra charge for that.
Even better, you can choose more than one product type.

After selecting the type of product, click on the Continue button.
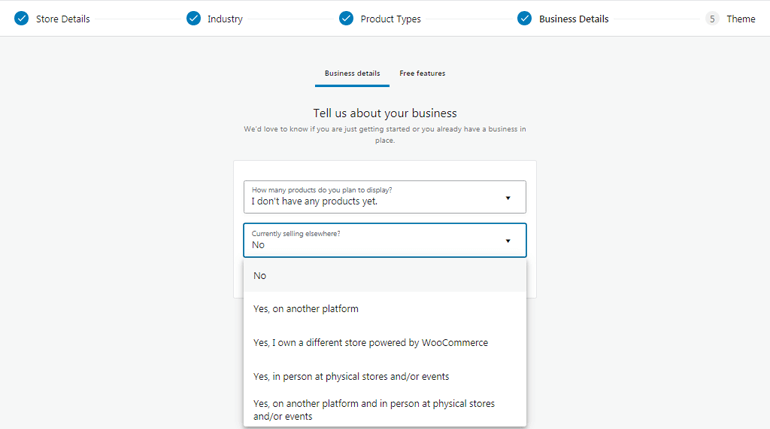
Add Business Details
It’s time to add some business details. Here, you need to specify the number of products you want to display on your site. Just click on the dropdown menus and choose the suitable option.

Since you’re just getting started, you can also select the option that says I don’t have any products yet. Likewise, you also need to inform if you’re selling elsewhere or not.
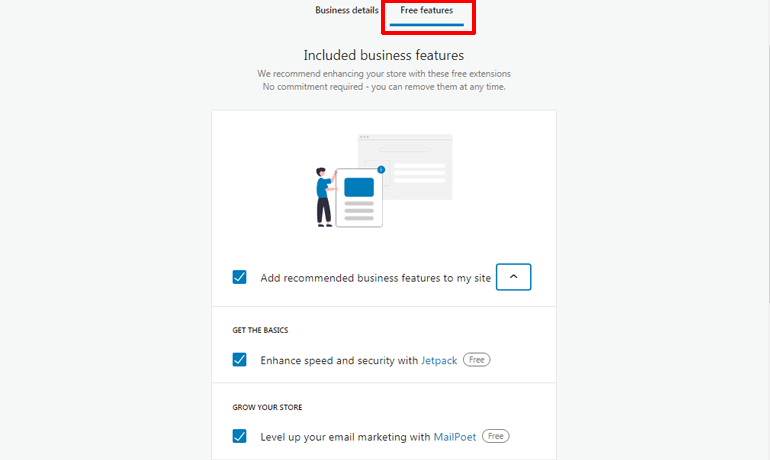
Again, switching to the Free features tab at the top from the Business details allows you to enable or disable some free extensions on your WooComerce store.
Once you’re done, click on Continue. This takes you to the step where you’re asked to choose a theme. But you can skip this step for now, as we’ll be discussing this in detail in our next section.

So, this is how you set up WooCommerce before you can build an online store with WordPress.
Step 3. Choose the Best WordPress WooCommerce Theme
The next step in our WooCommerce shop tutorial is choosing a WordPress theme. A theme you choose directly impacts the overall appearance of your eCommerce store. Not only that, but it also determines how your products are listed on your online store.
Thus, if you want to provide a great look and feel to your online store, you need to choose the best WordPress WooCommerce theme for your site. And, if you’ve searched the internet, you should know there are oceans of options for WooCommerce themes. However, not all of them are good for your site. Hence, we recommend using Zakra.
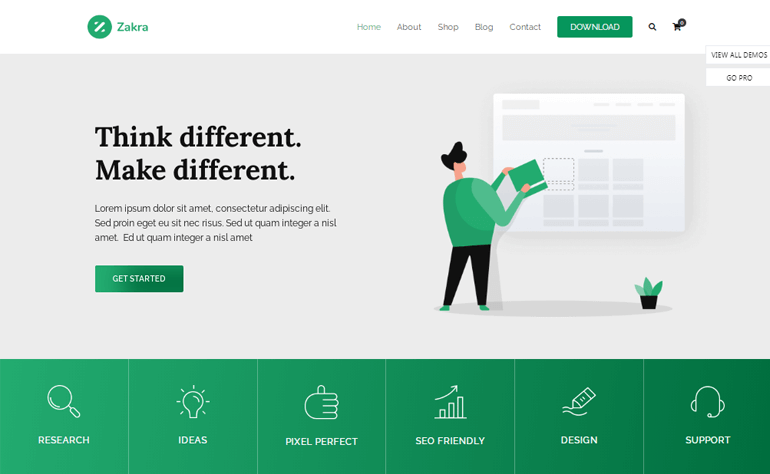
Zakra is a top multi-purpose WordPress theme that has won the heart of 60K+ users worldwide. It’s well-designed and packed with powerful features to help you build a stunning website. Besides, its integration with popular page builder plugins like Elementor and Brizy lets you create any website layout with ease.
On top of everything, it offers 80+ demos, including templates for your online store to eliminate the need to create a website from the ground up. Further, seamless integration with the WooCommerce plugin and easy page customization options for WooCommerce pages make Zakra one of the best choices for a WooCommerce theme.
So, let’s discuss how to install a theme next in our tutorial on how to create an eCommerce website using WooCommerce.
Install the WooCommerce Theme
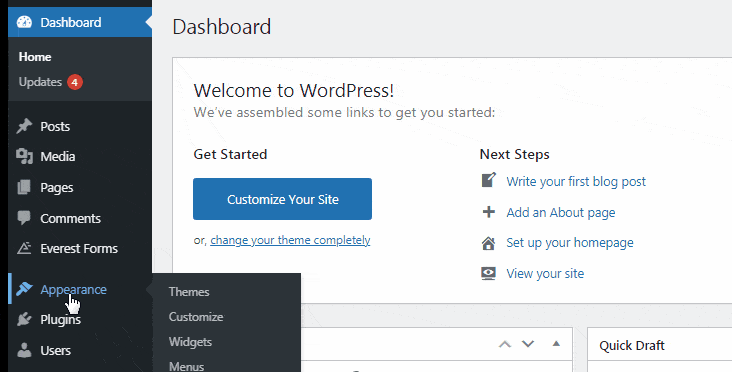
From your dashboard, go to Appearance >> Themes and click on the Add New button.
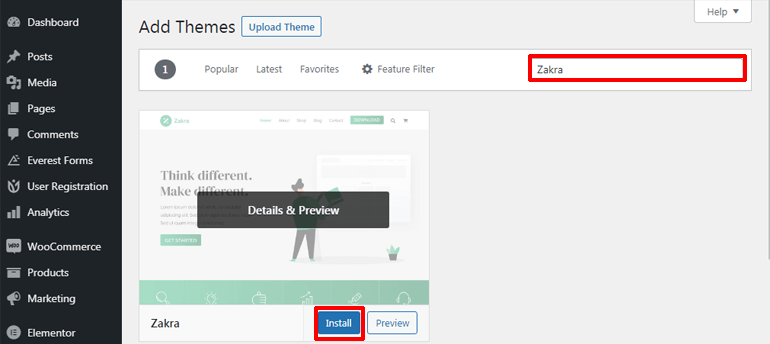
It’ll take you to the Add Themes page. Here, you can enter Zakra in the search box. Once the Zakra theme appears on your screen, click on the Install button.
After the installation process, you need to activate the theme on your site by clicking on the Activate button.
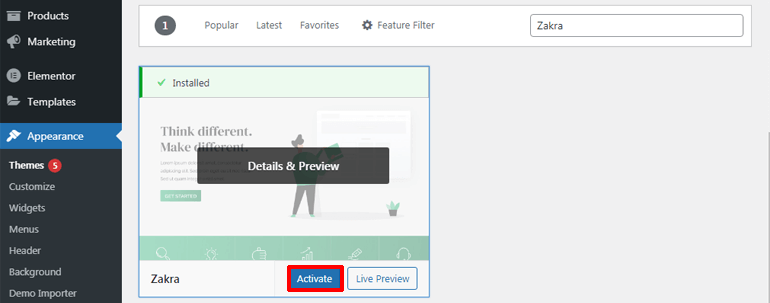
That’s all. You’ve successfully installed and activated the Zakra on your site. But if you remembered, Zakra has several starter sites that you can import with a single click.
Now, let’s discuss how to import the WooCommerce store demo to your eCommerce site.
Import WooCommerce Store Demo to Your eCommerce Site
As soon as you finish the installation of the theme, you should see the welcome message from the Zakra theme at the top. Clicking on the Get started with Zakra will automatically download the ThemeGrill Demo Importer plugin on your site.

Soon after that, you’ll be directed to the Demo Importer page, from where you can import demos.
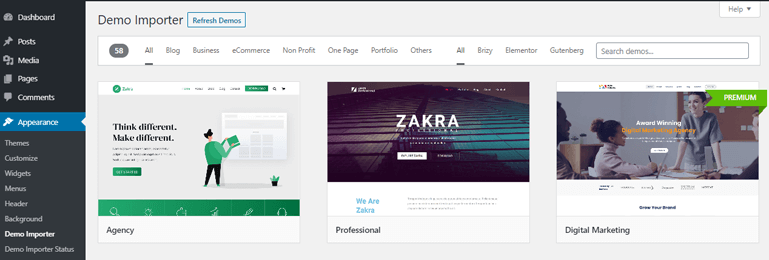
Since you’re trying to build an online store with WordPress, you need to choose a template mainly designed for an online store. You can also filter the templates by eCommerce categories for ease.
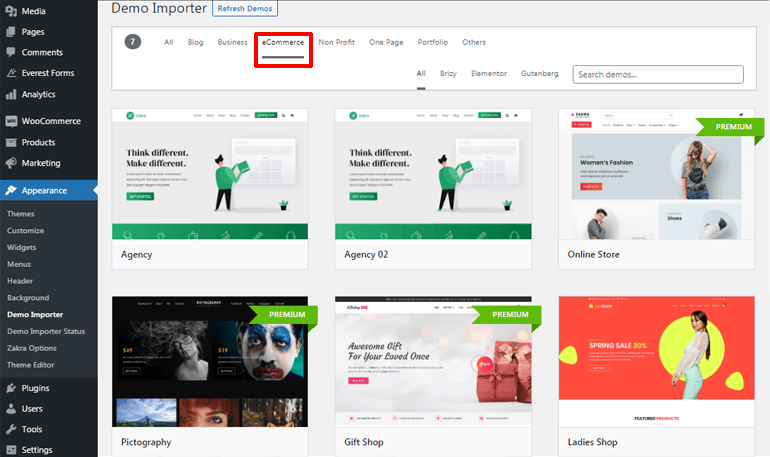
After deciding which demo to use, hover your cursor over it, and click on the Import button. You can even Preview the demo before you import it.
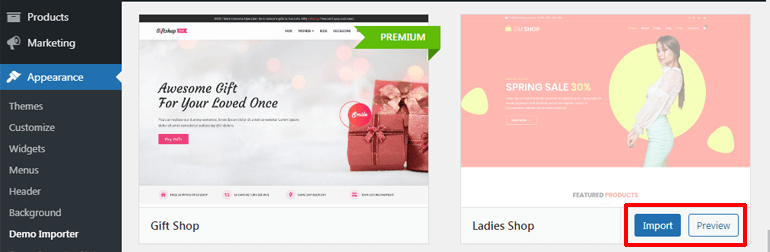
Again, a dialogue box will appear where you need to click on the Confirm button. Now, your theme demo is successfully imported.

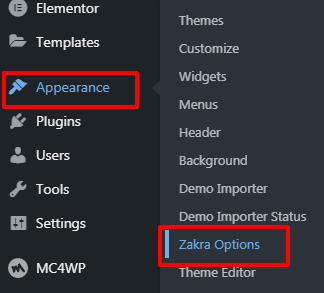
But what if you skipped the welcome message? Don’t worry; there’s an alternative method too. For this, navigate to Appearance >> Zakra Options.
On the right-hand side of the Zakra Options page, you’ll see the Starter Demos box. There, click on Install ThemeGrill Demo Importer Plugin.
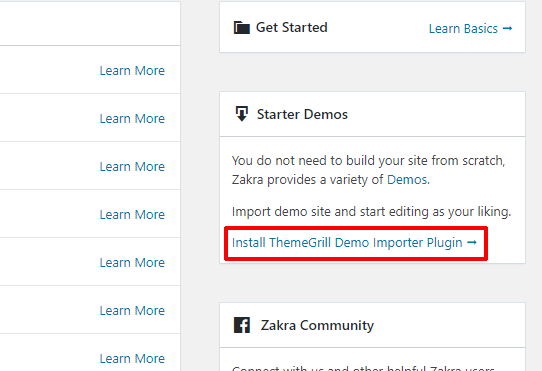
It’ll instantly install the plugin, and you’ll be directed to the Demo Importer page. Now, you can import the demos as before. However, you need to remember that you can access the premium starter demos only after purchasing the premium version of Zakra.
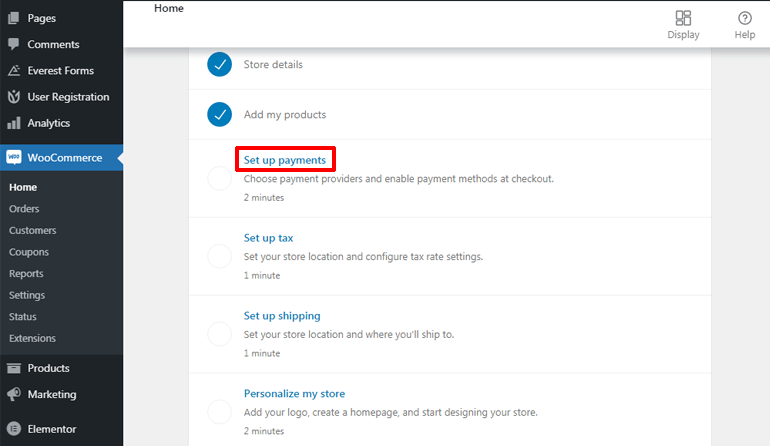
Step 4. Add Products to Your WooCommerce Store
Next, to build an online store with WordPress, you need to add products to your WooCommerce store. Hence, go to WooCommerce >> Home, and it’ll direct you to the homepage with several WooCommerce setting options. For now, click on the Add my products option.
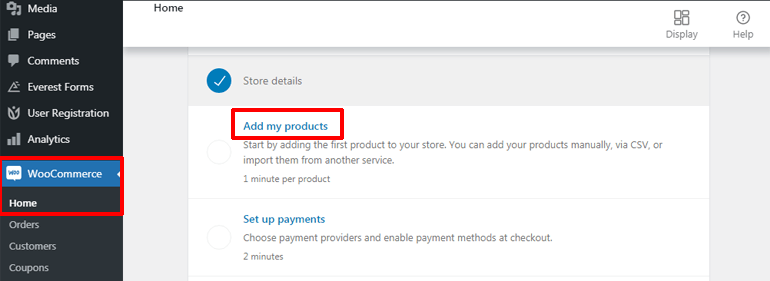
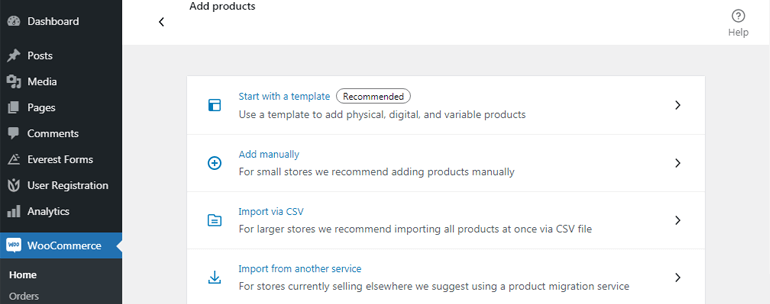
You can add your products to your WordPress website in 3 different ways, i.e., manually, by importing via CSV and other services.
So, let’s know these methods in detail in our WordPress WooCommerce tutorial now.
Add the Products Manually
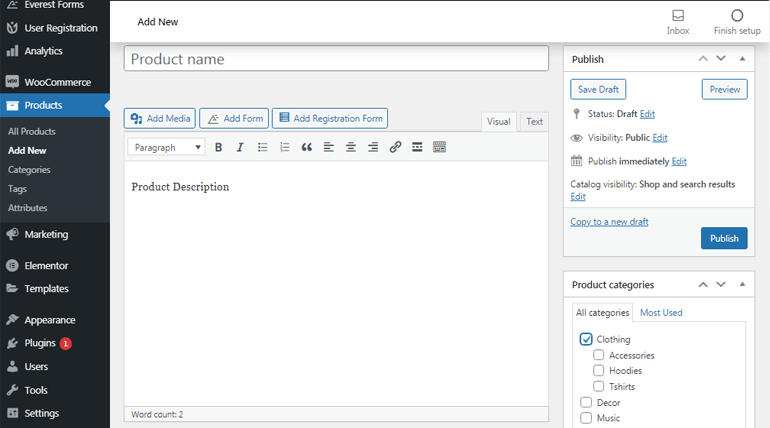
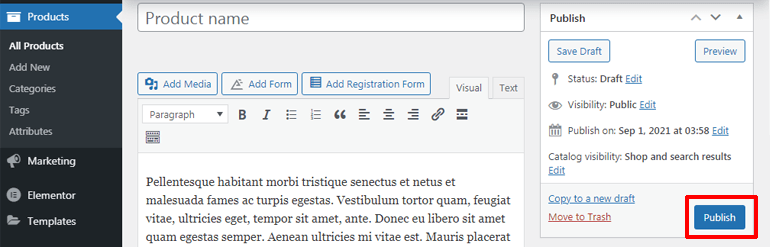
To add the products manually, click on Add manually option. This redirects you to the Add new product page, from where you can easily add products and their details. You can start by adding a name and an attractive description to your product first. Also, you can select or add the new Product category from the right side of the screen.
After that, scroll down to find the Product data section. There, click on the dropdown menus to select the Product Type. Now, from the General tab, you can add the regular and sale prices for your product.
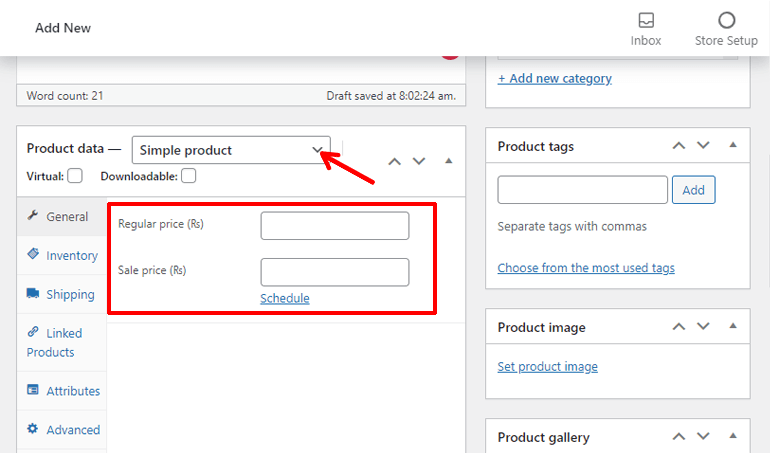
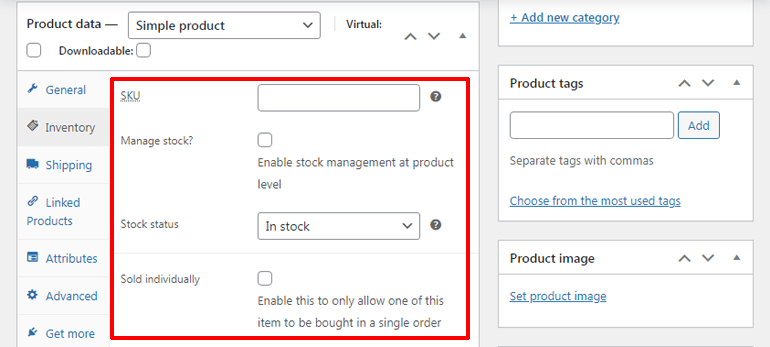
Likewise, the Inventory tab lets you manage everything related to your product’s stock level.
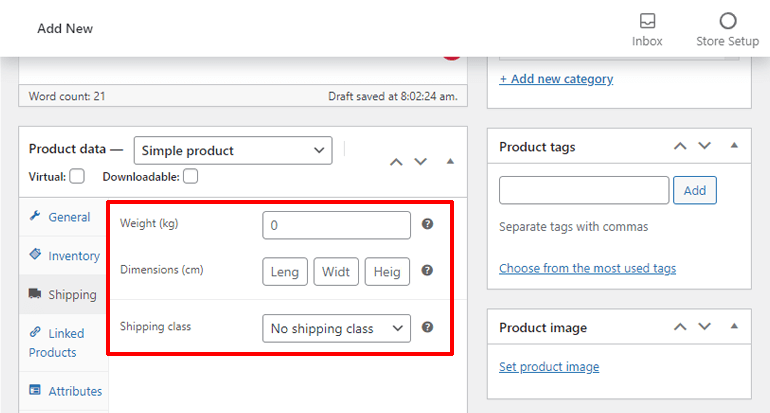
You can easily set your product’s weight, dimensions, and shipping class from the Shipping tab.
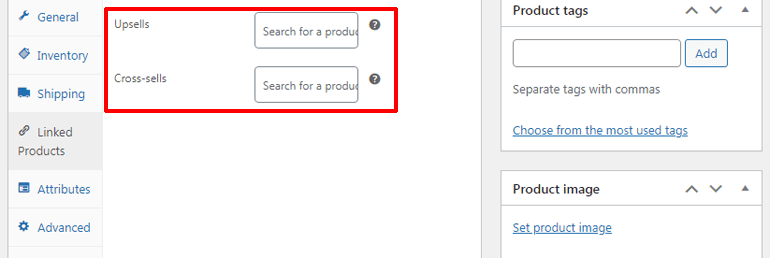
The Linked products tab enables you to set Upsells and Cross-sells for products. Upsells refer to the products you suggest over currently viewed products. On the contrary, Cross-sells are products you recommend in the cart based on current products selection by your customers.
Moreover, you can add custom product attributes (color, size, etc.) for your products from the Attribute tab and even add a purchase note to send to your customers from the Advanced tab.
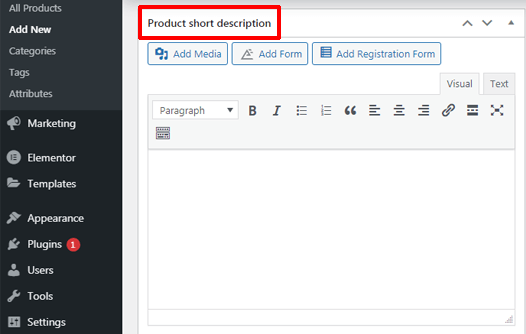
As you scroll down further, you’ll also see a Product short description section from where you can add short descriptions to your products that occurs below the product’s name.
Further, you can set the product image from the Product image section on the right side of the screen. You can even add additional images from the Product gallery section.

Once you complete all your product settings, don’t forget to hit the Publish button to make it visible on your eCommerce site.
Import Products via CSV
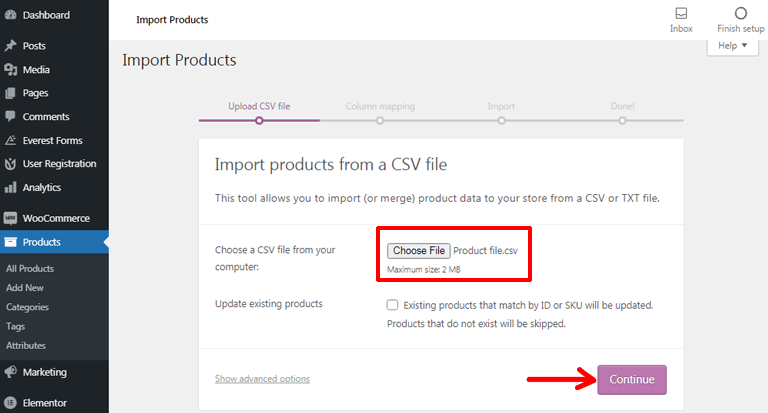
Now, if you own quite a large store, adding each product manually will be time-consuming and challenging. That’s where the import via CSV (Comma Separated Value) option comes into play.
WooCommerce plugin has a built-in CSV import and export feature. Hence, you can import/export the CSV files from/to your computer to add/download thousands of products in no time.
To import the products via CSV, click on the Import via CSV option. Then, press the Choose File button to choose the CSV file to upload. You can upload the file of a maximum of 2 MB size at once. After that, click on the Continue button.
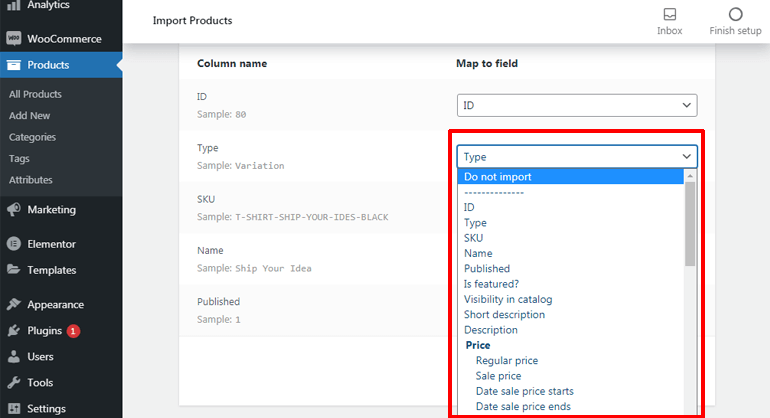
Next, you’ll land on the column mapping page. Here, you can see that the WooCommerce plugin tries to map or match the Column Name from the CSV file with the product Fields.

You can also set the product fields on your own by clicking on the dropdown option. And if you don’t want to import any field particularly, you can even select the Do not import option. Also, you should know that if the column name is unrecognized, it won’t be imported by default.
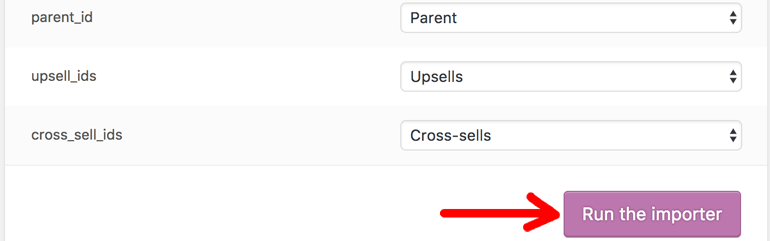
Once you complete column mapping, click on the Run the importer button. After that, importing of your products will start. Make sure that you don’t refresh or touch the browser when the importing is in progress.
Import Products via Another Service
This method is suitable for those online store owners who are selling elsewhere and wants to migrate all their products quickly and easily. And, the best migration service for this is Cart2Cart.
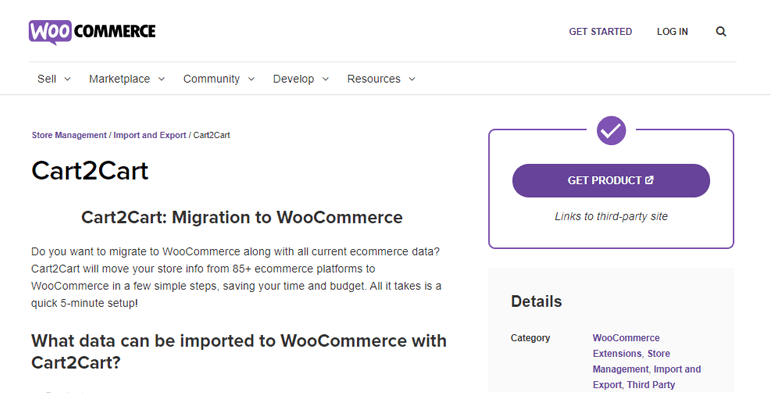
Cart2Cart lets you migrate your products from 80+ other eCommerce platforms to WooComerce in a breeze. You can also move your additional store information like customer, order data, coupons, manufacturers, and more without any difficulty.
Step 5. Configure Additional WooCommerce Settings
Till now, you’ve learned about adding products to your store. But that’s not all. You also need to configure other settings to create a complete eCommerce website using WooCommerce.
Thus, we’ll discuss what additional settings you need to configure to build an online store with WordPress next.
Set Up Payment Methods
Availability of convenient online payment options is vital for any eCommerce website. Hence, WooCommerce gives you several payment gateways you can choose from.
To set up payment methods for your WooCommerce store, navigate to WooCommerce >> Home. Then, click on the Set up payments option.
Here, you’ll see three different payment options. They are PayPal Payments, Cash on delivery, and Direct bank transfer.
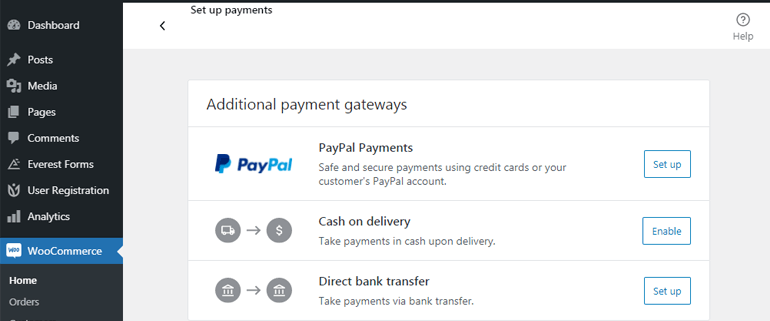
If you prefer payment via PayPal, click on the Set up button beside the PayPal Payment option. It’ll automatically install PayPal, and you can configure your PayPal payments account. You need to enter your PayPal account details and click on the Proceed button.
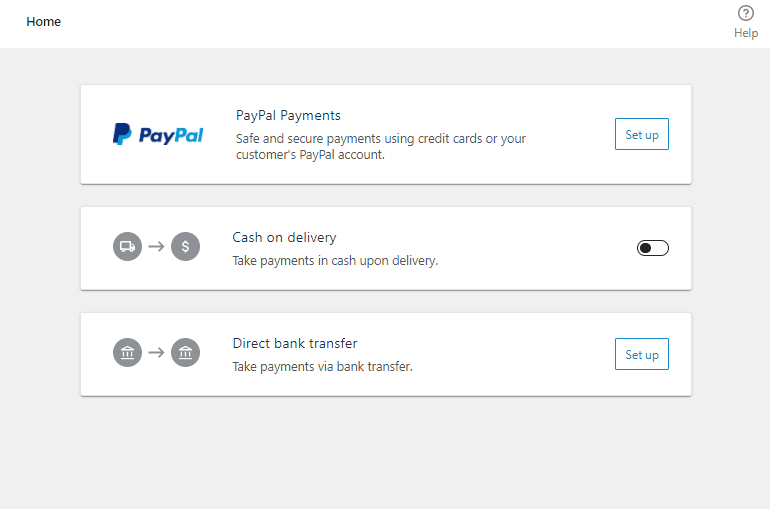
Alternatively, you can also choose to receive cash on delivery. For this, all you need to do is enable the Cash on delivery.
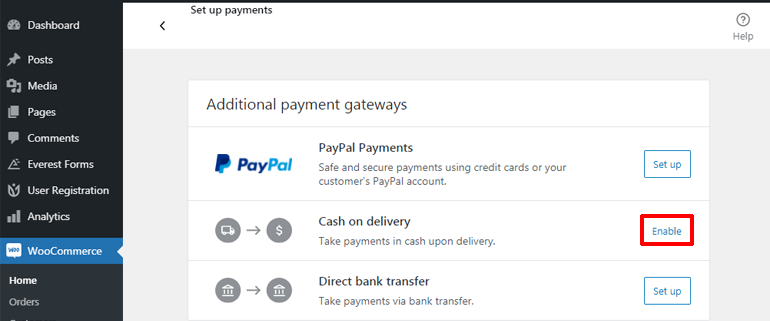
Another option is to accept the payments via Direct bank transfer. Simply click on the Set up button, and you’ll be taken to a page where you can add the necessary bank details to receive payment. Finally, click on the Save button, and you’re done.

Add Tax Rates
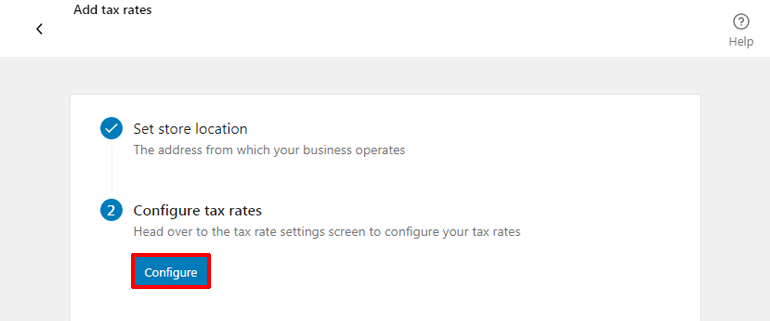
Again from the WooCommerce homepage, click on Set up tax. A page will load where you’ll find two options, i.e., to set the store location and configure tax rates. You’ve already added your store location in the previous step of setting up WooCommerce. Thus, you can go on to configure tax rates. So, click on the Configure button.
Now, you’ll see the tax rates table from where you can easily define the tax rate depending upon attributes like country code, state code, and more. You can click on the Insert row option to start setting the tax rate.
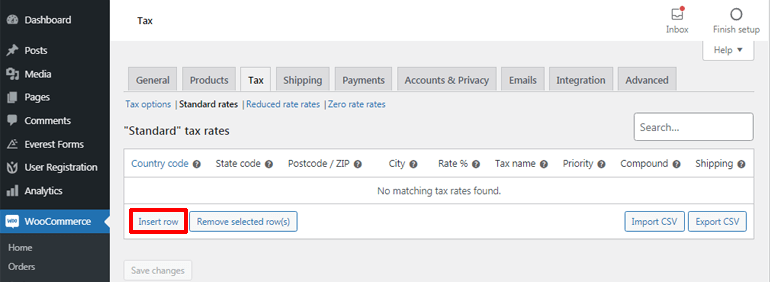
You can also choose to leave the attributes blank, denoted by (*), to apply the same tax rate to all the countries/states/ZIP/cities as per your need.
For instance, here, we’ve set a tax rate of 10% for the US (United States), but we haven’t defined any particular State, ZIP, or City. That means the tax rate we’ve set remains the same for the customers from different States, ZIP, or cities within the US.
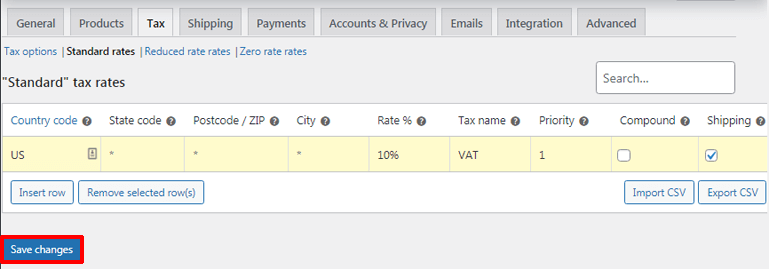
Once you complete your tax rate settings, don’t forget to click on the Save changes button.
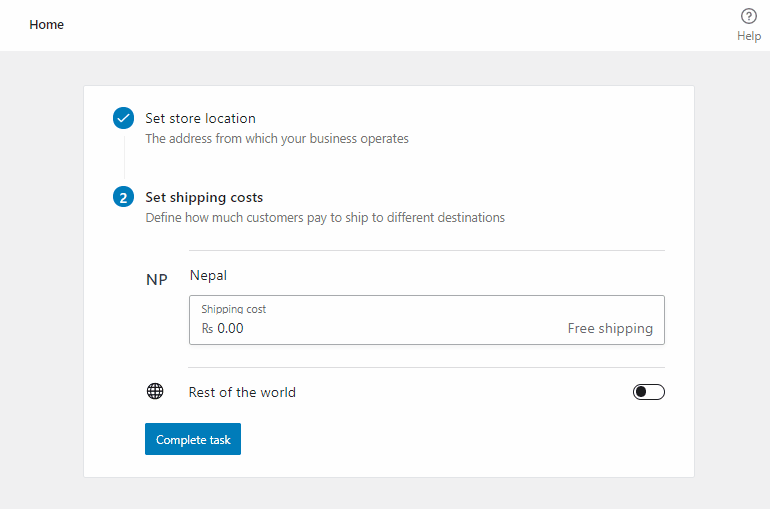
Set Up Shipping Costs
After completion of the tax rate settings, it’ll again redirect you to the WooCommerce homepage. Now, click on the Set up shipping option to configure the shipping costs.
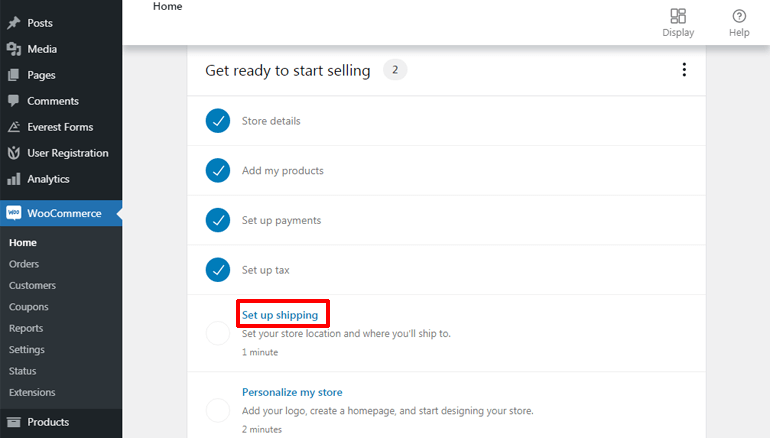
If you want to offer free shipping, you don’t need to set anything. But in case you want to add the shipping costs, you can enter that manually. After defining the price for your country, enable the Rest of the world option to set the cost for other parts of the world. Lastly, click on the Complete task button.
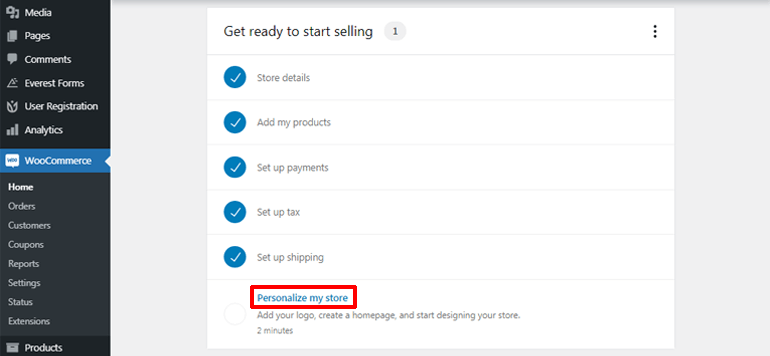
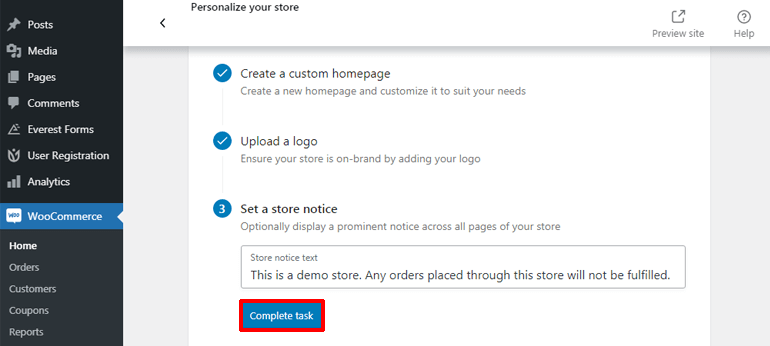
Personalize Your WooCommerce Store
We’ve one more step left out to build an online store with WordPress, i.e., to personalize your WooCommerce store. So, from the WooCommerce homepage, click on Personalize my store to get started.
To personalize your eCommerce website, you get an option to create a custom homepage. You just need to click on the Create homepage button to create a new homepage instantly and start customizing it to your liking. Conversely, if you want to stick to the same homepage that your theme provides, you can skip it as well.
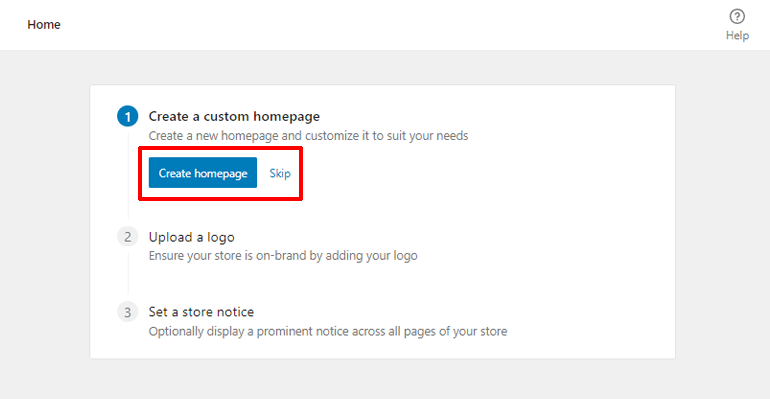
Now, you can click on the Add an image button to upload your brand logo. Then, hit on the Proceed button.
Finally, click on the Set a store notice and enter a short and sweet note to display across your online store’s pages. After that, click on the Complete task button.
And that’s how we can create an eCommerce website using WooCommerce. But wait, you still need to do one thing, i.e., to strengthen your store with useful WooCommerce plugins and extensions.
Step 6. Install Essential WooCommerce Plugins and Extensions for Additional Features
Our tutorial on how to build an online store with WordPress would be incomplete without discussing some essential plugins and extensions to add top-notch features to your site.
While plenty of plugins and extensions are available for your eCommerce site, we recommend only going with the important ones. That’s because too many plugins may do you bad rather than good by slowing down your site.
Thus, some of the incredible plugins that we’d like to suggest are as follows.
i. Customize My Account for WooCommerce
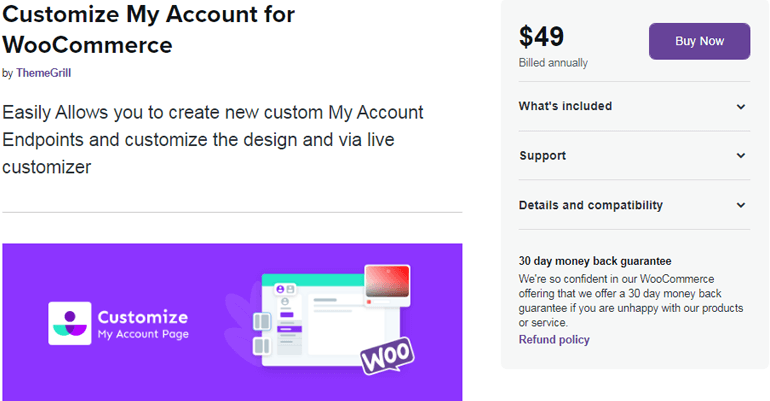
Customize My Account for WooCommerce is an outstanding extension for customizing the My Account page of your eCommerce site. It enables you to easily add or remove tabs, links, and groups to your My Account dashboard.
Key Features
- Hide/disable the tabs in one click
- Customize your account page in real-time
- Easily modify font, color background image, etc. of your My Account dashboard
- Provide endpoint access to specific user roles
ii. User Registration
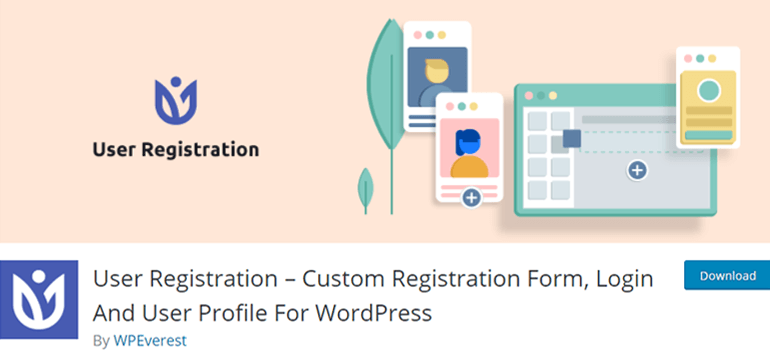
A simple and easy way to make your users register to your site is via registration forms. And the best WordPress plugin you can get for this purpose is User Registration. This amazing plugin lets you create any type of registration form with its intuitive drag and drop interface.
Key Features
- Fully WooCommerce compatible
- Well-designed user profile account
- Customizable email notifications
- Supports integration with email marketing services
iii. Everest Forms
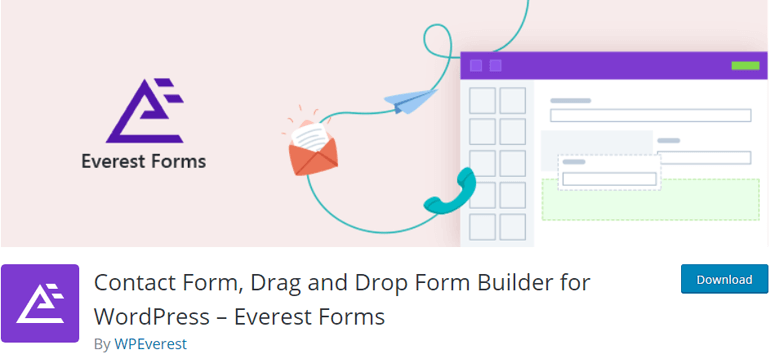
A popular drag and drop contact form plugin for WordPress, Everest Forms lets you create and manage various types of forms. Using this plugin, you can easily create amazing customer survey forms, sign-up forms, etc., to take your business to the next level.
Key Features
- Huge library of pre-built form templates
- Awesome live form designer tool
- Responsive form design
- Translation ready
iv. Yoast WooCommerce SEO
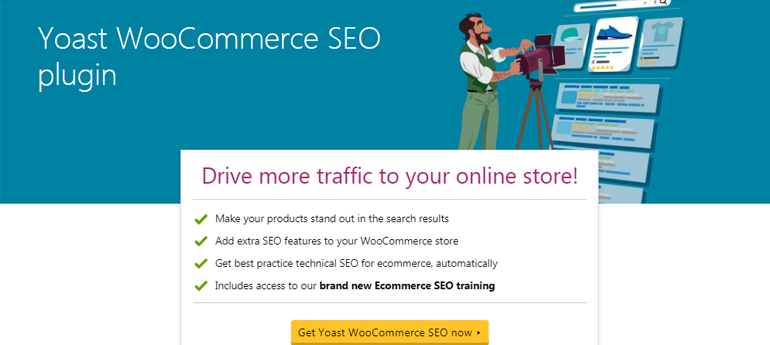
If you want to add more eCommerce features and make your online shop optimized for search engines, Yoast WooCommerce SEO is a brilliant choice. This plugin makes your products more visible in the search results and helps drive traffic to your WooCommerce site.
Key Features
- Adds extra SEO features to your online store
- Improves the visibility of your online shop
- Improves breadcrumb navigation
- Google preview option to view the products before going live
v. MonterInsights
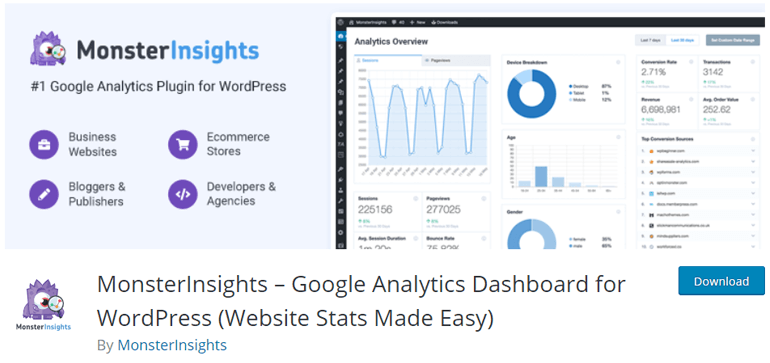
MonsterInsights is a wonderful Google Analytics plugin for WordPress that is powerful as well as user-friendly. With Monterinsight, you can track every aspect of your eCommerce site to get essential stats like total sales, conversion rate, order value, and so on.
Key Features
- Quick and easy setup
- Enhanced WooCommerce tracking feature
- Get real-time reports right from the Google Analytics dashboard
- Track conversion for the WordPress forms
vi. Crisp Live Chat

Crisp Live Chat WordPress plugin lets you add a live chat module to your website. It helps you improve the customer relationship by allowing customers to put the product and sales relevant queries via live chat. Likewise, you can also ask for the phone and email of your customers to grow your email list and generate more leads.
Key Features
- Receive real-time notification whenever live chat starts
- Option to see what users are typing
- Mobile and desktop apps available
- Integrates with Slack, Messenger, Twitter, etc.
vii. Sucuri Security

Sucuri Security is amongst the best WordPress security plugins that function to keep your site safe and secured. It protects your website from possible hacks, malicious traffic, and other security threats that can hamper your site and even crash it.
Key Features
- Audit security activity
- Scan remote malware
- Protect against DDoS (Distributed Denial of Service) attack
- Automatic and manual cleanup for post hack security
Wrapping Up
With spectacular platforms like WordPress and WooCommerce, setting up an eCommerce site is a piece of cake. Thus, you can follow the simple instructions discussed above to build a successful online store with WordPress and WooCommerce.
We’re at the end of our tutorial on how to create an eCommerce website using WordPress. Before wrapping up, let’s quickly go through the major steps to build a WordPress eCommerce website once again.
- Step 1. Buying a Domain Name & Web Hosting
- Step 2. Setting WooCommerce
- Step 3. Choosing the Best WordPress WooCommerce Theme
- Step 4. Adding Products to Your WooCommerce Store
- Step 5. Configuring Additional WooCommerce Settings
- Step 6. Installing Essential WooCommerce Plugins and Extensions
We expect that you enjoyed reading this WooCommerce tutorial. If you did, please make sure to share it on your social channels.
You can explore other WooCommerce-related articles on our blog to learn about the best WooCommerce registration form plugins, how to reduce cart abandonment, etc.
Also, don’t forget to follow us on Twitter and Facebook to get updates about new articles.


![Zakra 3.0 | Zakra Pro 2.0 Release [Major Updates!]](https://i.ytimg.com/vi/g3rifl7kWvg/maxresdefault.jpg)