Do you want to add AMP support to your WordPress Website? Roger that, a guide coming your way now.
AMP (Accelerated Mobile Pages) is a popular and one of the best ways to make your website load faster on mobile devices. Faster loading time means improved user experience and increased traffic.
AMP was launched officially in October 2015. Despite having spent quite some time on the internet, not everybody understands and knows how to use it. And that’s why we’re here.
In this article, we’ll show you how you can easily add AMP support to your WordPress website. Along the way, we’ll also introduce some of the best AMP plugins in WordPress.
Table of Contents
How does Google AMP work?
Google AMP is a powerful tool for achieving faster loading times in mobile devices. To do that, it takes your website and strips down all the JavaScript, CSS files, HTML that aren’t necessary for a mobile device, making the website light and fast.
The striped-down version of your webpage is saved on the Google AMP cache. And when a user requests to view the webpage, the cached version quickly loads into their device. AMP is an open-source and powerful platform. You can use AMP with any website, web application, or web browser.
The Merits and Demerits of Adding Google AMP
Adding Google AMP to your WordPress website is a good choice, especially if you’re targeting mobile-based traffic. Some of the major benefits you can reap from having AMP are as follows:
- Increased Traffic: Adding Google AMP on your WordPress website will load it faster on mobile devices. This boosts your traffic and gets you more visitors.
- Improved User Experience: A fast website on mobile devices feels more comfortable and interactive. Hence, improving the user experience on mobile devices.
- Better SEO Ranking: Google encourages the use of AMP by boosting it in mobile search results. So, websites with AMP are more likely to appear higher on mobile devices.
Apart from these advantages, AMP also comes with some drawbacks, or rather limitations.
- AMP limits the HTML, JavaScript, CSS, on your website. So, it will sometimes be difficult to display certain features of your website. Sometimes, adding AMP might make it hard to implement CTAs (Call To Action), popup forms, share buttons, etc.
- Having advertisements on an AMP page is more difficult than on a normal webpage. This will limit the number of chances of advertising on your website.
Well, Google AMP does have some drawbacks as does anything else. But as long as your website isn’t loaded with a thousand ads and some complex coding that nobody understands, you should be fine.
How to Add AMP Support to Your WordPress Site?
The time has come. Let’s get into the main subject of how to add AMP support to your WordPress website.
Being a WordPress user, you already know that many things in WordPress are accomplished using plugins. The same goes for AMP. And in WordPress, two very popular and easy-to-use AMP plugins can set up AMP support for your WordPress site.
A. Using the Official AMP Plugin to Add AMP Support to Your WordPress Website
The first plugin is the Official AMP plugin for WordPress. This is one of, if not the most popular, AMP plugin in WordPress. It’s very beginner-friendly and can give you an AMP version of your website within a minute.
1. Installing the Plugin
To install the plugin, login to your WordPress dashboard.
In your dashboard, head over to Plugins >> Add New.
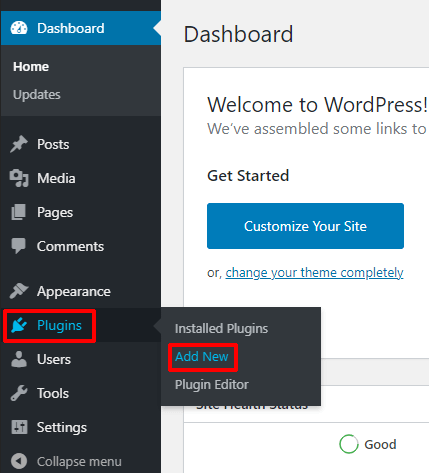
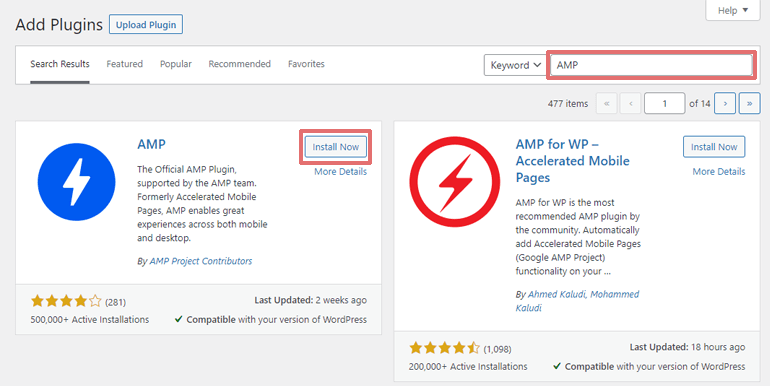
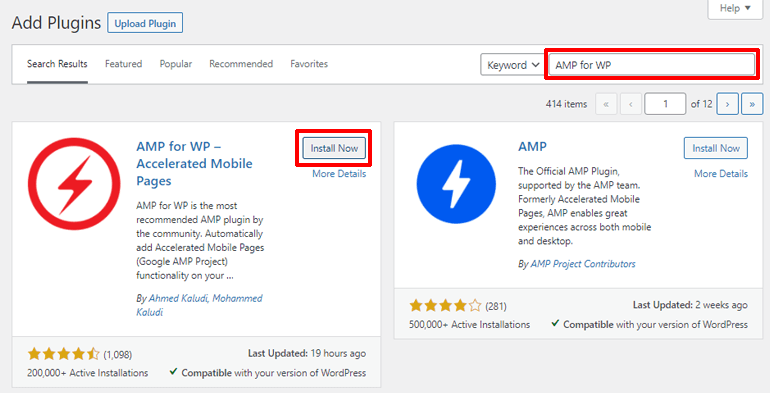
This will take you to the infamous plugin repository of WordPress. In the search bar, type AMP and hit Enter.
The first plugin to show up is the Official AMP Plugin for WordPress. Hit Install to install the plugin.
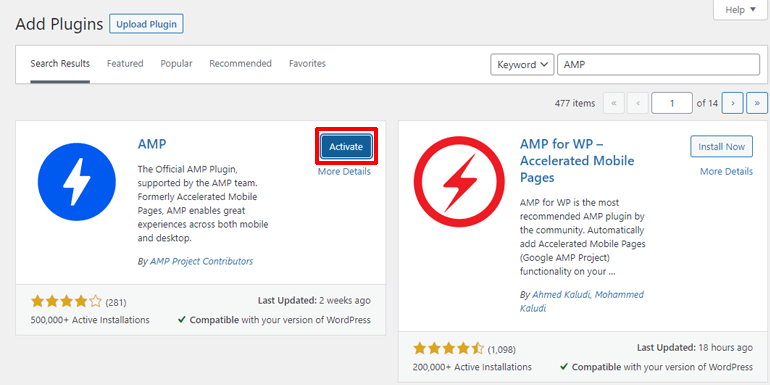
Once Installed, click on the Activate button to activate the plugin and start using it.
Psst: If you need help installing a plugin or simply want to know more about the same, you can refer to our article on How to Install a WordPress Plugin.
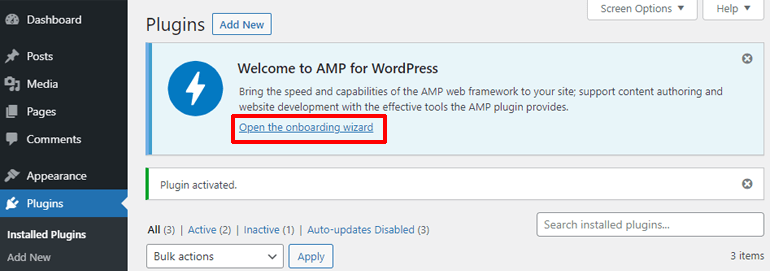
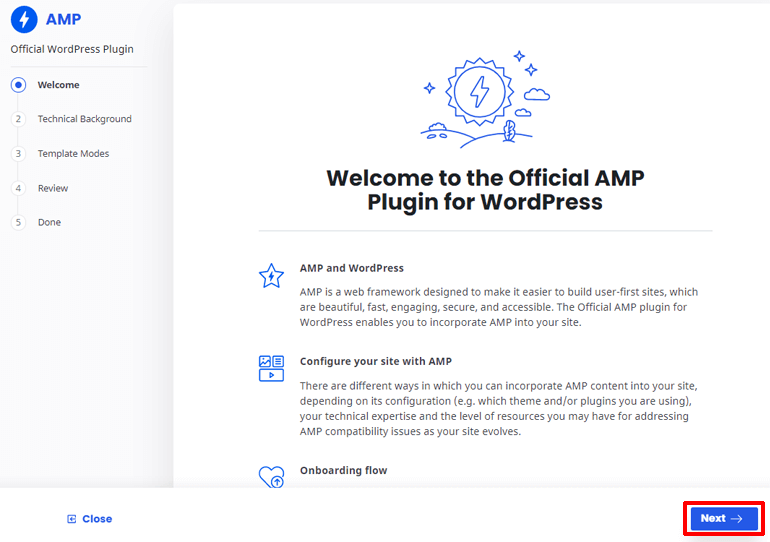
When installing the plugin for the first time, you’ll be greeted with a Welcome Text, with an option to open the onboarding wizard.
2. Settings Things Up With The Onboarding Wizard
Click on the Open the onboarding wizard option.
The plugin will take you to its setup wizard and the first step will be to welcome you. Read the text and hit Next.
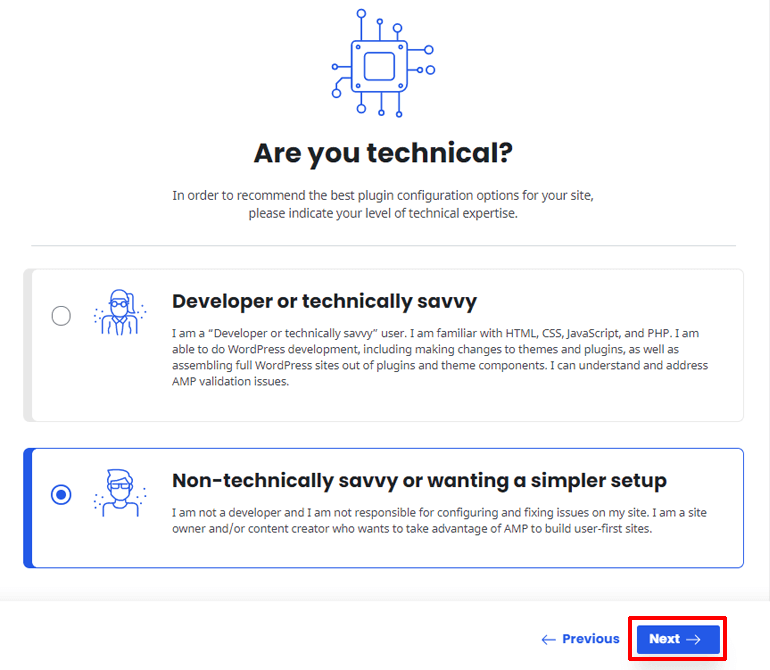
Next, it will ask you if you’re a developer or a non-technical person. Click on the Non-Techincal Savvy option and hit Next. This will let the plugin know that you want a simpler and easier setup.
You will now begin the major part of the setup.
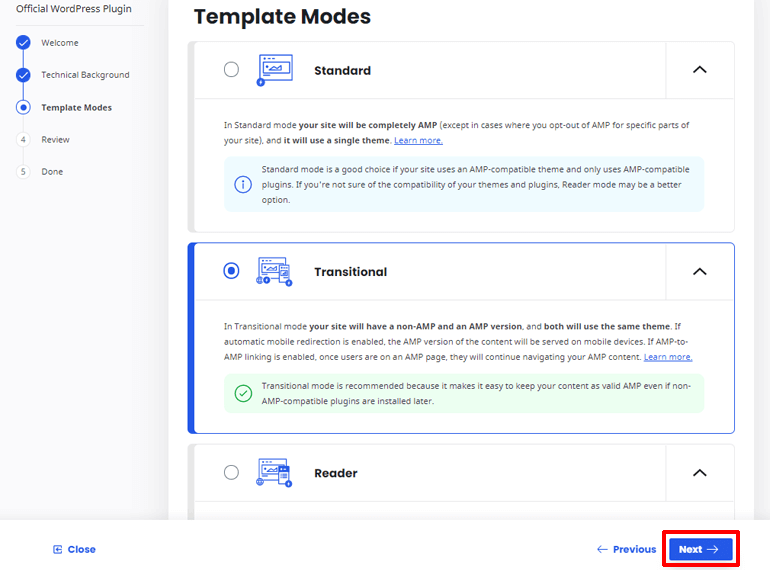
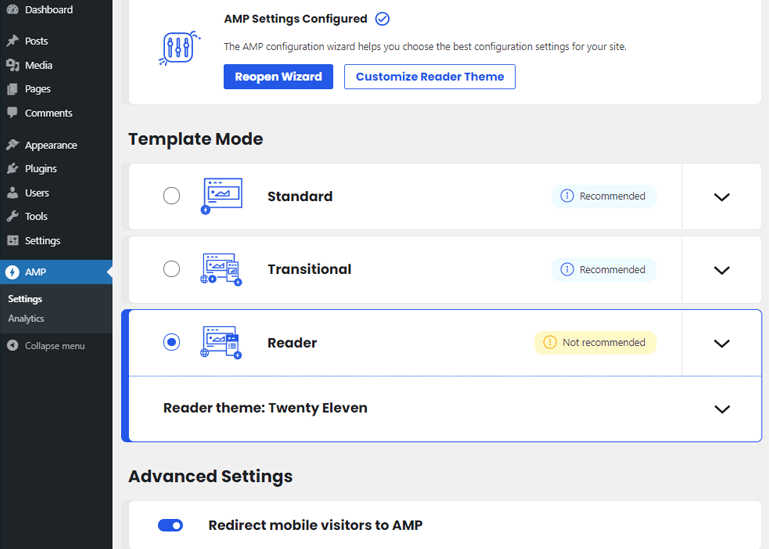
3. Template Modes in the Official AMP Plugin
The plugin provides three template modes, Standard, Transitional, and Reader.
Standard mode will turn all pages on your website into AMP. This is a good choice only if you use AMP-compatible themes like Zakra, Colormag and AMP compatible plugins..
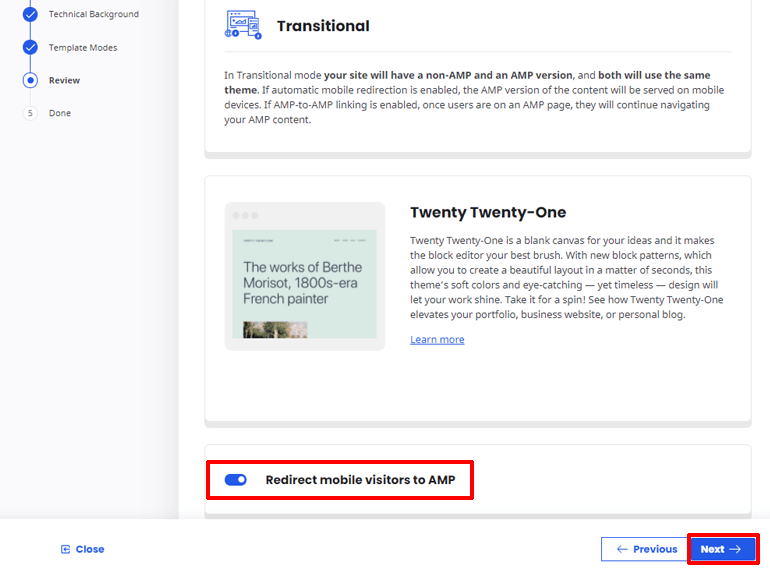
The transitional mode will create an AMP version of your website and keep the non-AMP version. The AMP version is served on mobile devices, and you will be able to install non-AMP-compatible plugins as well.
Reader mode is a simpler version of Transitional mode. Your site will have both versions, but with different themes. The AMP version will be much simpler and faster. This is a good choice if you’re not a developer and want a simpler setup.
Choose the template mode you want and click Next.
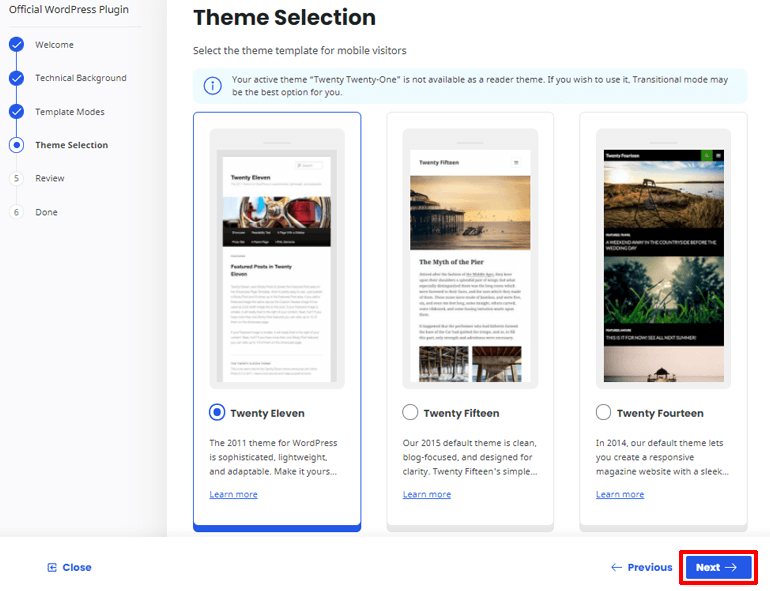
If you go with the Reader mode, you’ll be asked to select a theme for the AMP version. Choose a theme and click on the Next button.
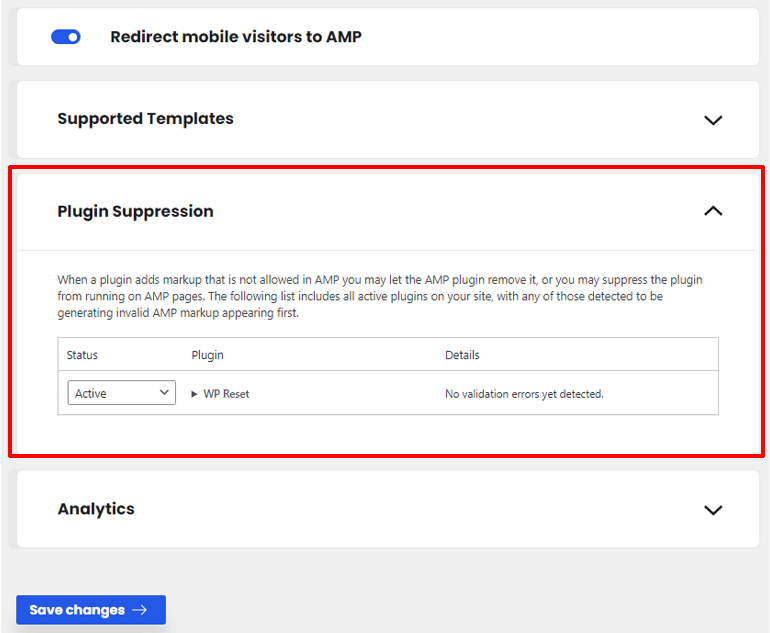
Finally, Review your choices on the Review window. If you’re on Transitional or Reader mode, make sure to enable the Redirect Mobile visitors to AMP option. Then Hit the Next button to finish the setup.
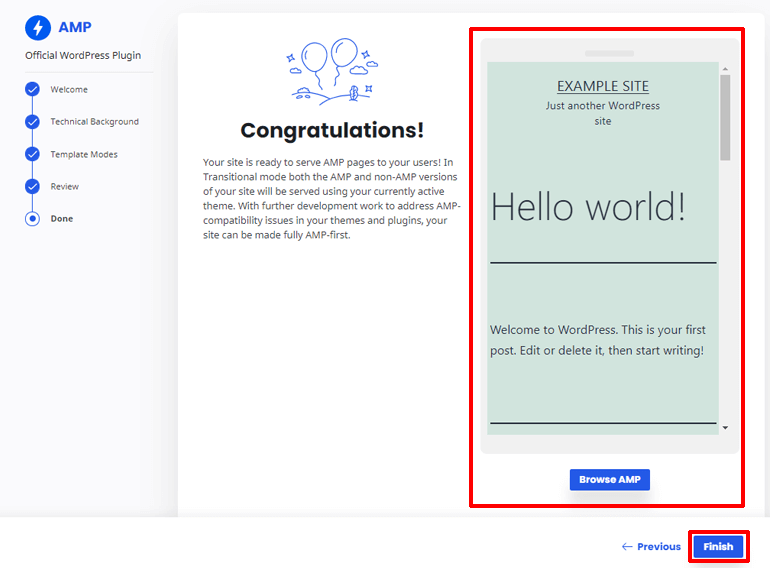
On the final page, you’ll be able to browse the AMP version of your website to check if it’s working. Once you’re done, hit the finish button to save your changes and add AMP to your site.
However, if you selected the Reader mode, you’ll have an option to customize your AMP site. This is because, in Reader mode, you have to select a different theme for your AMP site.
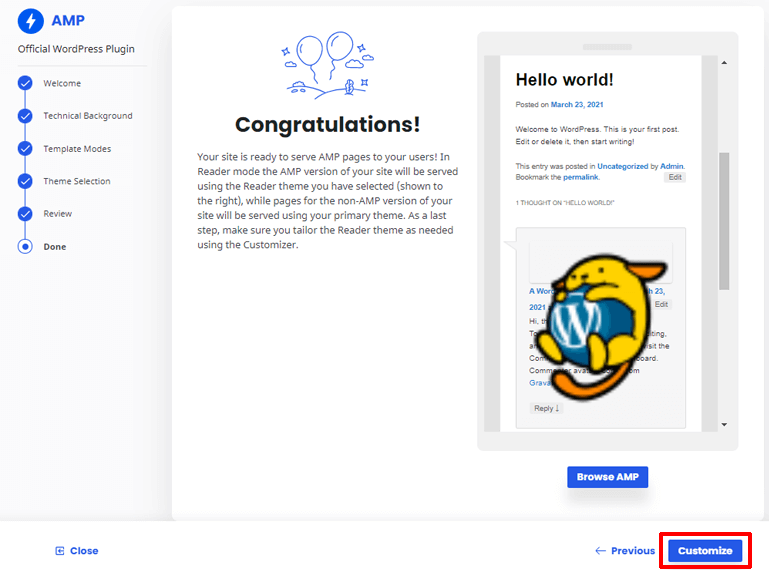
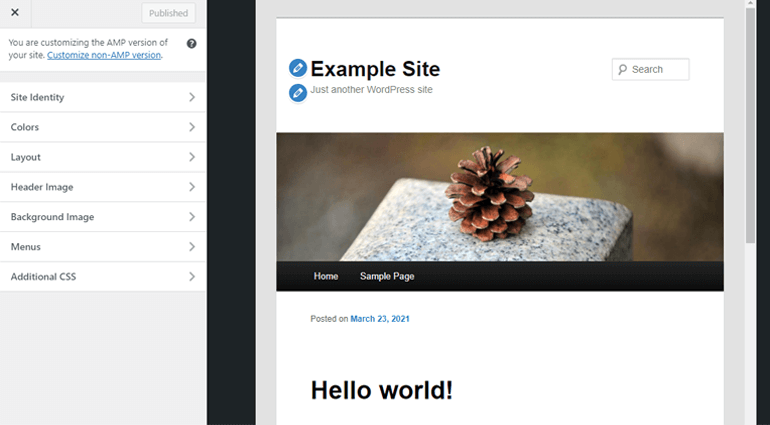
The plugin will take you to the WordPress customizer to customize your AMP website.
And that’s it! You have successfully added AMP to your WordPress site.
4. Configuring the AMP Settings
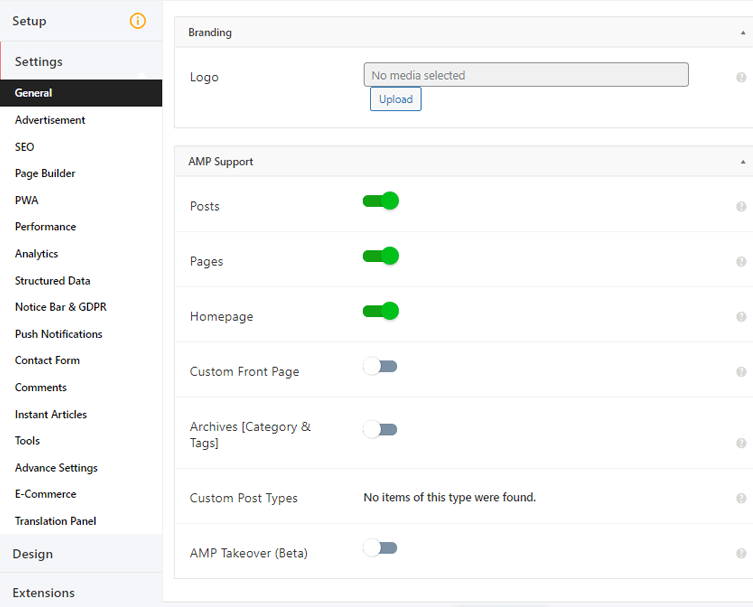
If you want to change settings, choose a different template mode, or else, you can always navigate to AMP >> Settings on your dashboard.
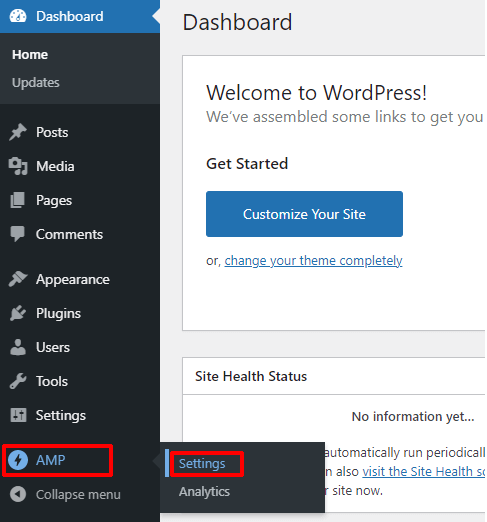
There, you can change the template mode and customize the Reader theme. You can also reopen the wizard we just used to setup AMP.
And, the Plugin Suppression allows you to suppress the non-AMP-compatible plugins for AMP pages without having to remove them. Also, the plugin will let you know if there are any validation errors with your installed plugins.
As for the Analytics, that falls more on the developer side as you’ll have to feast your eyes on some codes.
That’s the only non-beginner part of this plugin. But if you can overlook that, this plugin is a paradise for beginners looking to add AMP to their WordPress website.
B. Using the AMP for WP Plugin to Add AMP Support to Your Website
If you’re looking for an AMP plugin with more options and an easy interface, AMP for WP is the plugin. This plugin is easy to set up and use and puts you in the control room. And, this plugin offers many analytic services like Google
So let’s look at how we can set up analytics with AMP for WP. Firstly, install the plugin from the WordPress plugin repository.
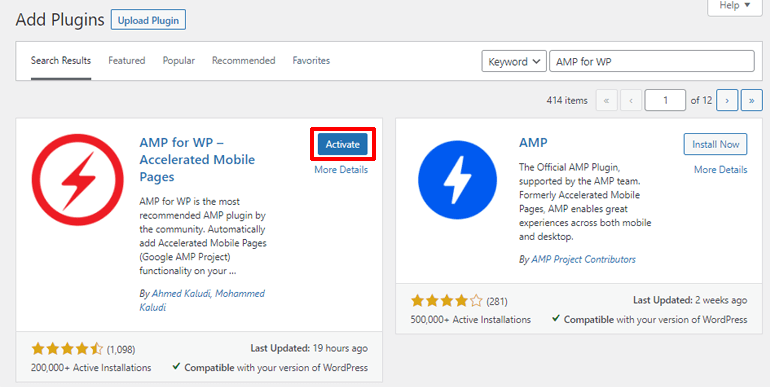
1. Installing the Plugin
To do that, go to Plugins > Add New. And on the search bar, type AMP for WP.
The first plugin to show up will be the AMP for the WP plugin. Hit install to install the plugin.
After installing, click on Activate to activate the plugin and start using it.
Now we can start using the plugin for AMP.
2. Setting Up AMP for Your Site
After the installation and activation, you will be asked if you want to use a basic panel view or the advanced one. The basic panel view is for beginners who just want to get AMP on their site. On the other hand the advanced panel view is for experts who know better about AMP or who want more customization options.
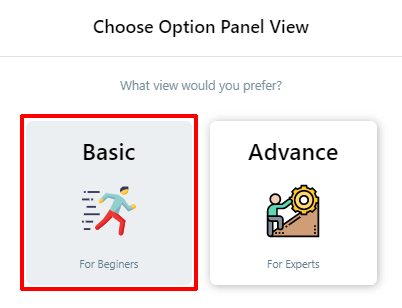
For now, let’s go with the basic panel view. And don’t worry, you’ll always be able to switch.
In the basic view, the plugin will present you with several options.

Lets look at the General and easy to set up options that AMP for WP provides.
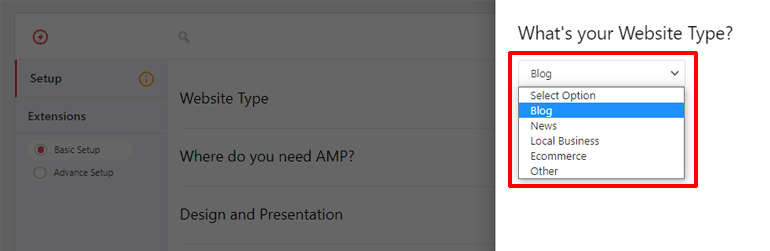
3. AMP Options in AMP for WP
To begin with, you’ll be able to let the plugin know what type of website you have.
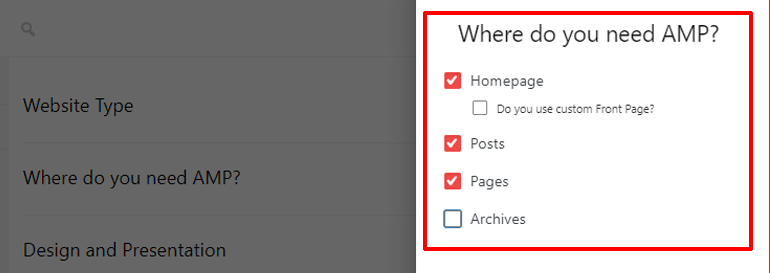
And, through the Where do you need AMP option, you can choose the pages you want AMP to be set in.
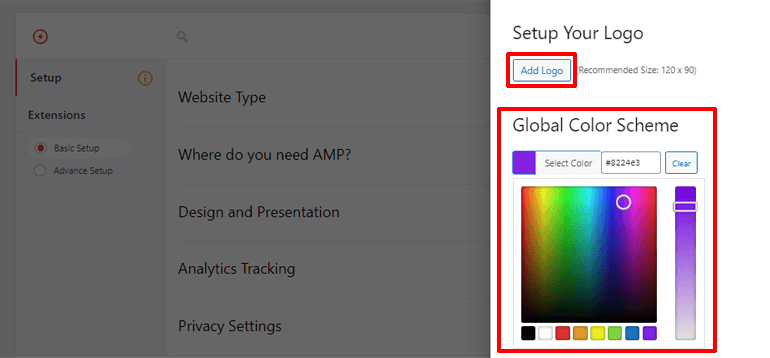
Apart from that, you’ll also be able to set a Global Color Scheme for your AMP pages. And, you’ll be able to upload a logo for your AMP page, through the Design and Presentation Option.
And unlike in the Official AMP Plugin, you’ll be able to choose from several Analytics services, through the Analytics tracking option. There’s Google Analytics, Histats Analytics, Segment Analytics, and many more.
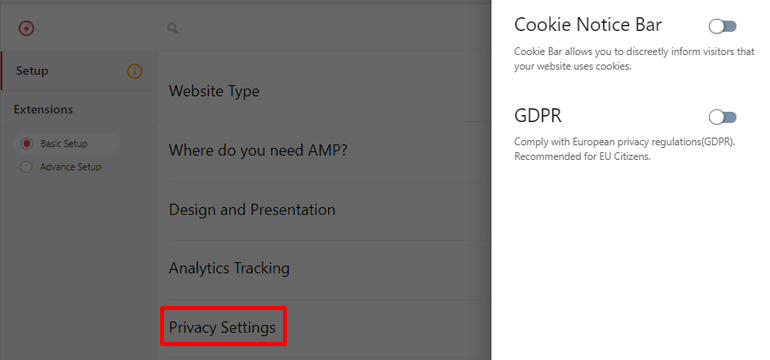
The next option you’ll find is the privacy settings. Through this, you can choose to let your visitors know that you use cookies in your site and your site is GDPR compliant.
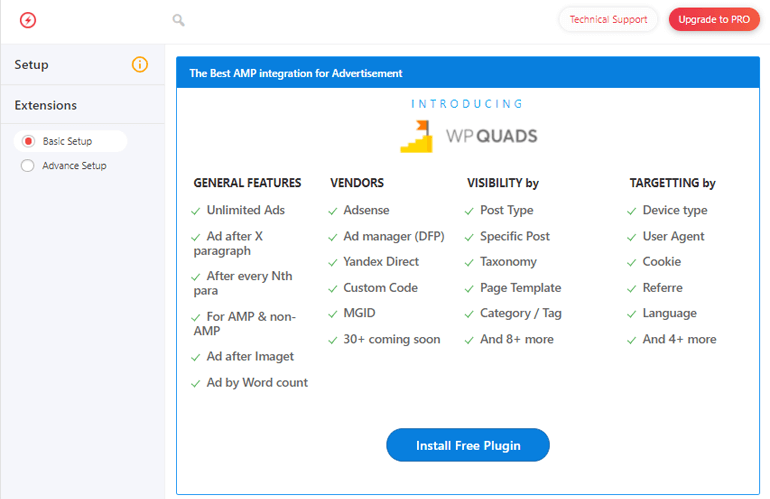
To set up ads on your AMP pages, you can use the Advertisement option. This will install another plugin named WPQuads on your site.
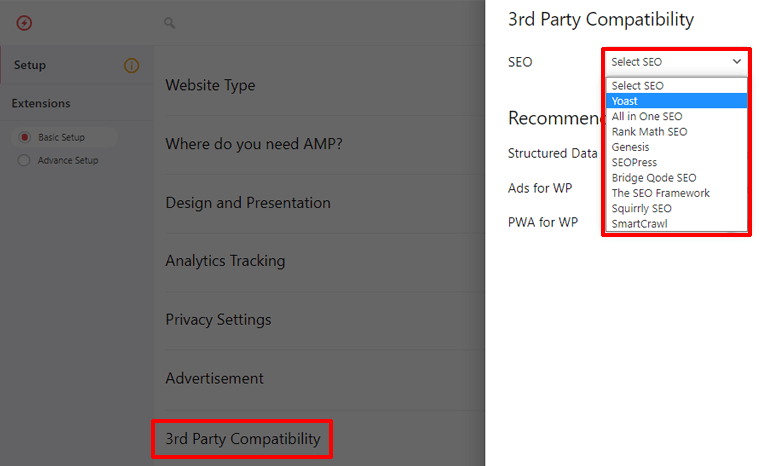
Furthermore, AMP for WP is also compatible with several SEO plugins like Yoast, RankMath, All in One SEO, etc.
Once you set things up with these options, you will have the AMP version of your website. To access it, simply add /amp after your website’s URL.
To see more options while setting up AMP, you can choose the Advanced Setup.
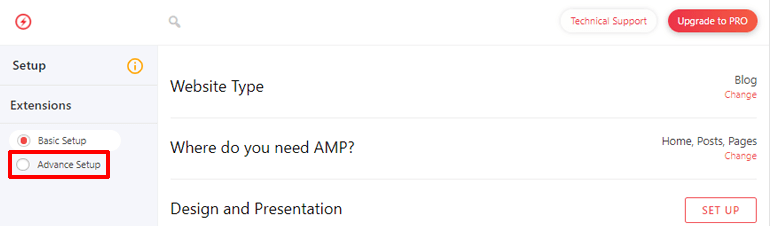
With the advanced setup, you will have a whole world of customization options. You can individually customize what categories and tags will have the AMP version, how the Cookies and GDPR messages will look. You can also set up a custom front page for your AMP site.
And that’s how to add AMP support to your WordPress website. Now go to your website and give it some of the AMP support for mobile devices.
Wrapping Things Up
AMP is the answer when it comes to faster browsing on mobile devices. With AMP, you can deliver a professional website with lightning speed on mobile devices. And with plugins like the Official AMP Plugin and AMP for WP, adding AMP support is a piece of cake as well.
Moreover, more plugins have been supporting AMP in different ways. For example, you can use the Glue for Yoast SEO and AMP plugin to boost your SEO in your AMP websites. In short, adding AMP support to your site is not as hard as it seems.
We hope that you liked the article. If you did, be sure to share it on socials. Also, don’t forget to provide us with feedback.
While on the topic of AMP, how about an article on the best AMP plugins in WordPress.


![Zakra 3.0 | Zakra Pro 2.0 Release [Major Updates!]](https://i.ytimg.com/vi/g3rifl7kWvg/maxresdefault.jpg)