Wondering how to send data from WordPress form to Google Spreadsheet? Hop in; this post is just for you.
If you want to keep detailed records of your WordPress form entries, Google Sheets is the best, and free spreadsheet program. You can easily create, edit, and collaborate with others on the spreadsheet.
Connecting your WordPress form to Google Sheets may feel like a daunting task at first. But in reality, it’s just as easy as anything else.
This post will show you how to send the contact form to Google Spreadsheet easily in two different ways. So, keep reading!
Table of Contents
Why Integrate WordPress Form to Google Sheets?
Before beginning with the tutorial, let’s get to know some of the advantages of integrating your WordPress form with Google Sheets.
- Available for Free: Google Sheets is 100% free. It saves your dollars as you don’t need to spend a penny on purchasing other such software.
- Save Form Data Automatically: Once you integrate your site with this cloud-based spreadsheet, it automatically saves, stores, and maintains your form data. No need to enter the form data manually and no errors.
- Easy Team Access: Your team can access all the contact form data without logging into your WordPress dashboard.
- Access via Wide Variety of Devices: All your Google Sheets data can be accessed and managed via different devices like smartphones, tablets, computers, etc.
- Easy Data Analysis and Organization: Using this powerful tool, you can interpret, analyze, and organize form entries without hassle.
Now, it’s time to know how to connect your WordPress form to Google Sheets so that you can enjoy all the benefits mentioned above.
How to Send WordPress Form Data to Google Spreadsheet?
Just follow the step-by-step instructions given below, and you’ll be able to send your data from a contact form to Google Spreadsheet easily. Let’s begin!
Step 1: Install and Activate Everest Forms and Everest Pro
Incredible, feature-rich, and beginner-friendly simultaneously, Everest Forms is a must-have drag and drop form builder plugin for your WordPress site. From simple contact forms to online booking forms, it allows you to design any online form imaginable.
I. Installing Free Everest Forms Plugin
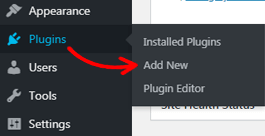
To install the free version of the Everest Forms plugin, login to your WordPress dashboard and navigate to Plugins>>Add New.
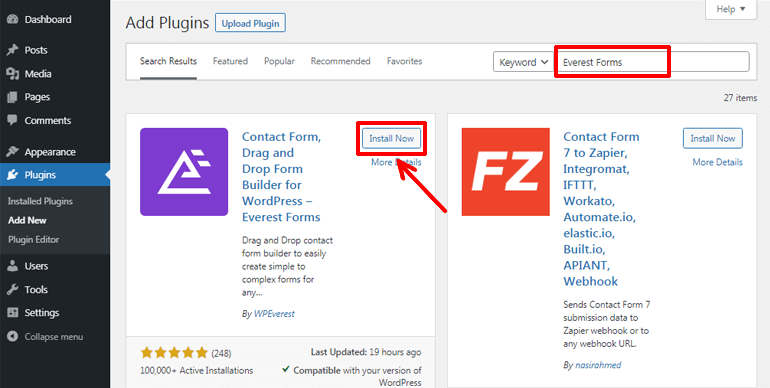
In the Add New Plugin page, type in Everest Forms in the search bar and install the plugin.
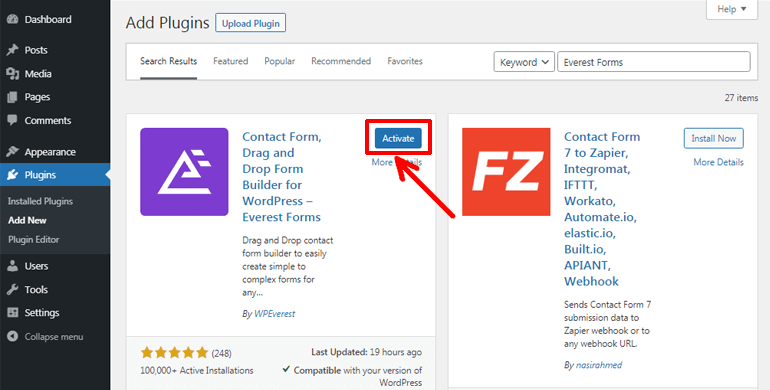
After that, click on the Activate button to activate it on your site.
Bravo! You’ve successfully installed the free Everest Forms plugin. It’s enough to build different types of forms like simple contact forms, leave request forms, etc. However, we’re trying to integrate WordPress forms with Google Sheets here, so we’ll require a pro-version of the plugin.
II. Installing Everest Forms Pro
Everest Forms comes with four pricing plans. The most popular option amongst them is the Professional plan.

The Professional plan provides 25 sites license along with powerful features and add-ons like Google Sheets and Zapier that we’ll need here. Hence, we require a professional plan of Everest Forms.
First of all, you need to visit the plugin’s official site and purchase the premium Everest Forms plugin. After that, create a WPEverest account and log into the account.
Now, from your account dashboard, find Everest Forms Pro and download it onto your computer. It’ll be downloaded as a ZIP file.
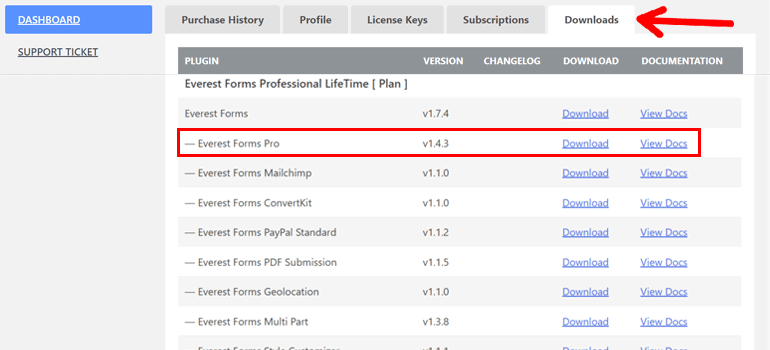
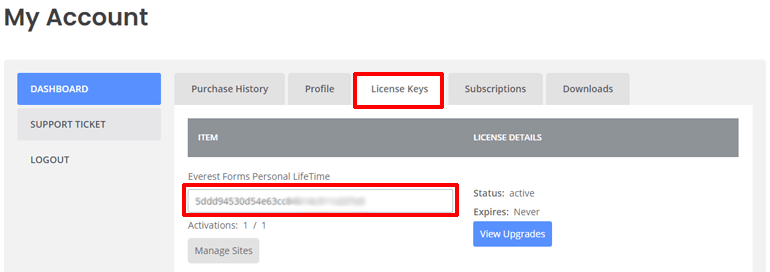
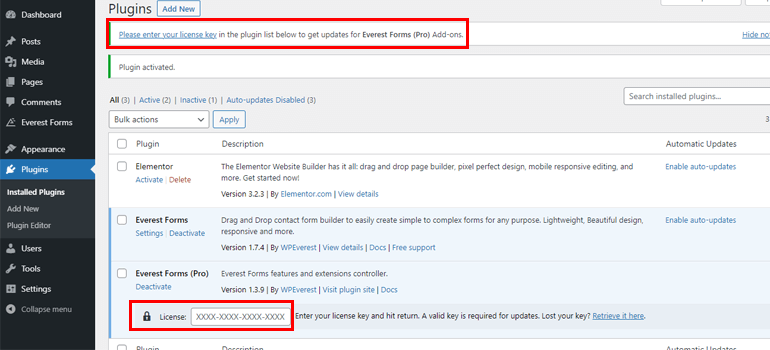
Again under the License Keys tab, you need to copy the license key. You’ll be asked to enter this key later to proceed with your premium plugin.
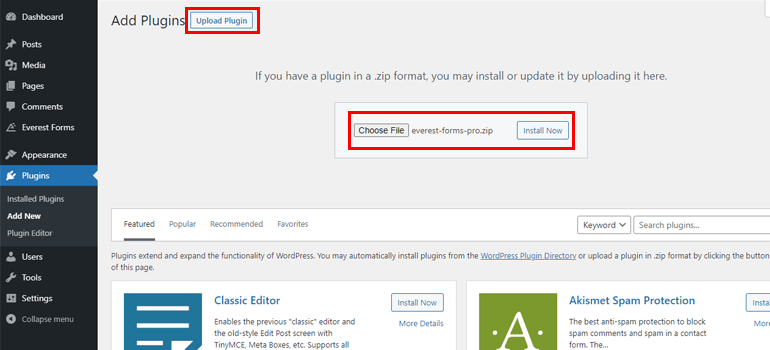
Once again, from your WordPress admin panel, navigate to Plugins>>Add New. Instead of searching for the plugin in the search box, hit on the Upload Plugin button. Then, select the ZIP file of the plugin you downloaded before and press the Install Now button.
Now, click on the Activate button to activate the plugin on your site.
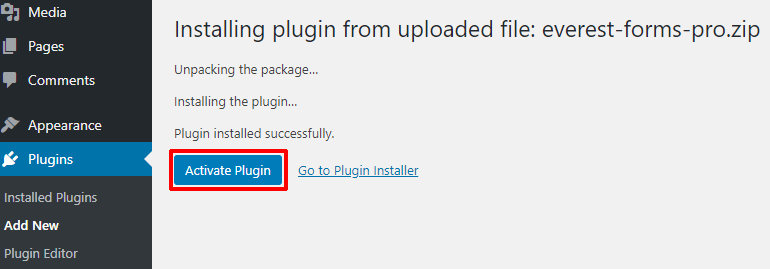
Soon after that, you’ll be asked to enter the license key. Just paste the license key that you copied before, and you’re good to go.
For more information, please go through our tutorial on how to install a WordPress plugin.
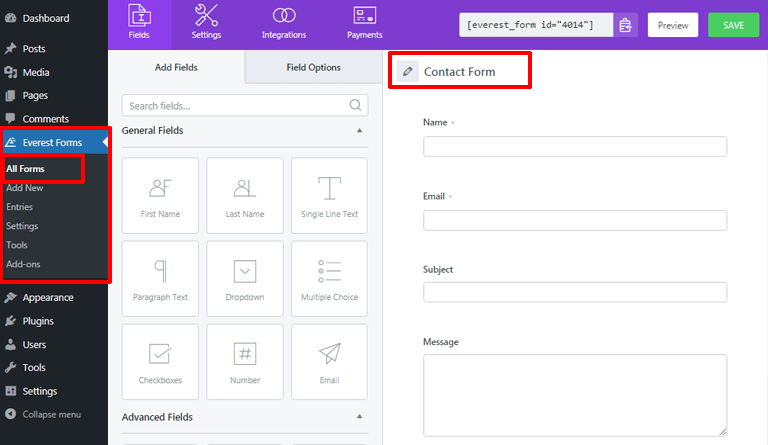
Step 2: Create a New Contact Form
Moving ahead, it’s time to know how to create a contact form in WordPress.
For this, go to Everest Forms>>Add New. With this fantastic plugin, you get an option to either choose from the pre-built template or start from scratch. The choice is solely yours.
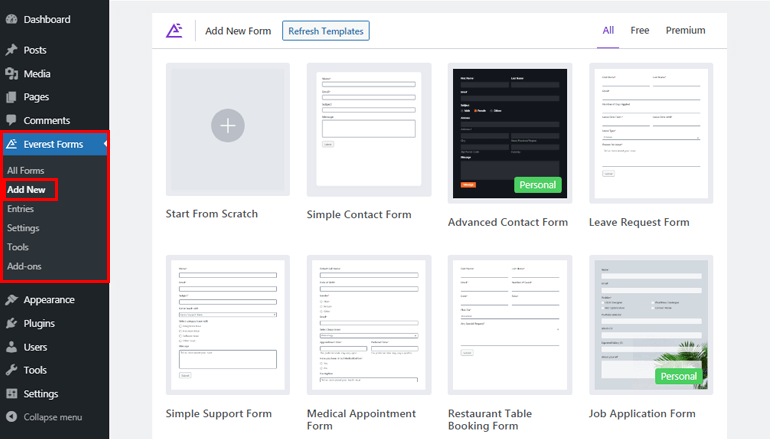
No matter whichever option you choose, this drag and drop form builder makes it super easy to build a beautiful form in no time.
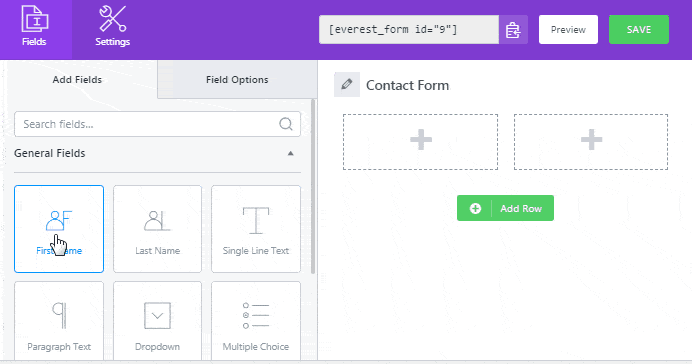
Not to mention, you can also customize your form fields effortlessly. Besides, you can configure the general and email settings of your forms. Furthermore, it enables you to view all your form entries right from your WordPress dashboard.
For a detailed guide, make sure you check our tutorial on how to create a contact form in WordPress.
Step 3: Send WordPress Contact Form Data to Google Spreadsheet
Next, you need to connect your WordPress contact form to Google Spreadsheet so that all your form entries are automatically saved and stored in a spreadsheet.
There are two different methods of doing so; using Google Sheet add-on and via Zapier add-on. You can choose to send your contacts in WordPress to Google Sheets via any of these methods at your convenience.
But note that, with the second method, you must also have a Zapier account. Otherwise, you won’t be able to use Everest Forms’ Zapier add-on.
Method I: Using Everest Forms Google Sheets Add-on (Easy Integration & Free Data Transfer)
Everest Forms Pro gives you access to powerful add-ons like Google Sheets that allow you to integrate your contact form directly to Google Sheets. This method is straightforward and quick to set up. For this, you need to follow the steps as given below:
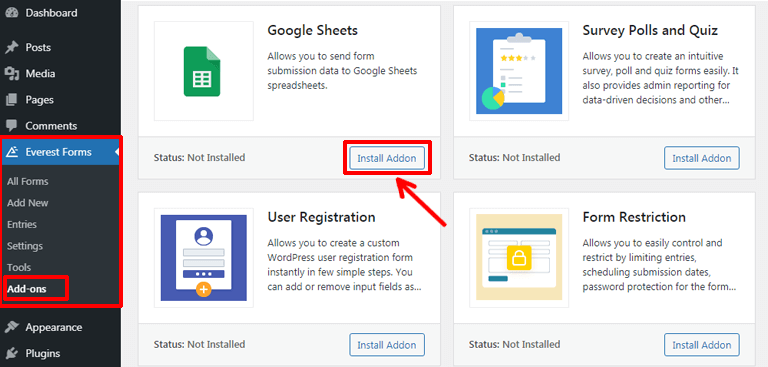
i. Install and Activate Google Sheets Add-on
To install and activate the Google Sheets add-on on your site, navigate to Everest Forms>>Add-ons. Now, search for Google Sheets and hit on the Install Addon button. After it’s installed, click on the Activate button to activate it on your site.
ii. Authenticate Google Sheets with Your Site
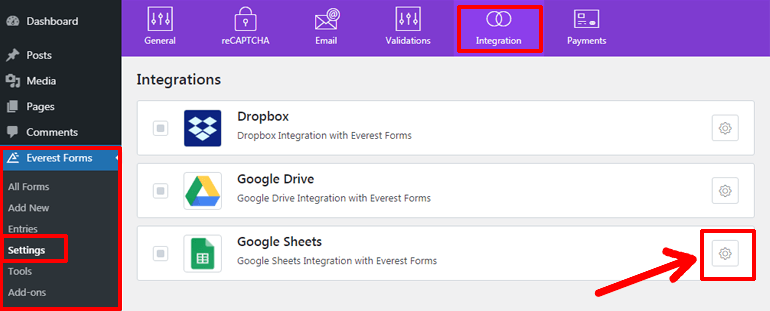
Before connecting the WordPress contact form to Google Spreadsheet, you need to authenticate the Google Sheets first. For this, you need to go to Everest Forms>>Settings>>Integration>>Google Sheets and click on the settings icon.
Soon after that, you’ll see two fields for Google Client ID and Google Client Secret. Hence, you’ll need the ID and secret key first to generate a Google access code and authenticate your Google account.
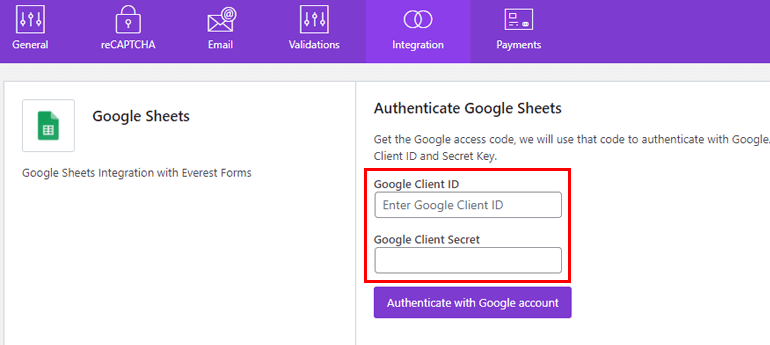
Learn how to get the Google Client ID and Secret Key from our detailed documentation on the Google Sheets add-on.
Once you have both the key and ID, go back and paste them into the respective fields. After that, click on the Authenticate with Google account button.

A new window will open that says Choose an account to continue to Everest Forms.
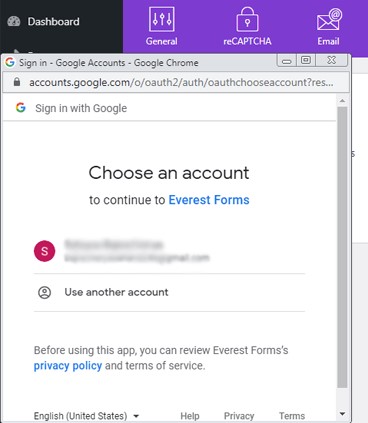
Now, choose your Google account, log into it, and allow Everest Forms to create, see, and edit your spreadsheet. Then, an access code is generated.
You need to copy and paste this in the Enter Google Access Code bar, as seen in the image given below. Next, press the Verify access code button.
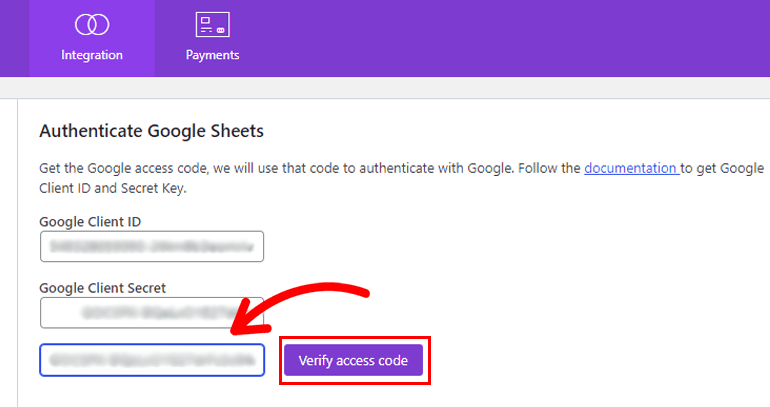
After doing so, the authentication step is completed.
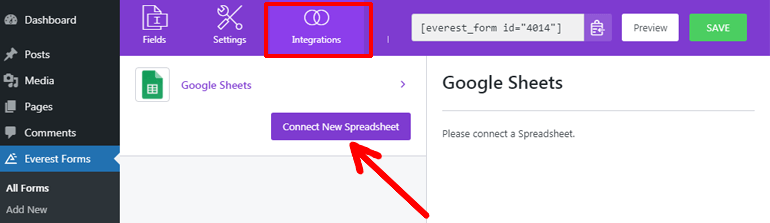
iii. Connect Your Contact Form with Spreadsheet
After completing the authentication step, you can now connect your WordPress contact form to Google Spreadsheet.
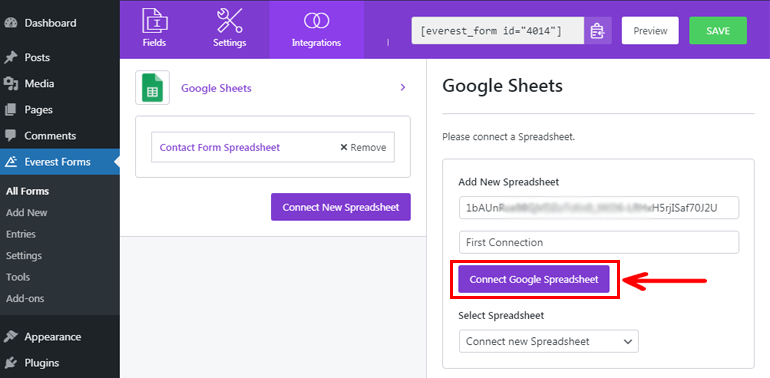
Again, go to the Integrations>>Google Sheets and click on the Connect New Spreadsheet button.
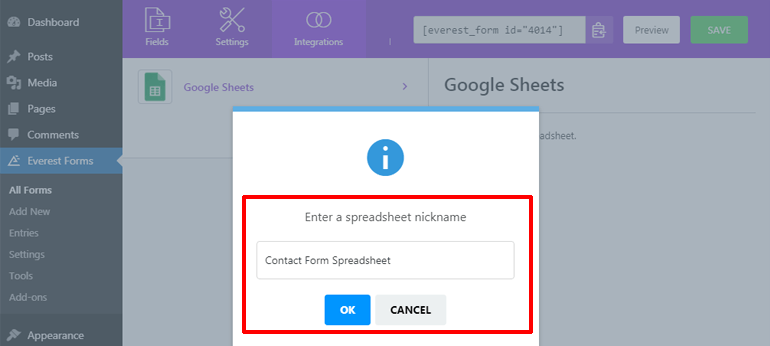
Now, you’ll be asked to enter a spreadsheet nickname. You can provide any name that you like or suits your purpose. Here, we’ll name it ‘Contact Form Spreadsheet.’
After that, you need to enter the Google Spreadsheet ID and Google Spreadsheet Nickname.
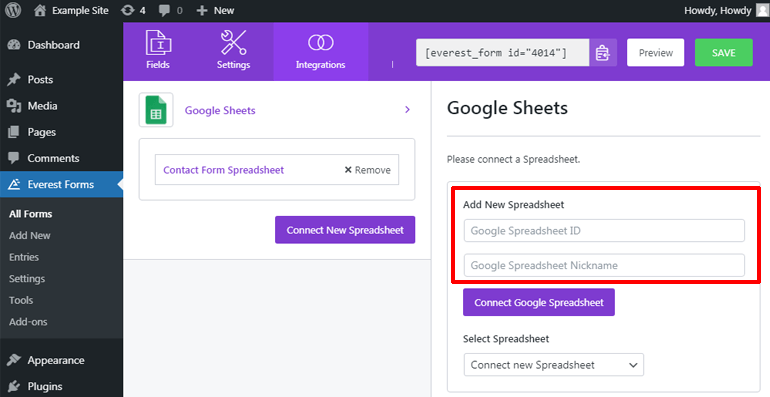
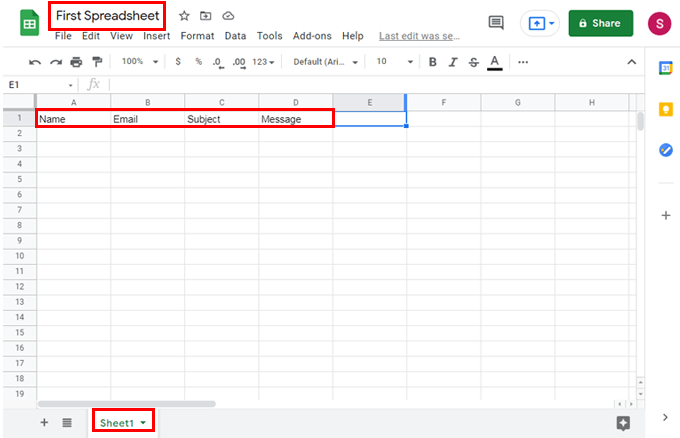
For this, you should go to docs.google.com/sheets and create a new spreadsheet first. Then, name your spreadsheet and enter the column names to create a header row.
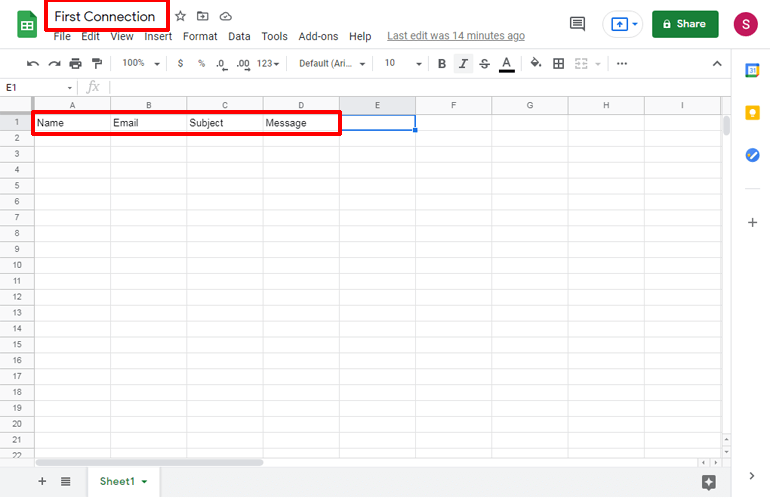
Make sure to enter the column names similar to the form fields in your contact form. This enables pulling relevant information from the contact form to Google Sheets without any problem.
After that, copy the spreadsheet ID from the URL as shown in the image given below. You don’t need to copy slashes.
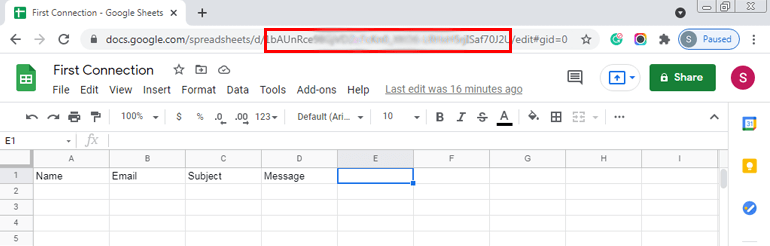
Next, paste the spreadsheet ID and enter the nickname that you provided to your Google Spreadsheet. Then, click on the Connect Google Spreadsheet button.
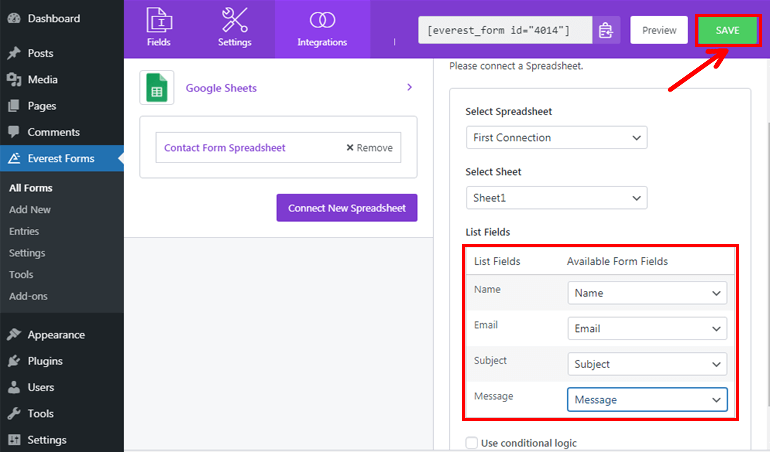
Again, you need to map the List Fields with Available Form Fields. The purpose of mapping fields is to pull the corresponding form field information to your Google Spreadsheet.
Finally, don’t forget to save the setting by clicking on the SAVE button at the top.
Now, all your form entries will be sent to Google Sheets whenever users submit the form.
Method II: Integrating Google Spreadsheet via Zapier
Not to mention that Everest Forms also enables you to integrate your WordPress forms to Google Sheets using Zapier effortlessly. In simple words, Zapier is a popular platform that allows you to connect with over 3000 web applications to automate your workflow.
However, Zapier is a freemium service, with its free plan offering only basic features. For extensive Zapier functionality, you’ll need to buy the service separately.
If you’ll be using Zapier for connecting contact forms to Google Sheets only, we don’t recommend it. That’s because this method is a bit more complicated than the previous one. But if you’re already a Zapier user, or plan to use Zapier for its other awesome features, then go ahead! This tutorial is for you.
You just need to follow the simple steps explained below to connect your contact forms to Google Spreadsheet.
i. Install and Activate Zapier Add-on
First of all, navigate to Everest Forms>> Add-ons. Now, search for the Zapier add-on and quickly hit on the Install add-on button. Once the installation process is completed, press the button to activate the add-on to your site.

ii. Integrate Everest Forms with Zapier
Integrating Everest Forms with Zapier can be done in three steps which are explained in detail as follows:
Create a Zap
To connect Everest Forms with Zapier, you need to create a Zap in your Zapier account first. Don’t have a Zapier account yet? You can go ahead and create one. You can either start with the free plan or buy a paid plan directly.
If you’re wondering what Zaps are, they’re simply the web functions connecting two or more applications.
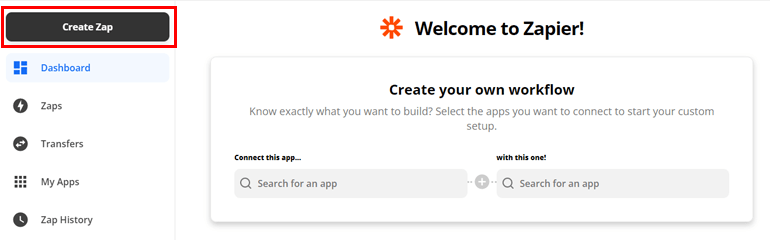
After creating a Zapier account, go to your Zapier dashboard, and click on the Create Zap option. Then, you’ll be directed to a Zap editor window.
Set Up Trigger
Next, you’ll need to set the Trigger and Action for Zaps. As suggested by the name itself, Trigger initiates the Zap, and it gets completed after the required Action is performed.
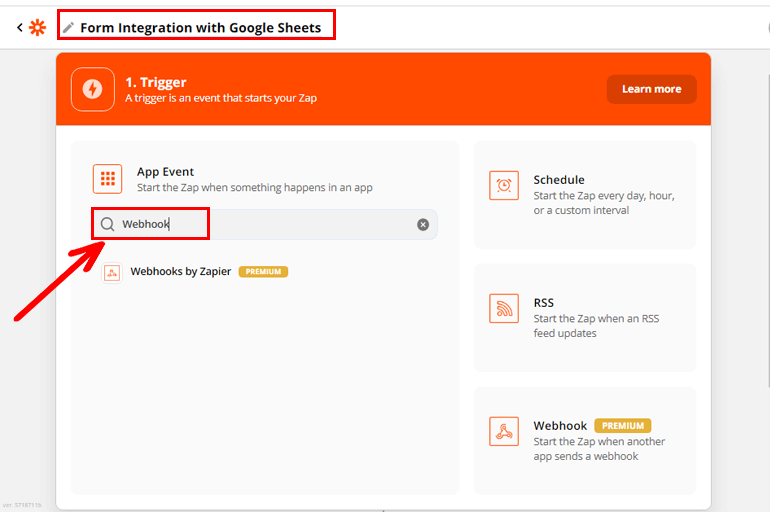
Before setting up a trigger, don’t forget to name your Zap. Now, search and select the trigger app, i.e., Webhook under the App Event tab. This app allows passing information between the two web applications. Thus, you need to choose Webhook as a trigger to start the Zap.
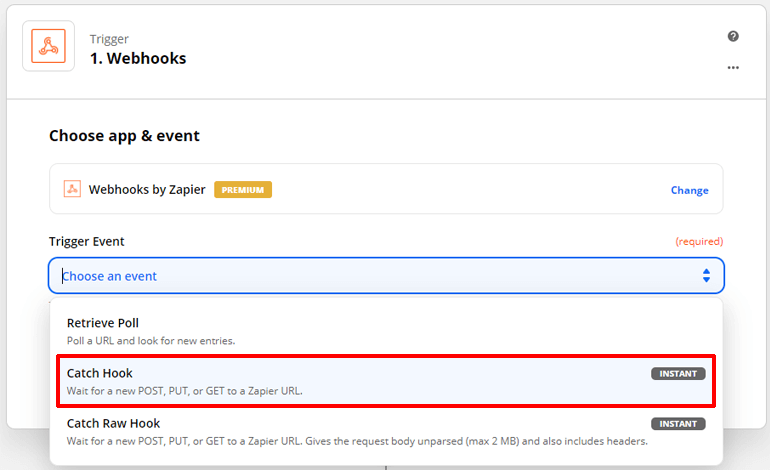
After that, you need to choose the Trigger Event. Select the Catch Hook option from the drop-down menus because it allows catching information of your contact form entries via Zapier URL. Then, press the Continue button.
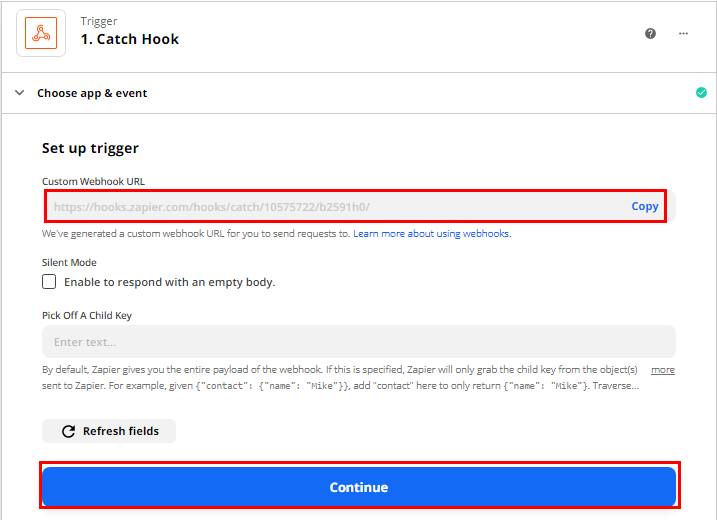
Again, copy the Webhook URL and click on the Continue button.
Now, from your WordPress dashboard, navigate to Everest Forms>>All Forms and click on the contact form to open it.
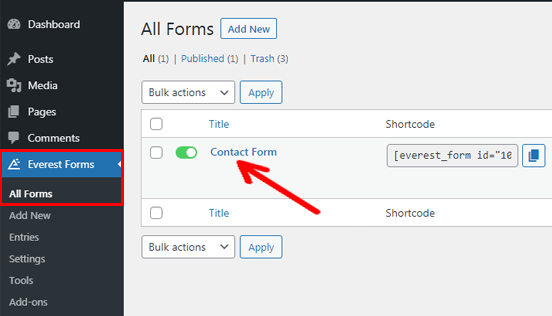
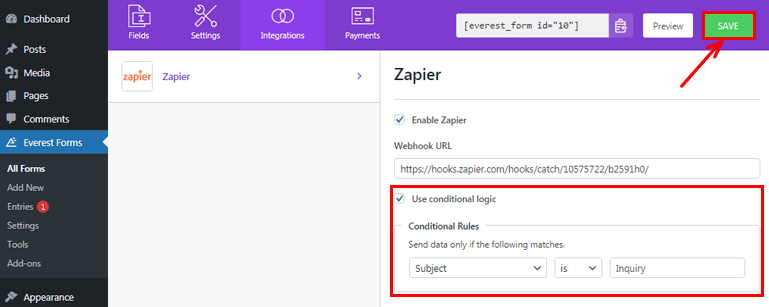
After that, press the Integrations tab at the top. Since you’ve already installed and activated the Zapier add-on to your site, you’ll see Zapier under the Integrations tab. You need to enable the Zapier option and paste the Webhook URL that you copied before.
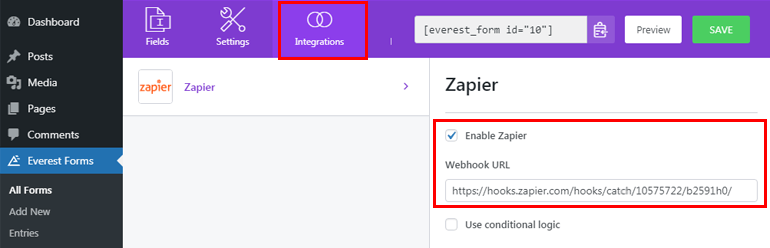
Furthermore, you can also enable conditional logic to apply conditional rules to send data with Zapier. Finally, don’t forget to hit the SAVE button at the top to save the changes you made.
Test Your Trigger
You’ve integrated your form with Zapier, but still, you need to confirm whether the information on your contact form is caught by Webhook or not. And that’s precisely why you need to test the trigger.
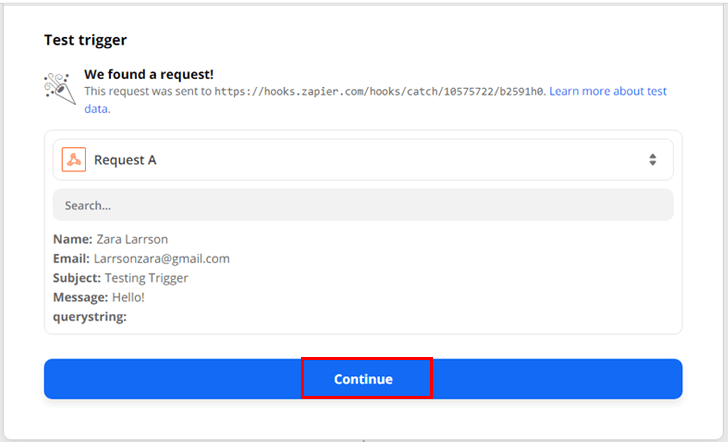
For this, you’ll need your contact form to be filled out by someone, or you can fill it out by yourself for the purpose of testing. Once you get the sample form entry, you can press the Test trigger button on Zapier.
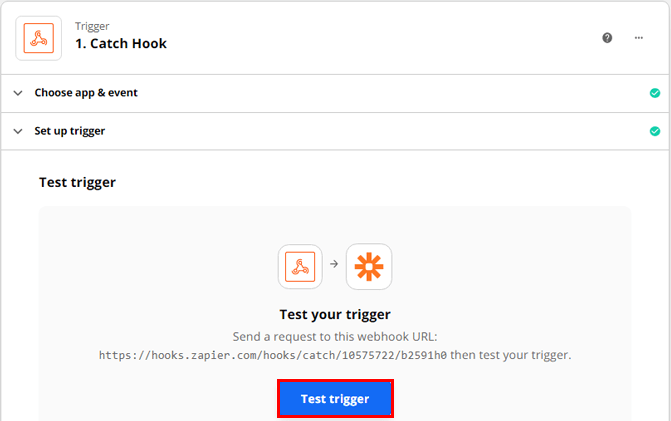
Soon after that, a message will be displayed which says We found a request. If you can see all the information filled up in your form, you’ve successfully set up the trigger. So, you can click on the Continue button to proceed to the next step.
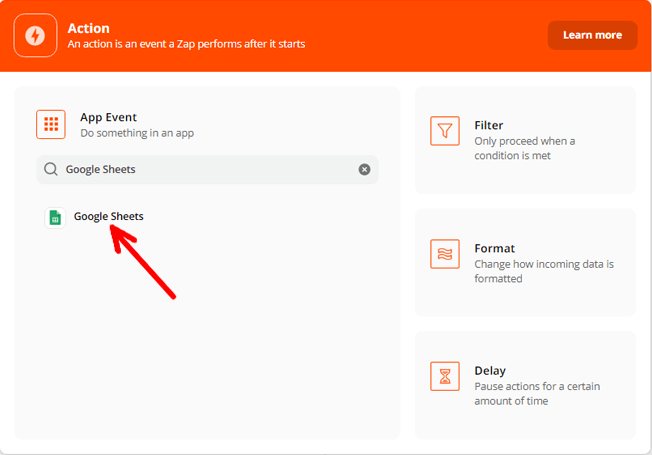
iii. Set Up Google Sheets App in Zapier
You’ve successfully integrated Everest Forms and Zapier, but you also need to connect the Google Sheets app with Zapier. So basically, Zapier acts as a bridge connecting your forms with Google Sheets.
Setting up Google Sheets in Zapier can be done in the following four steps:
Choose App & Event
After testing your trigger, you’ll be taken to the next step i.e. setting up the Action. So, search for the Google Sheets app and select it.
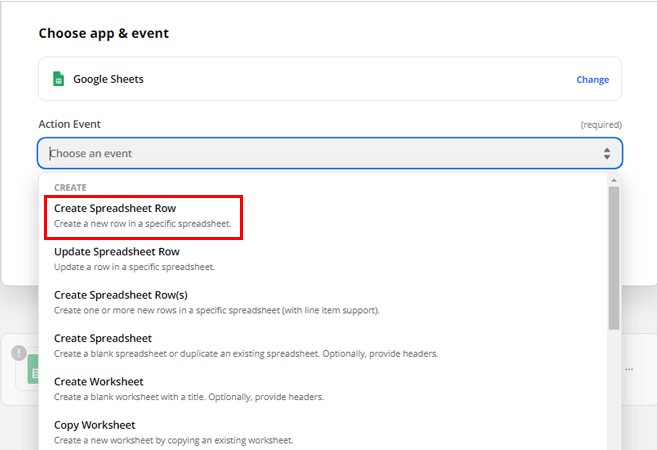
After that, click on the drop-down menus under the Action Event tab to choose from the different event options. Here, you need to choose the Create Spreadsheet Row option. Then, click on the Continue button.
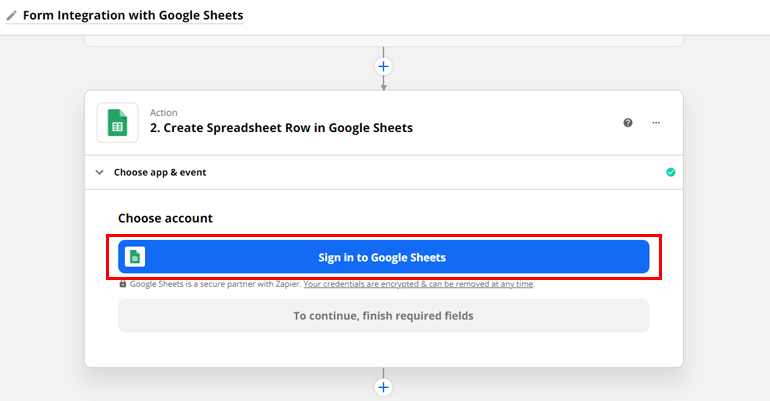
Choose an Account
Next, you need to sign in to your Google Account to connect with the Google Sheets. Also, you need to allow Zapier to access your Google Account to continue.
After that, you can move on to the action step of creating a spreadsheet row.
Set Up Action
Before you set up an action, you need to go to your Google spreadsheet and create a header row with the column names. You need to ensure that your Google Sheets column names match the fields of your contact form so that you won’t face difficulty while retrieving information from there.
Also, make sure you name your Google Spreadsheet and remember your worksheet number, for you’ll be needing it later in this step.
Now, from your Zapier window, you can select the My Google Drive under the Drive tab because it’s where your spreadsheet resides.
Under the Spreadsheet tab, select the name of the Google spreadsheet you just created.
Under the Worksheet tab, select Sheet1. Soon after that, it’ll display with the column names available on your Google Sheets.
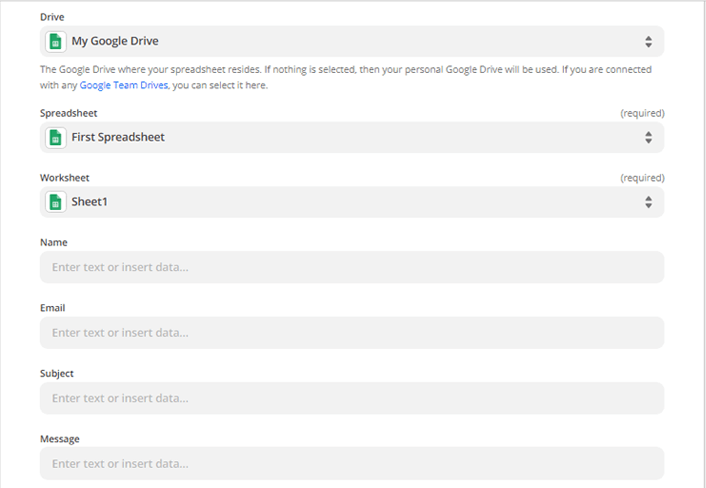
Now, you can easily pull the corresponding information from your forms.

Click on the Continue button when you finish pulling the information.

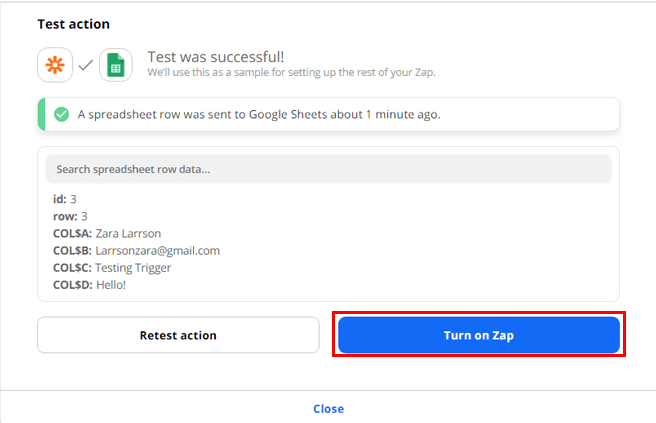
Test Action
You also need to test whether your Zap works well or not, so click on the Test & Continue button.

Then, go to your Google Spreadsheet to see if the data is transferred. You can see that the information is successfully pulled into the sheets.

Finally, you’re done with the process. Now, your Zap is ready, and all you need to do is Turn on Zap.
Congrats! You’ve successfully integrated your contact form to Google Spreadsheet via Zapier. Now, whenever your visitors submit the form, the form data will be automatically pulled to your Google Spreadsheet.
Wrapping Up
Everest Forms is probably the best form builder plugin available to you. However, this plugin isn’t limited to creating professional-looking forms and managing entries from the dashboard. It also enables sending your contact form entries to Google Spreadsheet effortlessly via awesome Google Sheets add-on and Zapier add-on.
By saving the WordPress form entries in Google Spreadsheet, you can unravel several benefits. You can organize and analyze your data for making informed decisions. Plus, it allows your team members to access and monitor the form data without logging into your WordPress dashboard.
We expect that you can now send your WordPress form entries to Google Sheets using spectacular WordPress plugins like Everest Forms easily. If you found this tutorial helpful, please don’t forget to share it.
And don’t forget to check our article on how to create a signup form and job application form in WordPress if you need them for your site.
Also, do go through our blog for similar articles and follow us on Twitter and Facebook to stay updated.


![Zakra 3.0 | Zakra Pro 2.0 Release [Major Updates!]](https://i.ytimg.com/vi/g3rifl7kWvg/maxresdefault.jpg)