Wondering how to enable conditional redirection after form submission in WordPress? If yes, this article is just the thing for you!
We’ll guide you through the entire process of conditional redirection in WordPress forms. You’ll learn how to set conditional rules for redirection in a WordPress form in a few simple steps. So, you can easily redirect your users to different pages on your website after they submit the form.
Without further ado, let’s start with a short introduction to conditional redirection and its importance.
Table of Contents
What is Conditional Redirection and Why Do You Need It?
In simple terms, conditional redirection redirects your users to the specified page or URL after they submit a form. They’re only redirected to the page if all the conditions you’ve set are met.
For example, you have a contact form on your site. Now, you only want users with a product query about pet food to be redirected to a page that displays discounts on pet food.
Now, how is this beneficial?
Based on the user’s input in your form, you can redirect them to a relevant page. You’re basically personalizing a user’s experience on your site. This increases the chances of a successful conversion since they end up with content or offers tailored for them.
That’s why you might also want to enable conditional redirection for the forms on your site.
How to Enable Conditional Redirection After Form Submission in WordPress?
WordPress doesn’t come with the conditional redirection feature by default. You’ll need a WordPress plugin for that.
And we can’t think of a better plugin than Everest Forms. It’s a drag-and-drop form builder plugin that helps you create and customize forms for any purpose. For instance, you can make simple or advanced contact forms, job application forms, booking forms, etc., in no time.

Moreover, you can enable conditional redirection for any form you’ve built with Everest Forms. You can set as many conditional rules as you need for each form.
Therefore, we’ll use the Everest Forms plugin to demonstrate the step-by-step process of enabling conditional redirection. Let’s start!
Step 1: Install and Activate Everest Forms and Everest Forms Pro
First, you must set up the Everest Forms plugin on your site. Since the conditional redirection feature is only available in the premium version. So, you’ll also need to install Everest Forms Pro on your site.
For a complete guide, refer to our article on how to set up Everest Forms and Everest Forms Pro.
After you’ve installed and activated both of these plugins, you can move on to the next step.
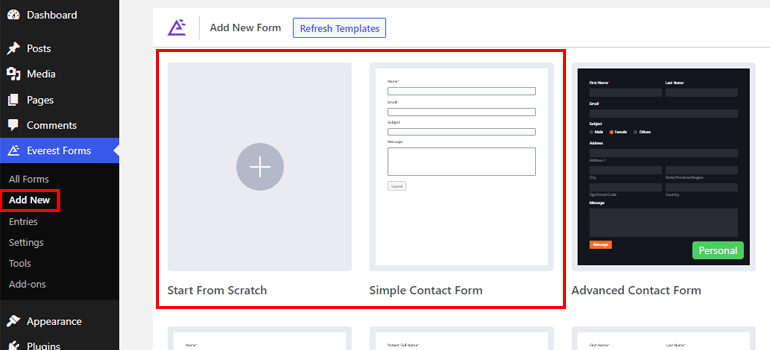
Step 2: Create a New Contact Form Using Everest Forms
Now, you need a new form where you can enable conditional redirection. It can be a contact form, a booking form, an appointment form, etc. It’s up to you!
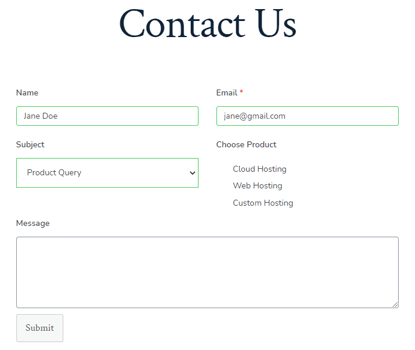
For this tutorial, we’ll be building a simple contact form. With Everest Forms, you can create a custom contact form in no time! You can use its pre-designed templates or create one from scratch.
If you need help, check out our article on building a WordPress contact form.
Once you have your contact form ready, you can proceed ahead.
Step 3: Enable Conditional Redirection in Contact Form
Now, here’s the critical part. You must enable conditional redirect for the contact form you just created.
To do that, click on the Settings tab at the top of the form builder.
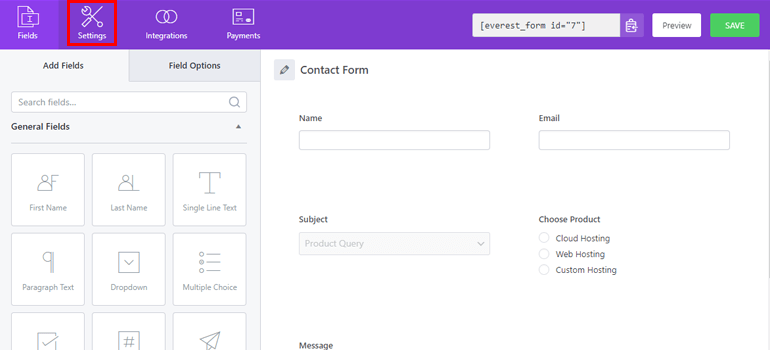
This opens the General settings for your contact form.
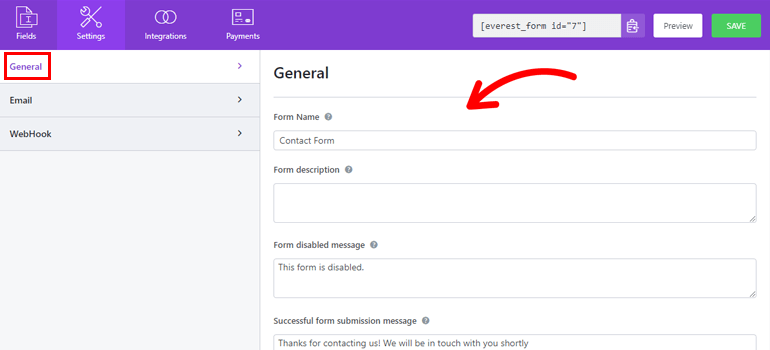
You can configure various options from here, like editing form name, form disabled message, submit button text, etc. You can even enable anti-spam honeypot, AJAX form submission, and more for the form.
Most importantly, the Submission Redirection option helps you enable conditional redirection after form submission.
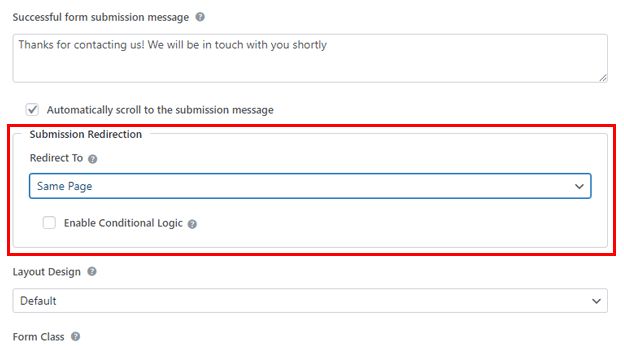
Normally, you can redirect the user to the following:
Same Page: This redirects the user to the page they were on when they submitted the form.
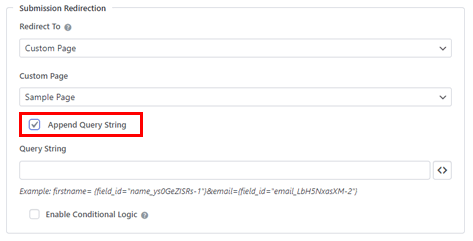
Custom Page: You can redirect the user to any page on your website. You can also enable the Append Query String option for Custom Page to send form data to another page.
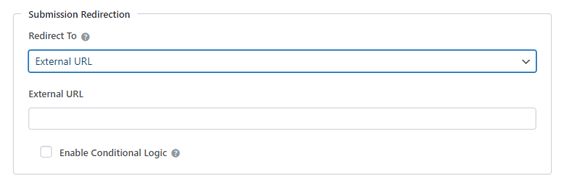
External URL: This redirects the user to an external URL.
However, you might need to redirect specific users to a different page. In such cases, you can apply conditional logic to the redirection.
Simply tick the checkbox for Enable Conditional Logic and create the conditional rules.
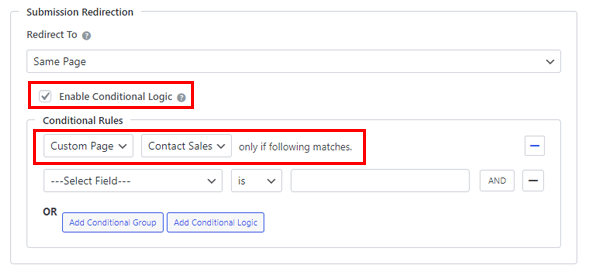
For instance, we’ve set the Redirect To option as Same Page. If you enable the conditional logic, you can define exceptional cases where the user is redirected to a different page rather than the same page.
So, we’ll choose the Custom Page option from the dropdown and select the Contact Sales page. This means the user is redirected to the Contact Sales page if the condition below is met. The condition can be anything you need.
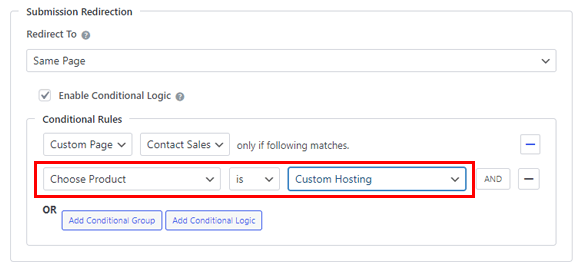
Here, we’ve created the condition “Choose Product is Custom Hosting.” Hence, the form redirects users to the Contact Sales page if they’ve chosen Custom Hosting in the Choose Product field. The rest of the users that don’t meet the condition are redirected to the same page.
This is just one conditional rule. You can add as many conditional rules to the group or create new conditional groups with the use of operators.
For more on conditional logic, refer to our complete guide on conditional logic in Everest Forms.
Save all the changes until now. With that, your form will redirect users conditionally based on their input.
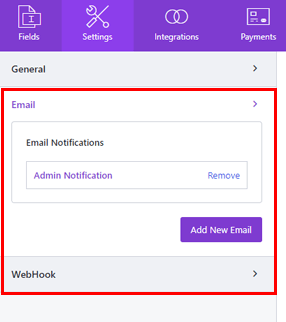
Besides the General settings, you also get Email and WebHook settings. You can customize them as you see fit!
Step 4: Add Contact Form to Your Site
After the form-building is complete, you still need to add the contact form to your live website.
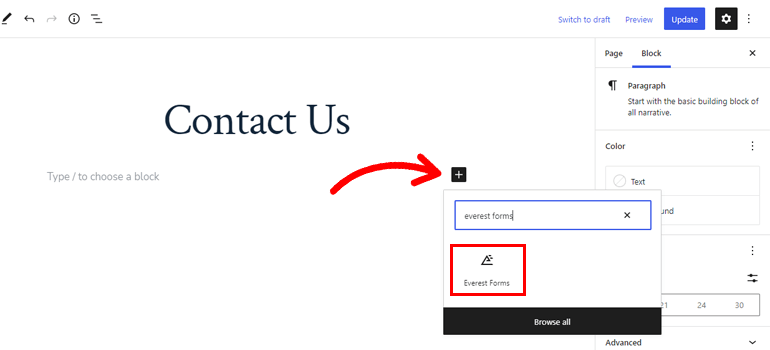
For that, open the page or post where you want to display the form. You can also create an entirely new page for the form.
Here, open the block inserter and add the Everest Forms block to the page.
Then, select the form with conditional redirection from the dropdown. Finally, click the Update button at the top.
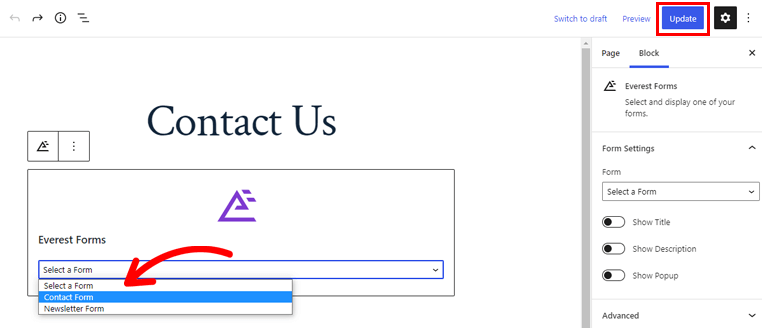
This will make the form available for your website visitors to find and fill out.
Wrapping Up
Conditional redirection in WordPress forms helps you send users to specific pages with content tailored for them. This improves user experience and increases the possibility of a successful conversion.
And the perfect tool to help you enable conditional redirection after form submission is Everest Forms. In a few simple steps, you can conditionally redirect users to your desired page after they submit the form.
Besides that, you can also use Everest Forms to add Google Maps to forms, prevent contact form spam, and more. You can go through our blog if you’re interested in learning more about this plugin.
For more WordPress-related updates and resources, follow us on YouTube, Twitter, and Facebook.


![Zakra 3.0 | Zakra Pro 2.0 Release [Major Updates!]](https://i.ytimg.com/vi/g3rifl7kWvg/maxresdefault.jpg)