If you want to provide a personalized registration experience to users, a conditional registration form in WordPress is your best bet.
Now, you might be wondering how to create one for your website. Don’t worry! All you need is the incredible User Registration plugin and this detailed step-by-step tutorial on how to add conditional fields to your WordPress registration form.
But before jumping right into the steps, let’s understand why you should use conditional logic in user registration forms first.
Table of Contents
Why Use Conditional Logic in User Registration Forms?
Conditional Logic is necessary to control what information you want your users to provide you with. That means you can display unique fields to users based on their occupation, educational background, age group, and other criteria. So, you’ll be creating a registration form as per the user’s needs.
To illustrate further, if a user sets the Occupation field as “Still a Student” in the registration form, the next fields to be displayed will only be the ones relevant to users who are still students.
Not only will you be providing a pleasant user experience during registration, but you’ll also be gathering accurate information on your users. On top of that, your sign-up rates will also increase if you focus your users on relevant registration fields.
Considering its benefits, you may want a conditional registration form for your site as well. There are many registration plugins that’ll help you create one in no time.
But we recommend User Registration, a drag and drop registration form builder that’s easy to set up and use. You don’t need any coding skills to make the best use of this plugin.
All you have to do is drag and drop all the necessary fields into your form, customize its settings, and you’re done!
Better yet, User Registration offers impeccable integration with WooCommerce. Along with its WooCommerce add-on, you’ll be able to design custom WooCommerce registration forms with billing, shipping, and payment fields.
That’s why we’ve used the User Registration plugin in our tutorial to show you how to create a conditional registration form in WordPress.
How to create a Conditional Registration Form in WordPress?
Here’s a detailed guide you can follow to create a conditional registration form in WordPress using the User Registration plugin. You should build one for your website quickly by following these simple steps.
So, let’s jump right into it!
1. Install the User Registration Pro Plugin
The first step is to install the plugin i.e User Registration Pro plugin on your WordPress site. You can use the free version of this plugin to build simple registration forms. However, the Conditional Logic add-on, that lets you create conditional fields is only available to premium users.
Thus, you must first buy User Registration’s Plus plan or above to access this add-on. For that, go to the official pricing page and choose a plan suitable for you. Once you’ve bought the premium plugin, log in to your account with the login details provided in your email.
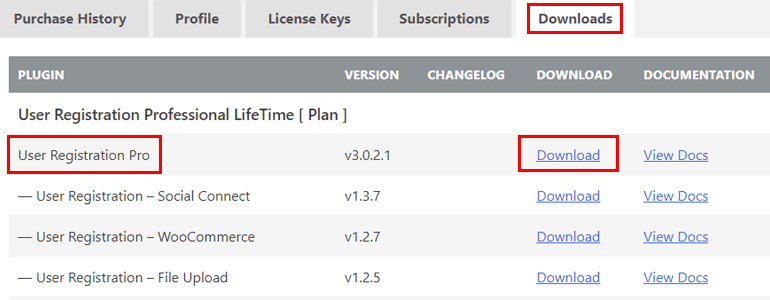
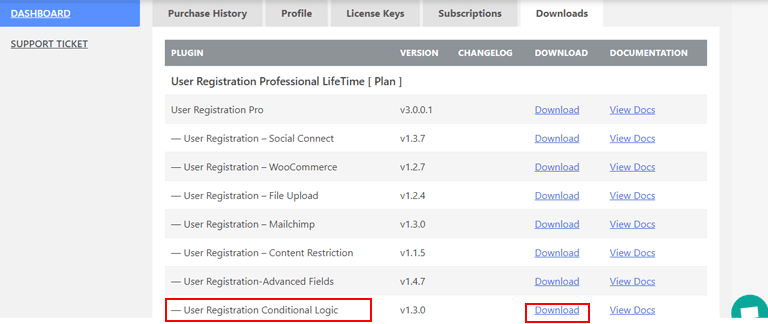
Here, open the Downloads tab and download the User Registration Pro ZIP file.
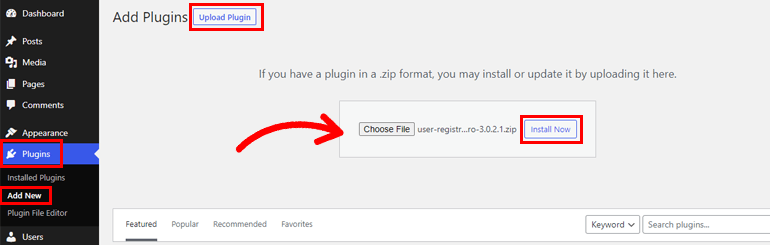
Next, log into your WordPress dashboard and navigate to Add New section under Plugins. On this page, click the Upload Plugin button and select Choose File. Then, upload the ZIP file and hit the Install Now button.
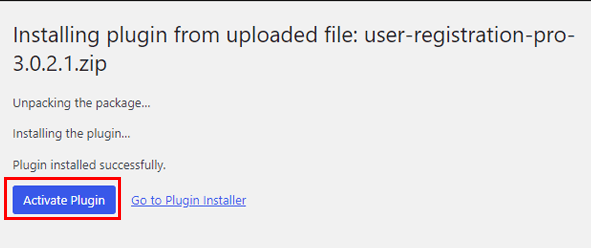
And don’t forget to activate the plugin to complete the installation.
Now, you’ll see a notice at the top asking you to Install User Registration Pages.

You can click on that option to add the My Account and Registration pages to your site. They eliminate the need to create brand new account and registration pages from scratch.
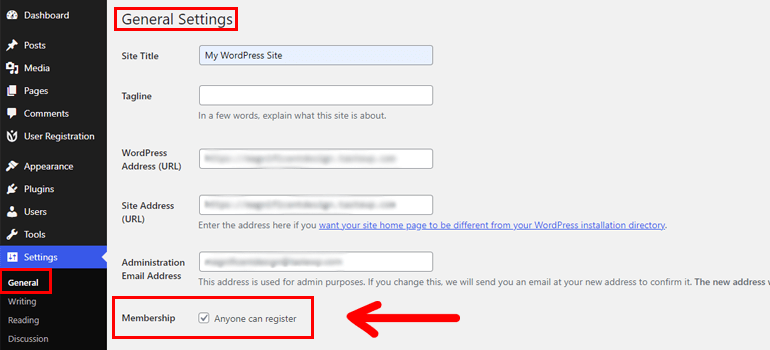
When you’re done installing the pages, you need to go to Settings >> General and enable the Membership option. Users can’t register on your site if you don’t enable this feature.
2. Install and Activate the Conditional Logic add-on
Now that you’ve installed the User Registration Pro plugin, you can create general registration forms easily. However, you must install the Conditional Logic add-on to create conditional registration forms.
You can find and download the add-on file from the Downloads tab in your account dashboard.
Next, open your WordPress dashboard and go to Plugins >> Add New >> Upload Plugin. Install and activate the add-on the same way we set up User Registration Pro.
Now, you’ll see a message under the User Registration (Pro) plugin asking for a Licence Key on the Installed Plugins page.
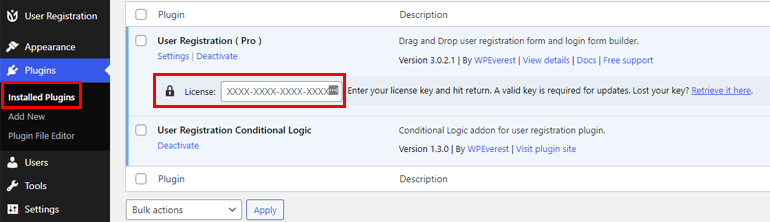
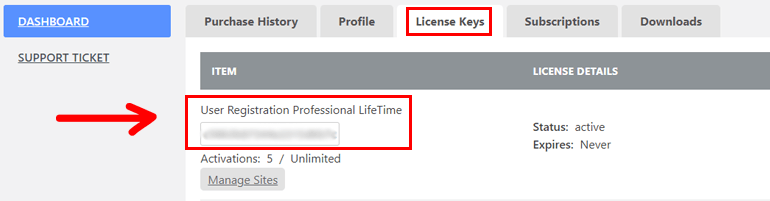
You need to copy your license key from your account dashboard, paste it here, and click enter.
With that, you’re ready to use the Conditional Logic add-on to create a conditional registration form in WordPress.
3. Create a Conditional Logic Registration Form
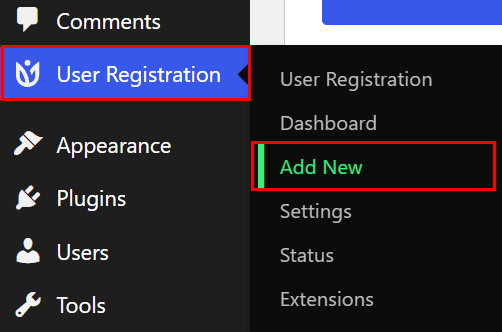
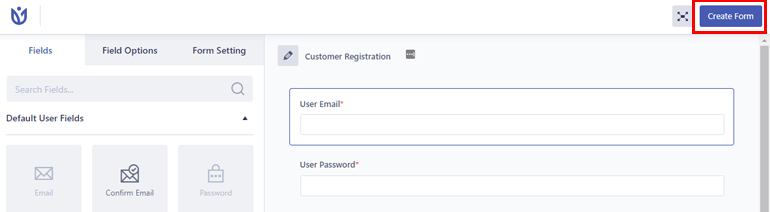
It’s now time to create a registration form for your site using the form builder. Start by clicking on Add New under the User Registration tab in your WordPress dashboard.
This will open up the User Registration form builder with all the available Fields on the left and the actual form on the right.
First, give your form a name, for example, “Customer Registration.”

The form already has two default fields: User Email and User Password. You can add any extra fields you require, like First Name, Last Name, Email, etc., to it. You may also use the Checkbox, Radio, and Dropdown fields to know your audience’s age, gender, and much more.
To add an extra field, drag the field and drop it into the form and move the position by quickly dragging it upwards and downwards.
If you wish to customize the fields, you can easily do it through Field Options, which will appear when you simply click on the field.
Now, you can edit the field’s Label, Placeholder, and Description through General Settings.
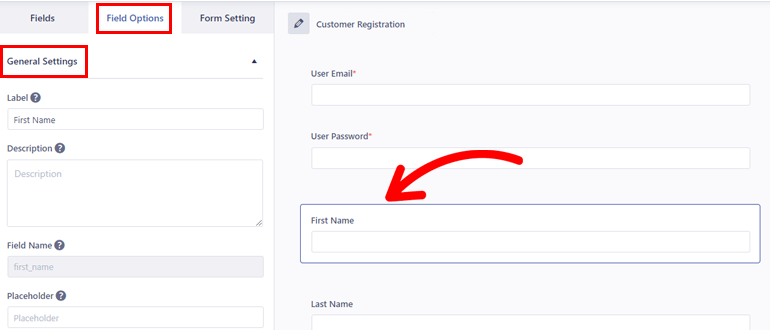
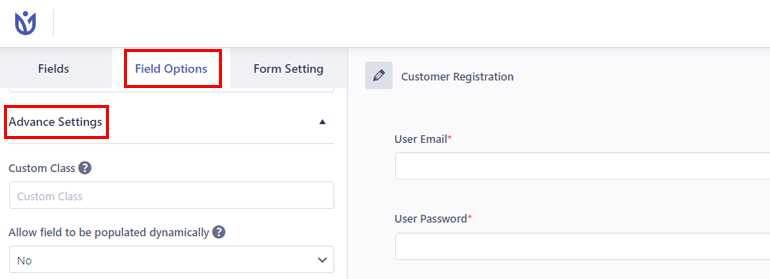
You can also add custom classes to the fields from Advance Settings. Some fields like First Name will feature more advanced options like Allow field to be populated dynamically.
But to make a form field conditional, you’ll need to enable conditional logic for the said field through Conditional Settings.
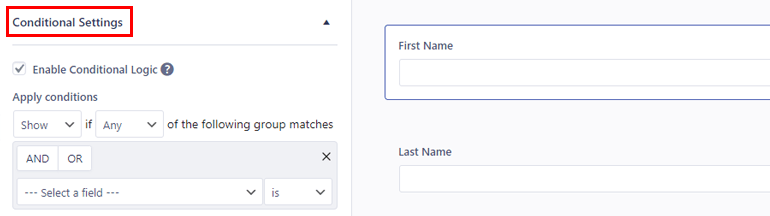
The conditional logic for any field stays turned off by default. So, you need to click on the Field Options and tick the checkbox for Enable Conditional Logic to apply conditional logic to your selected field.
Next, Apply Conditions for the field. You can choose to Show or Hide the field based on the conditions you’re about to set.
Then, select either ALL or ANY condition groups to apply to the field. ALL means all groups must be true, whereas ANY means any one of the following groups may be true for the condition to apply.
You have to make sure you have at least one group and one condition inside a group.
Now, decide whether you want AND or OR logic for the condition group. Choose AND if you want all the conditions defined inside the group to be true to show or hide the field. Choose OR to show or hide the field if at least one of the conditions defined inside the group is true.
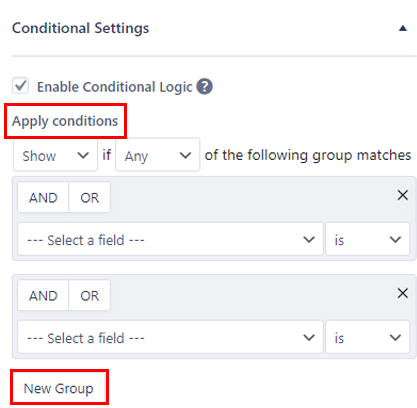
Once the first group is configured, you can add as many groups as you need. Just click New Group and it’ll add a new conditional logic group below the first one. Besides, you can click the “+” sign if you’re going to add multiple conditions inside a group and “x” to delete it.
For example, let’s say you enabled conditional logic for the Name of University field. You’ve set the condition as “Show the field if Any of the following group matches” and used the AND logic. Also, let’s create two conditions inside the second condition group and use the OR logic for it.
This means the Name of University field will only show when a user chooses Student for the Occupation field and Bachelor or Masters for the Level of Education field.
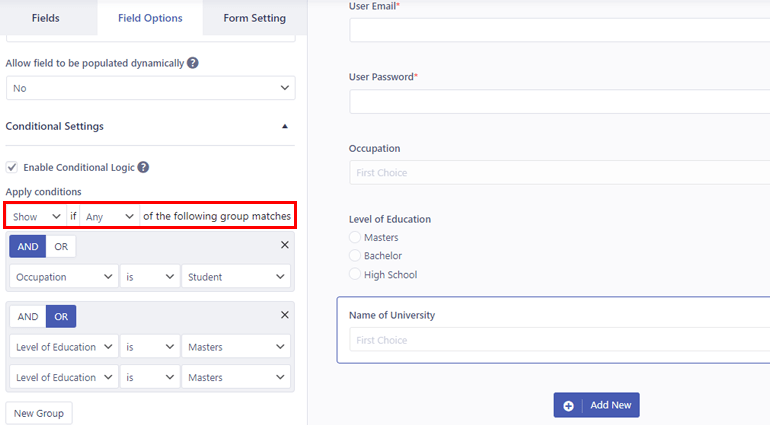
Likewise, if you use the OR logic for the conditional groups, the Name of University field will only show when a user is either a student or has a Master’s or Bachelor’s degree.
That’s it! You can add as many conditional fields as you want in your form. Just enable the conditional logic option and apply the conditions.
After you’re done with adding fields and customizing them, click on Create Form at the top right.
With that, you’ve successfully created a custom registration form with conditional fields.
4. Configure WordPress Conditional Registration Form Settings
Another important step of this process is to configure conditional registration form settings from the General Settings tab under Form Setting.
Here, you can choose to Enable Strong Password, set Default User Roles, and Enable reCaptcha Support.
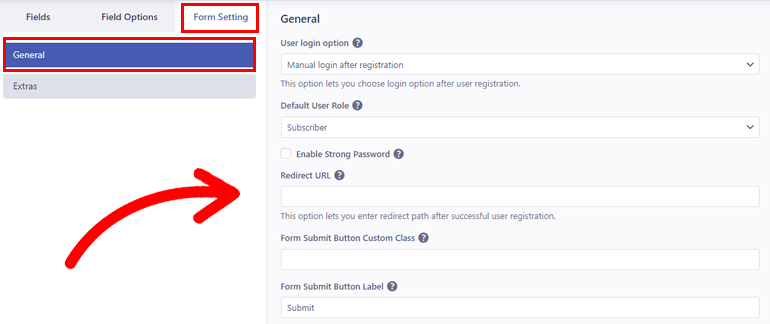
Enable reCaptcha Support and Enable Strong Password are some must-have features to enforce security during user registration.
Most importantly, you can Enable Assign User Roles Conditionally to assign user roles like administrator, editor, author, and more based on a specific set of conditions.
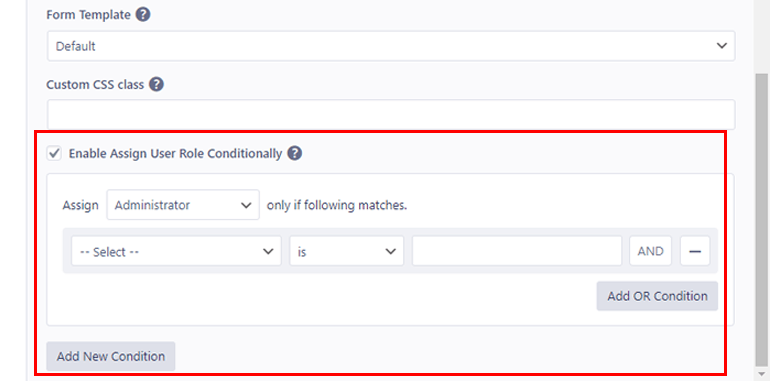
Plus, you get to edit other valuable settings like Success message position, Form Template, and Redirect URL.
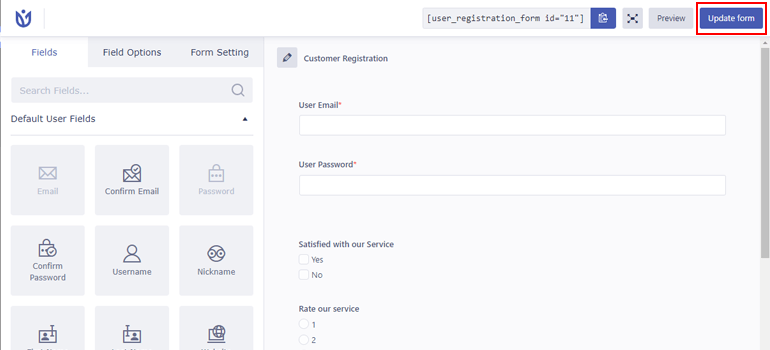
So, after configuring the conditional registration form setting, choose Update Form to update the changes.
5. Add the Conditional Registration Form to Your Site
Just building a conditional registration form is not enough. You still need to add it to your WordPress site after you’re done creating it.
You can place it at the most usual placement option like the post or page of your website. For that, create a new post or page in WordPress, or choose to update the form on an existing one.
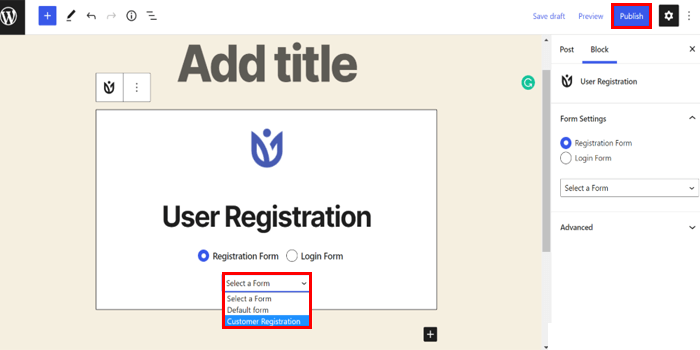
Click on the ‘+‘ icon and choose the User Registration block. After that, select the conditional registration form you’ve created from the dropdown to add them to your page. Now, select the Publish button in the top right to make your form appear on your site.
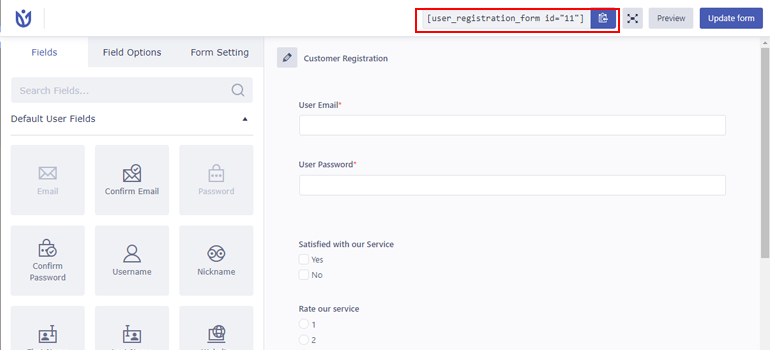
Alternatively, you can add a form to your site through shortcode too. All you need to do is copy form shortcode available at the top of the form builder.
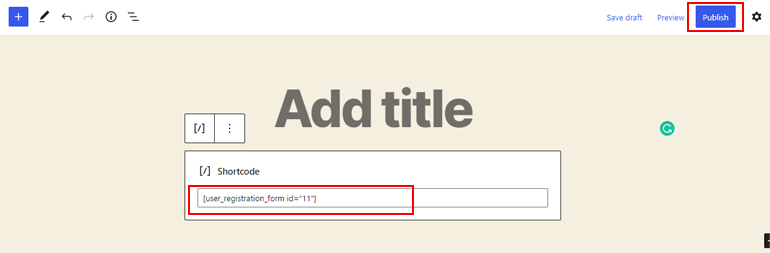
Then, paste it into a Shortcode block in your page or post. Finally, select the Publish button to display the conditional registration form in the front-end.
Conclusion
And that wraps up our guide on how to create a conditional registration form in WordPress. You need to follow each step carefully, and you can easily create one for your site.
User Registration makes this process even more straightforward and quicker for you. You just need to build a custom registration form and add conditional fields to it using the plugin’s Conditional Logic add-on. We highly recommend it to anyone that wants to place beautiful registration and login forms on their site.
You might also need online booking forms, donation forms, and survey forms for your WordPress website. So, make sure you go through our blog for similar guides on building different kinds of forms.
Also, if you find this article helpful, don’t forget to share it with your friends and family on social media. Happy Reading!


![Zakra 3.0 | Zakra Pro 2.0 Release [Major Updates!]](https://i.ytimg.com/vi/g3rifl7kWvg/maxresdefault.jpg)