Want to learn how to add HTML to show extra content in a WordPress Registration form? If yes, this article is for you!
HTML (Hyper Text Mark Up Language) is a coding language used to create web pages from scratch.
However, in WordPress, we only use a small part of it to control the structure of the content. So, you can include extra text, images, and videos in your WordPress posts.
The same can be done using the HTML form field on your WordPress registration forms. It’s a great way to provide additional information or instructions for users signing up on your site.
Below, we’ve prepared a simple guide to show you how to add HTML to the WordPress registration form. Let’s start!
Table of Contents
What is HTML Form Field? Why Add HTML in WordPress Registration Form?
People tend to get wary of the technical aspect of HTML. Especially, when you need to add HTML to something as simple as a registration form.
But with the HTML form field in WordPress, there’s nothing to worry about. The HTML field only uses minimal coding, which is super easy to wrap your head around.
Once you add this field to your registration form, you can customize it to provide additional information or instructions for users registering on your site.
Besides that, the field is beneficial for several other reasons:
- Increase User Engagement: Visual elements like images or videos can improve user engagement. It also encourages users to complete the registration process.
- Customization: Adding HTML to the registration form allows you to customize your form to suit your website’s design and branding better. This makes the website stand out and look more professional.
- Showcase Special Offers: If you’re offering a special deal or running a promotion, HTML can help you showcase such information. This encourages users to sign up for your site.
These are a few reasons why you should add HTML to the WordPress registration form. We’re sure you can come up with more.
With that said, let’s explore the best way to add HTML in a WordPress registration form.
Best Way to Add HTML field in Registration Forms to Show Extra Content
The best way to add an HTML field in registration forms is with the help of a registration form plugin.
These plugins allow you to add HTML fields to your WordPress registration forms without hassle.
There are so many options to choose from. However, we suggest the User Registration plugin, a drag-and-drop registration form plugin.

It lets you create unlimited forms even with the free version. Similarly, you’ll get endless fields to add to your registration forms.
Besides that, User Registration lets you:
- Create an intuitive and well-designed user profile account with a profile image.
- Export registration forms with a single click and import them on the same or different site.
- Create multi-step registration forms with ease.
- Create WooCommerce registration forms and sync them with the checkout page.
But above all, the feature-rich plugin comes with various add-ons, including the Advanced Fields add-on.

This add-on helps you unlock advanced fields like the HTML field for your registration form. And this is exactly what you need here.
Given its powerful features, we’ll use User Registration for this tutorial.
Step-by-Step Guide to Add HTML in WordPress Registration Form
In order to learn how to add an HTML field to add extra content to your registration form, follow the simple steps below:
Step 1: Install and Activate User Registration Pro
You can indeed create simple forms with the free version of the plugin. However, the HTML field comes under the Advanced Fields section.
And to unlock this field, you’ll require the Advanced Fields add-on, which only comes with the plugin’s premium version.
The installation process of the User Registration Pro is pretty simple. Just visit the plugin’s official site, where you’ll see 3 different pricing plans.
You’ll get the Advanced Fields add-on on all the plans, so purchase the plan according to your budget and requirement.
After that, you’ll receive a link to your email. Follow the link and get access to your account dashboard.
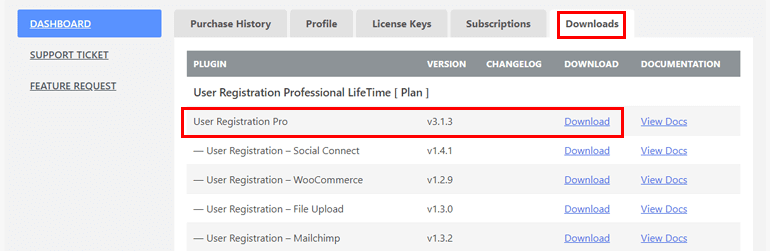
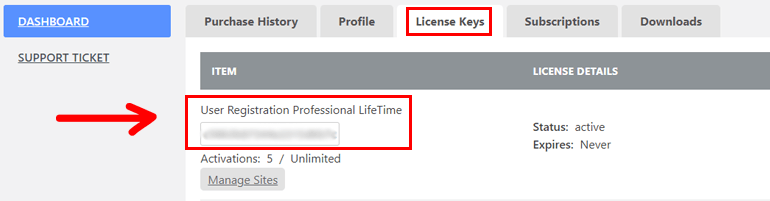
From there, you can download the pro version of the plugin and get the license key under the License Key tab.
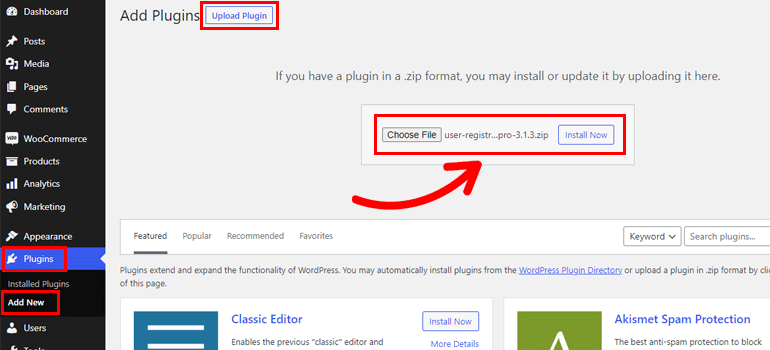
Afterward, return to your WordPress dashboard and navigate to Plugins >> Add New. And simply click on the Upload Plugin button.
Next, choose the User Registration Pro zip file you’ve downloaded before and hit Install Now.
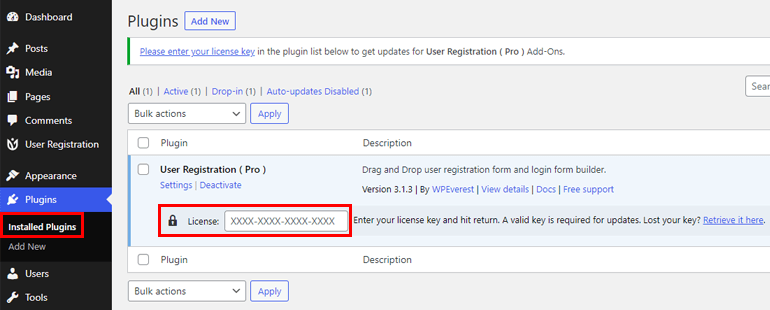
Now, paste the license key in the required area and Activate the plugin on your site.
If you need the entire installation and setup process in detail, follow this link on how to install User Registration Pro.
Once you’ve set up the plugin correctly, you can move on to the next step.
Step 2: Install and Activate Advanced Fields Add-on
Now that you have the premium version, you can easily access the Advanced Fields add-on.
So, navigate to User Registration >> Extensions and search for Advanced Fields.
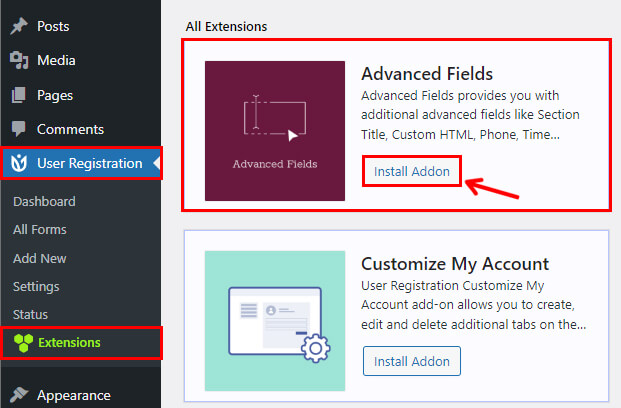
Next, click on the Install Add-on button and hit Activate sequentially. And just like that, you have your Advanced Fields add-on.

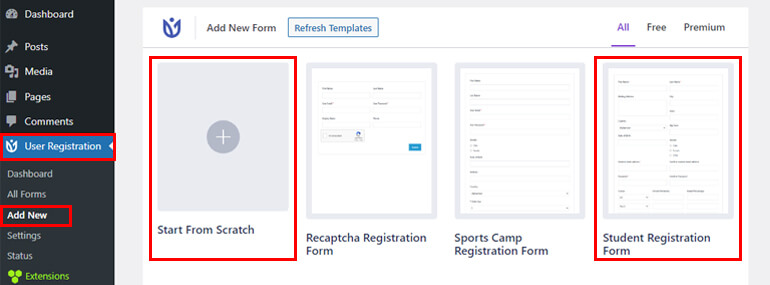
Step 3: Create a New Registration Form with HTML Field
Now, here’s the fun step, creating a new registration form. You can create your form from scratch or use a pre-existing template for this process.
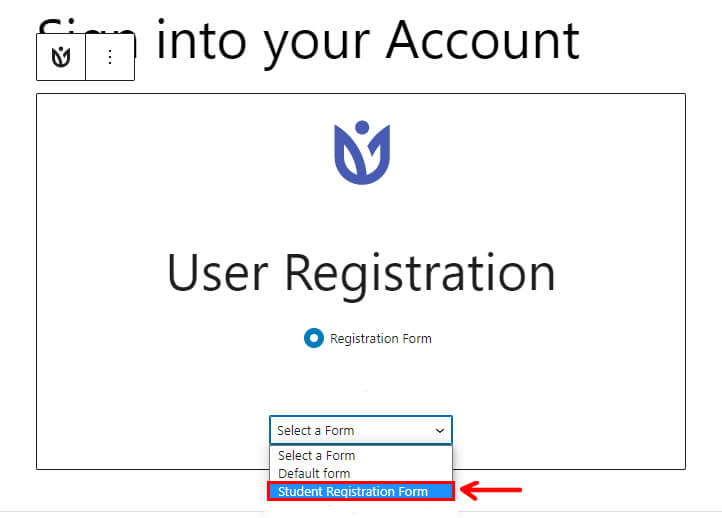
So, go to User Registration >> Add New, select Start From Scratch, or choose a form template.
The premium version shows that most of your templates are unlocked.
Here, we’ll use Student Registration Form template for this tutorial. You can hover over the desired template and click the Get Started button.
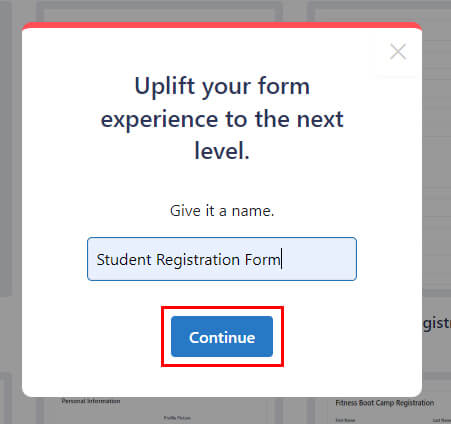
You’ll be asked to name your form immediately after you do this. So, enter the suitable form name and press Continue.
You can see that all the essential fields needed for a student registration form are already added.
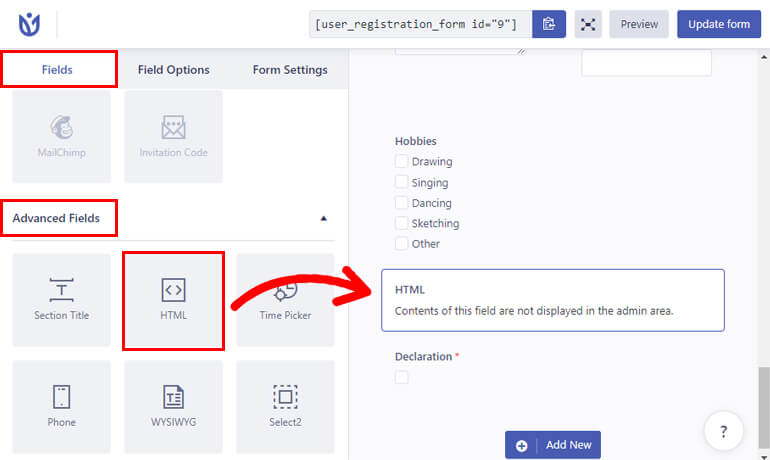
However, you’ll need an HTML field on your form to add extra content. As mentioned earlier, you can find this field under the Advanced Fields options.
Therefore, drag and drop it into the appropriate section of the registration form.
You can add as many fields as per your form’s requirement.
Further, you can customize each form field option. Just click on the desired field, and its Field Option will appear on the left.
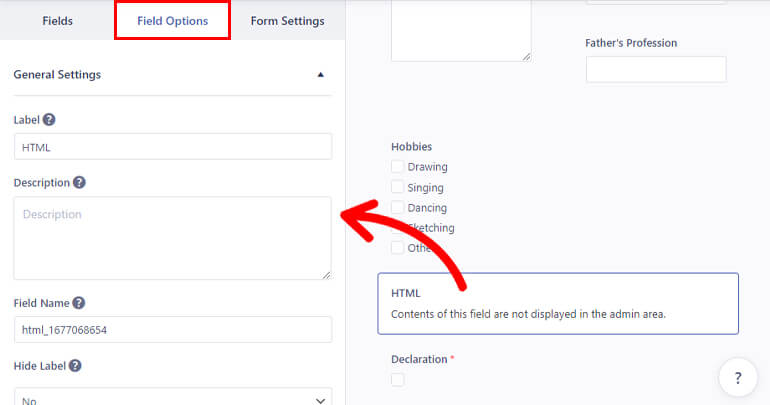
Thus, click on the HTML field, and edit the following:
- Label: Give a suitable title for your field like Notes, Request, etc.
- Description: Add the description you want to include in your form.
- Field Name: This area contains the id of the field. You can leave it as it is or change it to your preference.
- Hide Label: You can also hide the field label from the drop-down. Simply select Yes or No.
- HTML: You can add all the extra content in your form from this section. The extra content necessary for you can be notes, disclaimer content, warnings, etc.
- Enable Tooltip: Enable the tooltip to show information about the field to users.
In the same manner, edit the field options for the rest of the fields as well.
Note: The form fields have similar field options that you can edit. However, a few options are added/removed depending on the field. So, customize accordingly.
After the customization is complete, save it by clicking the Update Form button.
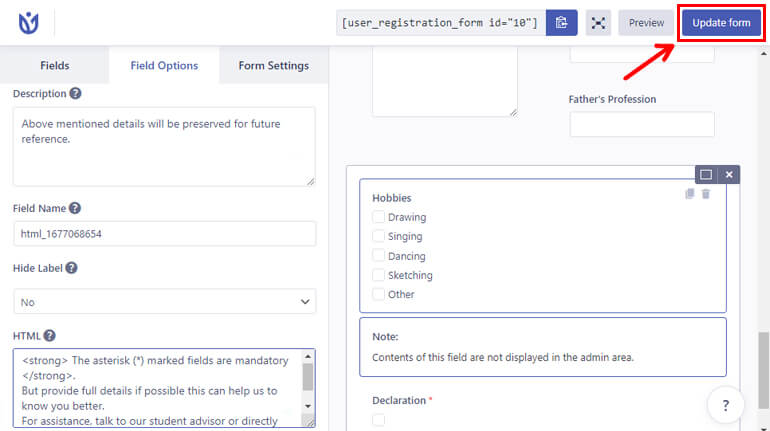
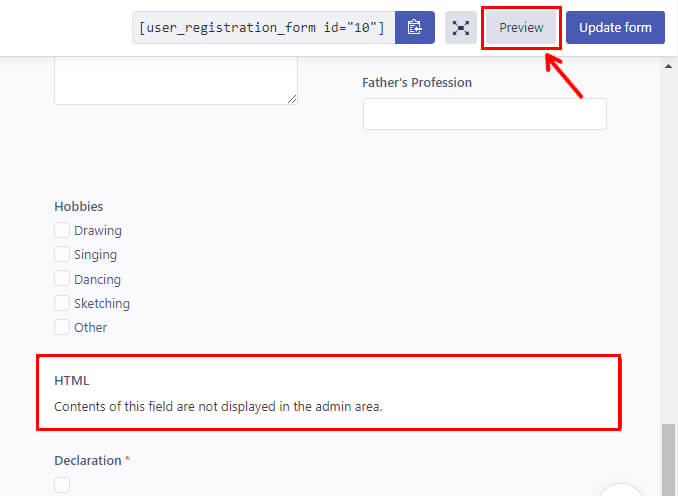
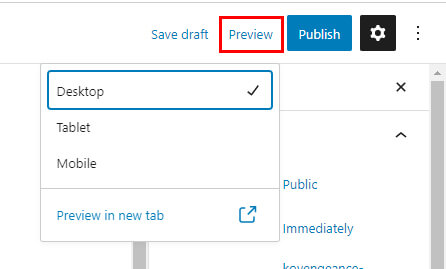
You should know that the content of the HTML field will not be displayed in the form builder. But you can always Preview it to see how it looks in the front end.
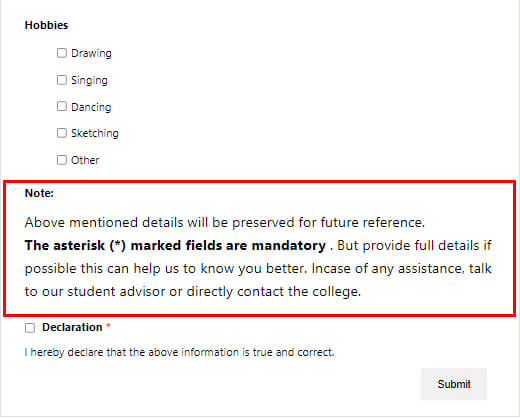
This is how your form appears for your users on the web.
Step 4: Customize the Registration Form Settings
The next important step is to configure the registration form’s settings.
You’ll find the Form Settings option right next to the Field Options.
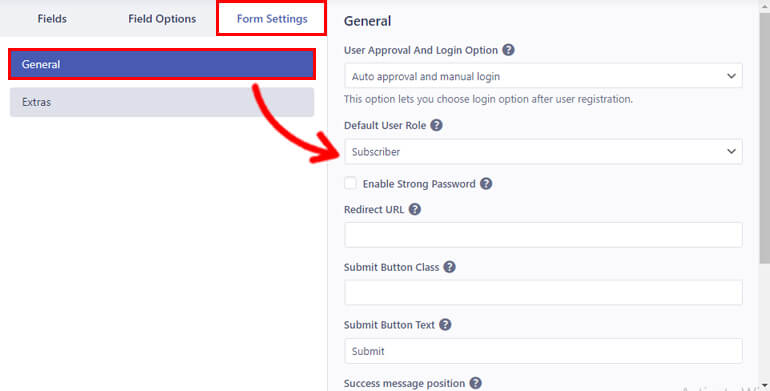
Clicking on it will further take you to General settings. And from here, you can customize the following options:
- User Approval and Login Option: You can set custom approval and login criteria for your users from the drop-down.
- Default User Role: The plugin lets you set the role of the users that register in your form. You can choose from the 6 default user roles like Administrator, Subscriber, Author, etc.
- Enable Strong Password: Tick the checkbox and select your desired strength for the user’s password.
- Redirect URL: This option lets you add a redirect URL for users after successfully registering.
- Submit Button Class: You can enter single or multiple CSS class names separately for the submit button.
- Submit Button Text: Enter the desired text for the submit button. You can use terms like Apply, Join Now, etc.
- Success message position: You can choose the position of your success messages, like the Top or Bottom.
- Enable Captcha Support: You can enable CAPTCHA support for spam and bot protection.
- Form Template: Choose from 5 different template styles for the form using the drop-down.
- Form Class: Add single or multiple CSS class names for the Form Wrapper.
Next, just like General settings, you can configure Extra settings of your form.
You can enable various important protection options, such as Activate Auto Generated Password for users, Activate Spam Protection by HoneyPot, and Enable Whitelist/Blacklist Domain.
Similarly, you can Enable the Keyboard Friendly Form and Enable Reset Button to make the form user-friendly. You can also change the label of your reset button from the Form Reset Button Label.
And you can Enable form field mapping with extra fields to make the User Registration plugin compatible with external plugins.
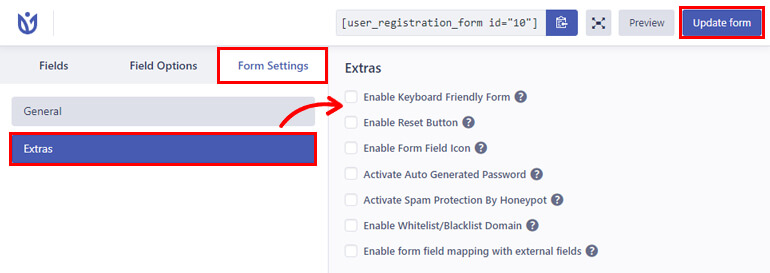
That’s it for the settings part. Once again, click on the Update form to save all your changes.
Step 5: Publish the Registration Form on Your Website
Finally, it’s time to publish the registration form with an HTML field for users to fill in on your site.
To embed the form on your site, go to Post/Pages >> Add New.
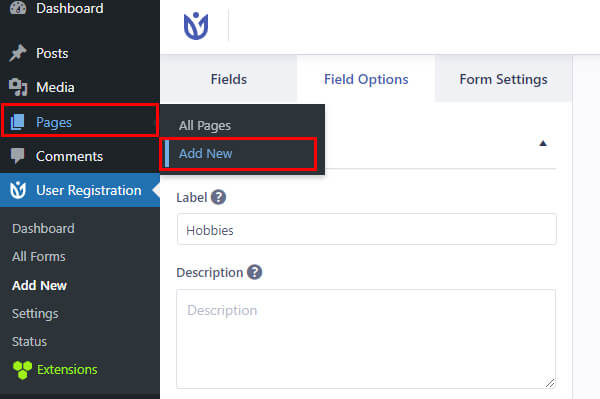
Next, click the Add Block (+) button and search for the User Registration block. Then, add it to the page by clicking on it.
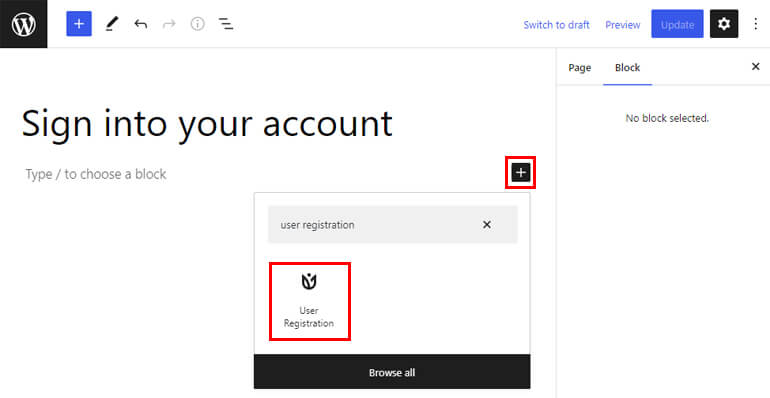
After that, select your WordPress Student Registration Form from the drop-down menu.
You can also check how the form looks in the frontend with the Preview button at the top.
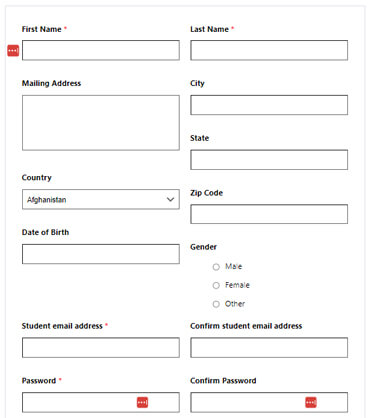
Below is the image of how your form looks on the front end.
And finally, if you like how your form looks, you can hit Publish.
Final Thoughts!
That’s it; we’ve come to the end of our article. We hope you’ve learned to add HTML in WordPress registration form to show extra content.
Thanks to the User Registration plugin, adding an HTML field in the registration form is pretty easy. All you have to do is drag and drop the field into your form and customize it.
Similarly, you can explore User Registration for features, like adding a password field to registration forms, enabling Woo-Commerce user approval by admin, etc.
You can read more about this powerful plugin on our blog. And for easy video tutorials, you can subscribe to our YouTube channel.
If you have queries about the plugin, contact us via social media. We’re available on Facebook and Twitter.


![Zakra 3.0 | Zakra Pro 2.0 Release [Major Updates!]](https://i.ytimg.com/vi/g3rifl7kWvg/maxresdefault.jpg)